AURATON Libra U Wireless Digital Room Thermostat User Manual


AURATON Libra
User manual ver. 20220222
The document presents collected information on safety, assembly and use of AURATON Libra.
Weekly, wired thermostat
AURATON Libra is a weekly, wired thermostat designed to work with a gas or electric heating device.
3 independently adjustable temperatures
Day, night, anti-freezing.
U
9 independent temperature programs
Including 6 user-modifiable programs.
&
Backlit LCD display
The backlit display allows you to supervise the operation of the device even in poorly lit
rooms.
LCD

| General | Details |
|---|---|
| Name | AURATON Libra U Wireless Digital Room Thermostat User Manual |
| Make | AURATON |
| Language | English |
| Filetype | PDF (Download) |
| File size | 0.3 MB |


AURATON Libra Room Thermostat User Manual

AURATON Cetus P Wired Thermostat User Manual

19810-102 Digital Room Thermostat Libra Auraton Weekly User Manual

AURATON Apus Set Wireless Thermostat with Electronic Radiator Head User Manual

AURATON Libra U Wireless Digital Room Thermostat User Manual Overview
Summary of Contents
- Page 1: AURATON Libra user manual presents collected information on safety, assembly, and use of AURATON Libra. AURATON Libra is a weekly, wired thermostat designed to work with a gas or electric heating device. It features three independently adjustable temperatures: day, night, and anti-freezing. The thermostat includes nine independent temperature programs, including six user-modifiable programs. The backlit LCD display allows supervision of the device's operation even in poorly lit rooms.
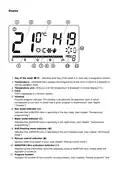
- Page 2: Description of the AURATON Libra Weekly, wired thermostat There is a backlit LCD display, four function buttons and a temperature setting knob with an OK button on the front part of the regulator’s casing. LCD display Setting knob with integrated button Mode selection buttons: day mode – comfort, night mode – economic Selection button Date/time/day of week setting button Temperature setting button
- Page 3: Day of the week indicates what day of the week it is. Each day is assigned a number. Temperature displays the temperature of the room in which it is installed in normal operation mode. Temperature unit tells you that the temperature is displayed in Celsius degrees (°C). Time is displayed in a 24-hour system. Program progress indicator shows how a given program is implemented. Day mode indicator indicates that AURATON Libra is operating in the day mode. Night mode indicator indicates that AURATON Libra is operating in the night mode. Anti-freezing mode indicator indicates that AURATON Libra is operating in the anti-freezing mode. Manual control indicator appears when no program is used. AURATON Libra activation indicator provides information about the operating status of AURATON Libra.
- Page 4: Dead batteries indicator is visible when the minimum permissible battery voltage level is exceeded. Batteries need to be replaced as soon as possible. In order to maintain any programmed parameters, the battery replacement operation should not exceed 30 seconds. The correct operation of AURATON Libra is largely influenced by its location. Using the device in a place with no air circulation or direct sunlight may result in incorrect temperature control. AURATON Libra should be installed on the internal wall of a building. It should be in an environment with free air circulation. Avoid proximity to heat-emitting devices like TVs, heaters, or refrigerators. Avoid locations exposed to direct sunlight. Consider the vicinity of doors when installing the device.
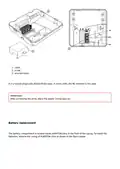
- Page 5: AURATON Libra may experience problems with proper operation due to possible vibrations. To connect the wires, remove the casing as shown below. The terminals are located on the back of AURATON Libra, under the plastic casing.
- Page 6: Cover Screw Wire terminals It is a typical single-pole double-throw relay. In most cases, the NC terminal is not used. IMPORTANT: After connecting the wires, place the plastic casing back on. Battery replacement The battery compartment is located inside AURATON Libra in the front of the casing. To install the batteries, remove the casing of AURATON Libra as shown in the figure below.
- Page 7: We recommend using alkaline batteries to power AURATON regulators. Do not use rechargeable batteries because their rated voltage is too low.
- Page 8: Insert two 1.5V AAA batteries into the battery compartment, paying attention to the correct polarity of the batteries. After replacing the battery and assembling the cover, we recommend pressing the OK button twice to stabilise the relay operation. In order to mount AURATON Libra on the wall: Remove the casing. Drill two holes with a diameter of 6 mm in the wall. Put wall plugs in the drilled holes. Fix the rear part of the casing of AURATON Libra to the wall using the screws included in the kit. Put the casing on. In the case of a wooden wall, there is no need to use wall plugs.
- Page 9: - Hole for fastening screw. - Important: Pay attention to the pins that transmit control to the relay when putting the front part of the casing to the rear part.
- Page 10: Front casing Rear casing Pins The socket of the pin connector or the place where the pins contact the board Make sure that the pins are not bent and that they are placed in the correct spots on the relay board when assembling the casing. This is crucial for the proper operation of AURATON Libra. Turning AURATON Libra on for the first time After inserting the batteries correctly into the battery compartment, the LCD screen will display all the segments for a second and then the software version number. After a while, AURATON Libra will automatically switch to the time setting mode. A flashing item on
- Page 11: The screen means that the device is currently in the edit mode. Turn the knob to the left or right to set the required hour and confirm using the button. Turn the knob to the left or right to set the correct value on the minute segment and confirm using the button.
- Page 12: A flashing symbol of the day of the week appears in the upper left corner. Turn the knob to the left or right to set the day and confirm the selection using the button. If no button is pressed for 60 seconds in the initial edit mode, 12:00 o’clock and Monday will be set automatically. When programming any other functions, not pressing any button for 10 seconds is equivalent to using the button. To set the clock and day of the week.
- Page 13: Press the m button. The hour segment on the display will start flashing. Turn the knob to the left or right to set the required hour and confirm with the button. Turn the knob to the left or right to set the correct value on the minute segment and confirm using the button.
- Page 14: A flashing symbol of the day of the week appears in the upper left corner. Turn the knob to the left or right to set the day and confirm the selection using the button. You can also switch by pressing the m button. Default program setting: Monday – Friday: The heating device maintains the day temperature (S) from 05:00 to 8:00 A.M. and from 3:00 to 11:00 P.M. Saturday – Sunday: The heating device maintains the day temperature (S) from 06:00 A.M. to 11:00 P.M. Default temperature settings: S day temperature – 21.0°C.
- Page 15: Night temperature – 19.0°C Anti-freeze temperature – 7.0°C Programming day and night temperatures AURATON Libra allows you to program 2 types of temperature. Day temperature (S) – from 5 to 30°C Night temperature (T) – from 5 to 30°C To set one of the temperatures above: Press the n button. The display will show the currently set temperature with one of the two symbols: S – day temperature; T – night temperature.
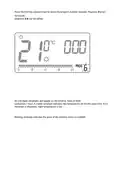
- Page 16: Turn the knob to the left or right to set the desired temperature value. Pressing the button will switch the edit mode between the day and night temperatures. After setting the temperatures, confirm using the button. The night temperature setting can be equal to or lower than the day temperature. The timeline on the LCD display is divided into 24 sections. Black rectangles above the timeline mean that the day temperature has been programmed for specific hours. The figure shows that from 6.00 A.M. to 11.00 P.M. the device will control the heating to maintain the day temperature. The device will switch to night temperature from 11.00 P.M. to 6.00 A.M.
- Page 17: Factory programs AURATON Libra requires an appropriate program for each day of the week to manage day and night temperatures. Program no. 0 is an unmodifiable factory program designed for all-day anti-freezing temperature setting. Program no. 1 is an unmodifiable factory program that sets day temperature from 5:00 to 8:00 A.M. and from 3:00 to 11:00 P.M. Program no. 2 is an unmodifiable factory program that sets day temperature from 6:00 A.M. to 11:00 P.M. Programs no. 3 to 8 are user-defined programs that can be modified to meet specific requirements. Weekly programming involves setting day temperature intervals for individual days of the week. Outside the programmed intervals, the night temperature will be set.
- Page 18: Press the m key to set the day of the week for the program. Press the h key to select the program number requested. Programs 0-2 are factory-set. Programs 3-8 can be edited.
- Page 19: Confirm selection by pressing the key. Repeat the procedure for the following days of the week. To set the program, press the h key. The program number segment will start blinking.
- Page 20: Press the m key as many times as required to set the day of the week for the program.
- Page 21: Press the h key several times to select the program number required. Programs 0-2 are factory set, programs 3-8 can be edited. All (24) black rectangles will appear on the timeline. Each of them symbolizes 1 hour. A visible rectangle indicates day temperature set for the given time. If no rectangle is displayed, night temperature is set. Blinking rectangle indicates the point of the timeline which is modified.
- Page 22: Press the r key to select day or night temperature. Select the time interval for the temperature with the knob.
- Page 23: By pressing the r key and selecting time interval, the entire program is modified. Confirm selection with the key. Any modified program for a specific day can also be selected and implemented during another day of the week. Manual control.
- Page 24: If you want to stop the current program and extend the day or night temperature, you can do it manually for up to 24 hours. Hold the r button for 3 seconds and select the number of hours of manual operation using the knob. AURATON Libra will wait until you choose one of the two temperatures to maintain. To suspend the execution of a program, press the r button when the T symbol appears on the display. The day temperature will be maintained until the next scheduled temperature change. To implement the night temperature immediately, press the r button when the program is using the day temperature. The night temperature will then be maintained until the next scheduled temperature change. In the event of being away for a long time, you can turn on the anti-freezing temperature mode. This mode automatically sets the temperature to 7°C to prevent water from freezing in the heating system. To set the anti-freezing program, select program 0 for the desired day of the week.
- Page 25: To enter the edit mode of the configuration settings, hold the h and buttons simultaneously for 3 seconds until the settings menu is displayed. AURATON Libra can work in two modes: heating mode and air-conditioning mode. Set heating mode if you want AURATON Libra to cooperate with heating devices. Set air-conditioning mode if you want AURATON Libra to cooperate with air-conditioning devices. Turn the knob to the left or right to set the required mode. Confirm your choice by pressing the button. AURATON Libra will proceed to change the next parameter. Hysteresis is supposed to prevent too frequent activation of the actuator due to small temperature changes.
- Page 26: For example, in the case of HI 2 hysteresis, when the temperature is set to 20°C, the boiler will be switched on at 19.8°C, and switched off at 20.2°C. In the case of HI 4 hysteresis, when the temperature is set to 20°C, the boiler will be switched on at 19.6°C, and switched off at 20.4°C. The hysteresis change mode is signaled by a flashing HI. Turn the knob to the left or right to set the desired hysteresis. HI 2 – ±0,2 °C (preset), HI 4 – ±0,4 °C, HI P – PWM operating mode. Confirm your choice by pressing the button. AURATON Libra will proceed to change the next parameter. The delay prevents too frequent activation of the actuator.
- Page 27: The delay change mode is signaled by a flashing 90:SE. By turning the knob left or right, we set the delay. 90:SE – delay of 90 s (preset), 0:SE – no delay. Confirm your choice by pressing the button. AURATON Libra will proceed to change the next parameter. Offset allows you to calibrate temperature indications with a tolerance of ± 3 °C. The offset change mode is signaled by a flashing OFFS. By turning the knob to the left or right, you can set the desired value in the range from -3.0 to 3.0 (preset – 0.0). Confirm your choice by pressing the button. AURATON Libra will return to the normal operating mode.
- Page 28: If no button is pressed for 10 seconds while changing the configuration settings, AURATON Libra will return to the normal operating mode. Pressing any function button for the first time always turns on the backlight, and then the function of a specific button. This function is used to correct the clock indications in case of any deviations. If the clock is working incorrectly within a week, the extent of incorrect clock indications should be determined. This value should be entered in AURATON Libra in the form of seconds. After a week of operation, AURATON Libra shows time accelerated by 1 minute and 20 seconds. In this case you should slow down the clock by setting C -80.
- Page 29: After a week of operation, the clock in AURATON Libra is 2 minutes slow. You should speed up the clock by setting C 120. The number of seconds should be determined after one week of operation for the clock calibration function to work correctly. If no button is pressed for 10 seconds while changing the configuration settings, AURATON Libra will return to the normal operating mode. By changing the hysteresis settings, you can turn on the PWM operating mode. In PWM mode, AURATON Libra cyclically turns on the heating device to minimize temperature fluctuations. AURATON Libra checks temperature rise times and temperature drop times. Knowing these values allows AURATON Libra to turn on and off the heating device in appropriate cycles. This helps maintain the temperature to the set value as close as possible.
- Page 30: Temperature Time Set temperature Room temperature AURATON Libra can turn on the heating device despite the fact that the temperature in the room is higher than the set temperature in the PWM mode. This is caused by the PWM algorithm aiming at maintaining the set temperature and anticipating the behavior of the thermal system. At least 30 seconds must elapse between switching the relay off and on again. AURATON Libra enables you to turn on or off the control functions at any time by briefly holding down the button.
- Page 31: Pressing any function button for the first time always turns on the backlight. When using the knob, each step keeps the backlight on. Not pressing any button for 10 seconds is equivalent to pressing the button. The AURATON Libra connection schematics.
- Page 32: Heating device, e.g. a gas furnace. Electric heating device (MAX 230 V AC, 16 A).
- Page 33: Cleaning and maintenance The outside part of the device should be cleaned with a dry cloth. Do not use solvents (such as benzene, thinner or alcohol). Do not touch the device when your hands are wet. Do not expose the device to excessive smoke or dust. Do not touch the screen with a sharp object. Keep the device away from liquids or moisture. Technical specifications Power supply: 2 x AAA (2 x 1.5 V), alkaline. Working temperature range: 0 – 45 °C. Temperature measurement range: 5 – 30 °C. Disposing of the devices The devices are marked with the crossed-out wheeled bin.
- Page 34: The user shall return it to a collection point for electrical and electronic waste. LARS Andrzej Szymanski declares that the radio equipment type AURATON Libra is in compliance with Directive 2014/53/EU and 2011/65/EU. The full text of the EU declaration of conformity is available below in the download area. User manual Declaration of conformity

Drayton Wiser Smart Room Thermostat Instruction Manual

sinop TH1134ZB Smart Line Voltage Thermostat Installation Guide

emos P56211 Wireless Room Thermostat Instruction Manual
Total Home TTHWD Wired Digital Room Thermostat User Guide

Danfoss RT 103 Thermostat Installation Guide

Beca BHT-9000 Smart Knob Thermostat User Guide

Schluter DITRA-HEAT-E-RS1 Smart Thermostat Instruction Manual

GENERAL LIFE HT250 RF Digital Room Thermostat User Manual

Comfortmaker ION Gray Smart Thermostat Instruction Manual

Danfoss RET230 HCW-1 Electronic Heat Cool Thermostat User Manual