×
- 1. Auraton Libra (User Manual Ver. 20220222 → Weekly, Wired Thermostat → Independently Adjustable Temperatures → Independent Temperature Programs → Backlit Lcd Display)
- 2. Description Of The Auraton Libra (Weekly, Wired Thermostat → Lcd Display → Setting Knob With Integrated Button → Mode Selection Buttons → Selection Button → Date/time/day Of Week Setting Button → Temperature Setting Button)
- 3. Day Of The Week (Temperature → Temperature Unit → Clock → Timeline → Day Mode Indicator → Night Mode Indicator)
- 4. Dead Batteries (Important → Choosing The Right Location For Auraton Libra)
- 5. Connecting Cables To Auraton Libra
- 6. Cover (Screw → Wire Terminals → Important → Battery Replacement)
- 7. Important: (Aaa 1.5 V Battery Socket)
- 8. Important: (Mounting Auraton Libra The Weekly, Wired Temperature Regulator)
- 9. Putting The Casing Back On: Important
- 10. Front Casing (Rear Casing → Pins → The Socket Of The Pin Connector Or The Place Where The Pins Contact The Board → Important → Turning Auraton Libra On For The First Time)
- 11. The Screen Means That The Device Is Currently In The Edit Mode. Turn The Knob To The Left Or Right To Set The Required Hour And Confirm Usin…
- 12. Flashing Symbol Of The Day Of The Week (Important → Setting The Clock And Day Of The Week)
- 13. Press The M Button (Setting The Hour → Setting The Minute)
- 14. A Flashing Symbol Of The Day Of The Week Appears In The Upper Left Corner. Turn The Knob To The Left Or Right To Set The Day And Confirm The…
- 15. Programming Day And Night Temperatures (Day Temperature → Night Temperature)
- 16. Introduction To Programming (Timeline)
- 17. Factory Programs (Program No. 0 Anti-freezing → Program No. 1 Weekly → Program No. 2 Weekend → Programs No. 3, 4,., 8 User-defined Programs → Programming → Weekly Programming)
- 18. Press The M Key As Many Times As Required To Set The Day Of The Week For The Program. Press The H Key Several Times And Select The Program N…
- 19. Modyfying User-defined Programs (To Set The Program:)
- 20. Press The M Key As Many Times As Required To Set The Day Of The Week For The Program.
- 21. Press The H Key Several Times To Select The Program Number Required. Programs 0-2 Are Factory Set, Programs 3-8 Can Be Edited. All (24) Blac…
- 22. Press The R Key To Select Day Or Night Temperature. Then, Select The Time Interval For The Temperature Selected With The Knob.
- 23. By Pressing The R Key And Selecting Time Interval The Entire Program Is Modified.
- 24. Option 1 (Option 2 → Anti-freezing Temperature)
- 25. Changes In The Delay (Clock Calibration → Heating Mode/air-conditioning Mode → Changes In Hysteresis)
- 26. Hysteresis Change Mode (Changes In The Delay)
- 27. Delay Change Mode (Offset Change)
- 28. Important: (Clock Calibration)
- 29. Important: (Pwm Operating Mode)
- 30. Temperature (Time → Set Temperature → Room Temperature → Important → Additional Remarks)
- 31. Pressing Function Buttons (Using The Knob → Programming Functions → Auraton Libra Connection Schematics)
- 32. Heating Device (Electric Heating Device (max 230 V Ac, 16 A))
- 33. Cleaning And Maintenance (Technical Specifications → Disposing Of The Devices)
- 34. Contact And Address Of The Manufacturer (Compliance With Directive 2014/53/eu And 2011/65/eu → User Manual → Declaration Of Conformity)
×
AURATON Libra U Wireless Digital Room Thermostat User Manual
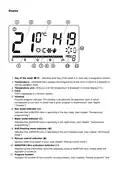
Pressing any function button for the first time always turns on the backlight, and then the
function of a specific button. When using the knob, each step keeps the backlight on.
When programming any function, not pressing any button for 10 seconds is equivalent to
pressing the button.
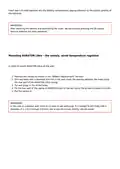
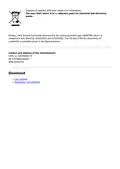
The AURATON Libra connection schematics
| General | Details |
|---|---|
| Name | AURATON Libra U Wireless Digital Room Thermostat User Manual |
| Make | AURATON |
| Language | English |
| Filetype | PDF (Download) |
| File size | 0.3 MB |

AURATON Libra Room Thermostat User Manual

AURATON Cetus P Wired Thermostat User Manual

19810-102 Digital Room Thermostat Libra Auraton Weekly User Manual

AURATON Apus Set Wireless Thermostat with Electronic Radiator Head User Manual


seitron DR R02M Thermostat Wireless Kit Instruction Manual

MI-HEAT MST1 Room Thermostat for Underfloor Heating User Manual

FantiniCosmi CH123E 230V Flush Mounting Thermostat Installation Guide

Robertshaw RS1110 Programmable 1 Heat 1 Cool Wall Thermostat Instruction Manual

beok BOT-323W Room Thermostat Instruction Manual

sensi 1F96U-42WF Series Touch 2 Smart Thermostat Installation Guide

resideo TH2320WF4011 Smart Thermostat Installation Guide

Honeywell T3 Programmable Thermostat User Guide

GENERAL LIFE HT300S RF Digital Room Thermostat User Manual

EPH CONTROLS COMBIPACK2 Smart Thermostat with Automation and Optimum Start Instructions
Table of Contents
- 1. Auraton Libra - User Manual Ver. 20220222 →
- 2. Description Of The Auraton Libra - Weekly, Wired Thermostat →
- 3. Day Of The Week - Temperature →
- 4. Dead Batteries - Important →
- 5. Connecting Cables To Auraton Libra →
- 6. Cover - Screw →
- 7. Important: - Aaa 1.5 V Battery Socket →
- 8. Important: - Mounting Auraton Libra The Weekly, Wired Temper... →
- 9. Putting The Casing Back On: Important →
- 10. Front Casing - Rear Casing →
- 11. The Screen Means That The Device Is Currently In The Edit Mo... →
- 12. Flashing Symbol Of The Day Of The Week - Important →
- 13. Press The M Button - Setting The Hour →
- 14. A Flashing Symbol Of The Day Of The Week Appears In The Uppe... →
- 15. Programming Day And Night Temperatures - Day Temperature →
- 16. Introduction To Programming - Timeline →
- 17. Factory Programs - Program No. 0 Anti-freezing →
- 18. Press The M Key As Many Times As Required To Set The Day Of ... →
- 19. Modyfying User-defined Programs - To Set The Program: →
- 20. Press The M Key As Many Times As Required To Set The Day Of ... →
- 21. Press The H Key Several Times To Select The Program Number R... →
- 22. Press The R Key To Select Day Or Night Temperature. Then, Se... →
- 23. By Pressing The R Key And Selecting Time Interval The Entire... →
- 24. Option 1 - Option 2 →
- 25. Changes In The Delay - Clock Calibration →
- 26. Hysteresis Change Mode - Changes In The Delay →
- 27. Delay Change Mode - Offset Change →
- 28. Important: - Clock Calibration →
- 29. Important: - Pwm Operating Mode →
- 30. Temperature - Time →
- 31. Pressing Function Buttons - Using The Knob →
- 32. Heating Device - Electric Heating Device (max 230 V Ac, 16 A... →
- 33. Cleaning And Maintenance - Technical Specifications →
- 34. Contact And Address Of The Manufacturer - Compliance With Di... →


