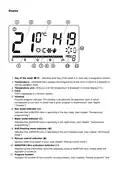
AURATON Libra U Wireless Digital Room Thermostat User Manual


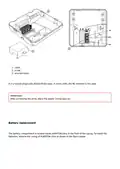


IMPORTANT:
We recommend using alkaline batteries to power AURATON regulators. Do not use “rechargeable
batteries” because their rated voltage is too low.
1. – AAA 1.5 V battery socket
| General | Details |
|---|---|
| Name | AURATON Libra U Wireless Digital Room Thermostat User Manual |
| Make | AURATON |
| Language | English |
| Filetype | PDF (Download) |
| File size | 0.3 MB |


AURATON Libra Room Thermostat User Manual

AURATON Cetus P Wired Thermostat User Manual

19810-102 Digital Room Thermostat Libra Auraton Weekly User Manual

AURATON Apus Set Wireless Thermostat with Electronic Radiator Head User Manual


HIVE Cheap Smart Thermostat User Guide

Vive Comfort TP-S-955WH Programmable Thermostat Instruction Manual

Honeywell RTH2510/RTH2410 Thermostat Installation Guide

KONIGHAUS Remote Infrared Heater Plus Thermostat User Guide

LuxPro T10-1141 Heat Thermostat Instruction Manual

DELTA DORE TYBOX 1117 Programmable Thermostat User Guide

EMERSON 1F83C-11NP Single Stage Thermostat Owner’s Manual

qunda QD-HVAC10W Programmable Thermostat Installation Guide

Honeywell RCHT8610WF Series Smart Thermostat Installation Guide

Warmup 6iE mini WiFi Thermostat User Guide