Warmup 6iE mini WiFi Thermostat User Guide


TM
WiFi Thermostat
iE mini
6
The smartest, most efficient way to control
the world’s best selling floor heating.
Miniaturised.
User Guide

| General | Details |
|---|---|
| Name | Warmup 6iE mini WiFi Thermostat User Guide |
| Make | Warmup |
| Language | English |
| Filetype | PDF (Download) |
| File size | 0.73 MB |


warmup RFT-P Programmable Radiant Floor Thermostat User Manual

Warmup 3iE Energy Monitoring Thermostat Instruction Manual

Warmup 6iE mini WiFi Thermostat User Guide Overview
Summary of Contents
- Page 1: WiFi thermostat user guide. The smartest, most efficient way to control floor heating. Miniaturised.
- Page 2: Pack contents Safety information Step 1 - Installation Step 2 - Wiring connections Step 3 - Thermostat mounting Step 4 - Initial setup Welcome to the 6iE mini How to quickly change the temperature Energy monitor Troubleshooting
- Page 3: Safety information includes the requirement for installation by a qualified electrician and a permanent 230 V AC supply from a 30mA RCD or RCBO protected circuit. The 6iE mini must be isolated from the mains supply during installation, and wires should be fully inserted and secured to prevent short-circuits. Installation should occur in a well-ventilated area, away from windows, direct sunlight, and heat-generating devices. The distance from the router to the 6iE mini should not be excessive to avoid wireless connection issues. For bathroom installations, the 6iE mini must be mounted outside of specific zones or in an adjacent room using a floor sensor. The 6iE mini and its packaging are not toys and pose a choking hazard to children. It is suitable for indoor use only and must not be exposed to moisture, vibrations, or extreme temperatures. Unauthorized changes or modifications to the 6iE mini are not permitted for safety and licensing reasons. Installation steps include isolating the thermostat supply from the mains and unclipping the display from the power base. A 50 mm deep electrical back box should be installed at the thermostat location, with wires pulled through for terminal wiring.
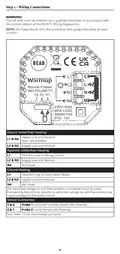
- Page 4: Step 2 - Wiring Connections The 6iE mini must be installed by a qualified electrician in accordance with the current edition of the BS7671 Wiring Regulations. For loads above 10 A, the conductor wire gauge should be at least 2.5mm². Heater Live and Neutral Max. 16A (3680W). For extra low voltage or volt-free systems a contactor must be used. Connecting the 6iE mini directly to extra low voltage or volt-free boilers may cause damage to the boiler circuit. Probe 1 - Floor/Air Control Sensor (No Polarity). Probe 2 - Limit Sensor (No Polarity). See Table 1.0 for thermostat use cases.
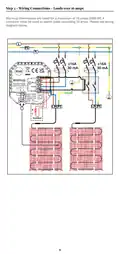
- Page 5: Wiring connections for loads over 16 amps require a contactor. Warmup thermostats are rated for a maximum of 16 amps (3680 W). Refer to the wiring diagram for proper connections.
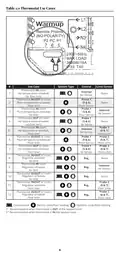
- Page 6: Thermostat use cases outline various configurations for temperature control. Different system types include air and floor temperature schedules. Control options vary based on whether the thermostat is inside or outside the room. Limit sensors are categorized as air limits or floor limits. Specific probes are used for air and floor sensors in different scenarios. Recommendations are provided for thermostat placement in relation to the heated room. The document includes a table summarizing these use cases. Each use case specifies the type of thermostat and its corresponding control and limit sensor. The configurations aim to optimize temperature regulation in various settings. Overall, the document serves as a guide for selecting the appropriate thermostat setup.
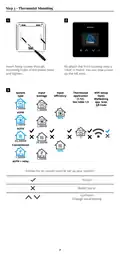
- Page 7: Step 3 - Thermostat Mounting Insert fixing screws through mounting holes of the power base and tighten. Re-attach the front housing until a “click” is heard. You can now power up the 6iE mini. WiFi Setup Open MyHeating app. Scan QR Code Follow the on screen icons to set up your system.
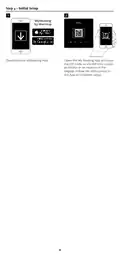
- Page 8: Step 4 - Initial setup Download the MyHeating app. Open the MyHeating app and scan the QR code on the 6iE mini screen protector or on the reverse of the display. Follow the instructions in the app to complete setup.
- Page 9: Welcome to the 6iE mini. How to quickly change the temperature. Press / to change your target temperature. If in program mode this will set a temporary override until your next heating period. If in manual mode this will set a fixed target temperature. Once the target temperature is set above current floor/air temperature the heating indicator will appear in the top right hand corner. How to quickly change mode. Mode select allows you to quickly change from manual mode, program mode or simply switch the heating off. Manual mode. Program mode. Heating off.
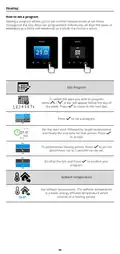
- Page 10: Heating How to set a program Setting a program allows you to set comfort temperatures at set times throughout the day. Days can be programmed individually, all days the same, or weekdays as a block and weekends as a block. Edit Program To select the days you wish to program, press the designated button. A bar will appear below the day of the week. Press to move to the next day. Press to set a program. Set the start time, followed by target temperature and finally the end time for that period. Press to accept. To add/remove heating period, press the plus/minus button. Up to 5 periods can be set. Scroll to the tick and press to confirm your program. Setback temperature Set setback temperature. The setback temperature is a lower energy efficient temperature when outside of a heating period.
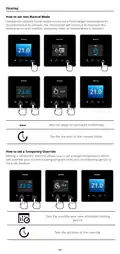
- Page 11: Heating How to set into manual mode Setting into manual mode allows you to set a fixed target temperature for the thermostat to achieve. The thermostat will continue to maintain this temperature until another operating mode or temperature is selected. Sets the target temperature indefinitely. Set the duration of the manual mode. How to set a temporary override Setting a temporary override allows you to set a target temperature which will override your current heating program until your next heating period or for a set duration. Sets the override until next scheduled heating period. Sets the duration of the override.
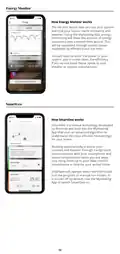
- Page 12: Energy Monitor The 6iE mini learns how you use your system and how your house reacts to heating and weather. Using the MyHeating App, energy monitoring will show the amount of energy consumed over a certain time period. This will be calculated through system power multiplied by efficiency and run time. You will need to enter the power of your system, and in some cases, the efficiency. SmartGeo SmartGeo is a unique technology developed by Warmup and built into the MyHeating App that uses an advanced algorithm to understand the most efficient heat settings for your home. It learns your routines and location through background communication with your smartphone. SmartGeo lowers temperatures when you are away, only rising them up to your ideal comfort temperature in time for your arrival home. SmartGeo will operate when the thermostat is in the program or manual run modes. It is turned off by default. Use the MyHeating App to switch SmartGeo on.
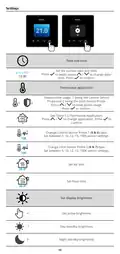
- Page 13: Settings Set the current date and time. Press to begin, press to change date/time. Press to confirm. Thermostat application swaps probe usage, 1 being the Control Sensor Probe and 2 being the Limit Sensor Probe. Press to swap probe usage. Change Control Sensor Probe type. Set between 5, 10, 12, 15, 100K sensor settings. Change Limit Sensor Probe type. Set between 5, 10, 12, 15, 100K sensor settings. Set Air limit. Set Floor limit. Set display brightness. Set active brightness.
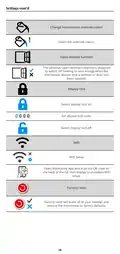
- Page 14: Change homescreen override colour. The windows open detection feature is designed to switch off heating to save energy when the thermostat detects that a window or door has been opened. Switch display lock on. Set display lock code. Switch display lock off. Open MyHeating App and scan the QR code on the back of the 6iE mini display to complete WiFi setup. Factory reset will erase all of your settings and restore the thermostat to factory defaults.
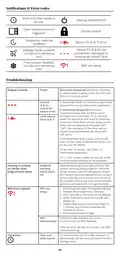
- Page 15: Notifications & error codes Date and time needs to be set. Heating switched OFF. Display locked. Open window function triggered. Temporary override enabled. Sensor P2 error. Sensor P1 not connected or damaged. Internal air sensor fault. Holiday mode enabled. Frost protect enabled. WiFi not setup. Troubleshooting: Display is blank. Electrician required to verify power is going to the 6iE mini. Ensure you have selected the correct thermostat application. Electrician required to verify that the floor sensor has been wired correctly. Limit sensor error. Heating is coming on earlier than programmed times. Adaptive learning will use historic heating/cooling rates. WiFi error symbol indicates WiFi not setup. Follow instructions in the app to connect to WiFi. Connect the 6iE mini to a WiFi network or set the time and date from the settings menu.
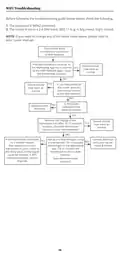
- Page 16: WiFi troubleshooting Before following the troubleshooting guide, please check the following: The password is WPA2 protected. The router is set to a 2.4 GHz band. Possible connection timeout. In the MyHeating App, try to connect to the WiFi Network again. If you reboot/restart the router, does the thermostat connect to the WiFi network? Is the router updated to the latest firmware? Remove the display of the thermostat and after 10-15 seconds reattach. If the thermostat connected to a mobile hotspot, set up a mobile hotspot using a smartphone. The distance from the thermostat to your router may be the likely issue, or the signal could be blocked. A WiFi repeater/extender may be required.
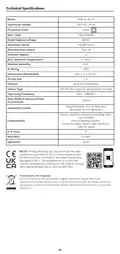
- Page 17: Technical specifications Model: RSW-02-XX-YY Operating voltage: 230 V AC, 50 Hz Max load: 16A (3680W) Protection class: Class II Max ambient temperature: 0 - 40°C IP rating: IP33 Dimensions (assembled): 90 x 115 x 39 mm Warranty: 12 years Instructions for disposal: Do not dispose of the device with regular domestic waste.
- Page 18: Warranty information is provided for the product, covering defects in workmanship or materials for twelve years from the date of purchase. The warranty applies only if the product is installed with a Warmup heater and registered within 30 days of purchase. If a defect is found during the warranty period, Warmup will repair or replace the product at their discretion. Consumers must provide proof of purchase when returning a defective product. The warranty does not cover removal or re-installation costs. It is void if defects are due to improper installation or failure to follow instruction manuals. A three-year warranty applies if the thermostat is installed with a non-Warmup heater. The warranty does not extend to associated software such as apps or portals. Warmup is not liable for any incidental or consequential damages resulting from warranty breaches. This warranty does not affect statutory rights.
- Page 19: Page 19

BOSCH Smart Home Room Thermostat Instruction Manual

sensi 1F95U-42WF Series Touch Smart Thermostat User Guide

BEOK CONTROLS BOT-R6W Boiler Thermostat User Guide

HYSEN HY608 Wi-Fi Digital Heating Thermostat User Manual

AURATON Cetus P Wired Thermostat User Manual

Honeywell RTH9590 Wi-Fi Color Touchscreen Programmable Thermostat User Guide

Danfoss UT 72-UT 73 Universal Thermostat Installation Guide

SALUS RT510 Thermostat Instruction Manual

Honeywell CT50A Standard low volt Thermostat Instruction Manual

Living Heat T5 Touch Screen Digital Smart Thermostat Instructions