
Micro-Air 359 Touchscreen Thermostat Instruction Manual



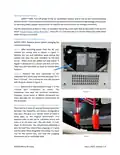



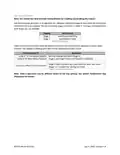






Table of Contents
Safety First ....................................................................................................................................................3
Removing the old thermostat...................................................................................................................3
Using the push button terminals ..............................................................................................................4
Change the control box wiring..................................................................................................................5
Mounting the thermostat.............................................................................................................................6
Thermostat Setup .........................................................................................................................................7
Setting the Available Sources....................................................................................................................7
Gas Heat Override Enable/Disable............................................................................................................7
Valve Output: Active Heat/Active Cool.....................................................................................................7
Furnace output: Inverted/Normal ............................................................................................................7
Connecting remotely.................................................................................................................................7
Operating the Thermostat ............................................................................................................................8
Main Screen ..............................................................................................................................................8
Operational Modes.................................................................................................................................10
Gas Heat Override...................................................................................................................................12
Local Weather and Local Time................................................................................................................13
Status Messages......................................................................................................................................13
Schedule Screens ....................................................................................................................................14
Create and Enable a Schedule.............................................................................................................15
Settings Screens......................................................................................................................................16
Smart device settings options.....................................................................................................................19
Reset device ............................................................................................................................................19
Calibrate Touchscreen ............................................................................................................................19
Check for updates ...................................................................................................................................19
Notifications............................................................................................................................................19
Edit Wi-Fi Settings or Connect to Wi-Fi...................................................................................................19
Troubleshooting..........................................................................................................................................20
Testing an output....................................................................................................................................20
EasyTouch RV Knowledge Bank – More Information .............................................................................20
Working Wirelessly .....................................................................................................................................21
First connection steps.............................................................................................................................21
Adding a Thermostat to Your Account....................................................................................................21
Connecting to a New Wi-Fi Network ......................................................................................................22
Updating The EasyTouch RV Thermostat................................................................................................22
Appendix .....................................................................................................................................................23
Using this thermostat on other applications ..........................................................................................23
2
©2023 Micro-Air Corp
July 3, 2023, revision 1.4
The EasyTouch 359 model 12-volt thermostats were designed to directly replace Dometic™ model
3106995 single zone DC 7.5-volt thermostats. The thermostats can be used in other applications with
certain electrical limitations as explained later in this document.
Safety First
Turn off power to the air conditioner breaker and to the 12-volt circuit powering the thermostat.
There is always a risk of shock in any system that is connected to high voltage utility power so removing
power greatly reduces that risk.
There is a risk of creating a short circuit with some of the thermostat wires during installation that
can cause a failure or undesired operation. Removing power reduces the risk you will damage something
or open a hard-to-find fuse during installation.
Installing the thermostat
There are four steps to installing the thermostat. Removing the thermostat, wiring the new
thermostat, installing the new thermostat, and finally, updating the control box wiring. Please read each
section entirely before proceeding with that section. Please perform these steps in order otherwise you
may damage your original thermostat.
Removing the old thermostat
IMPORTANT: Take a picture of the wires and labeling so if there are any questions about the original
configuration later, you can see how it was connected.
colors may be different from the normal factory suggested wire colors and not all wires may be used.
Label any that are not there with “Not used”.
3
©2023 Micro-Air Corp
July 3, 2023, revision 1.4

Table 1
Connect to
EasyTouch
terminal
label
Typical original
thermostat wire
color
Original factory wire harness
color (Write in here)
Function
Red or Red/White
Black or Green
Orange or Tan
Green
R
B
+7.5VDC
-Ground
Fan
GL
GH
Y
Fan high
Cool
Yellow
Violet or Orange
White
WHP
W
HP (heat pump)
Furnace
Sensor
Not used
SEN
SEN
Not used
Sensor
Disconnect the red or red/white wire labeled +7.5V and place a piece of tape around the exposed
wire end. Disconnect the remaining wires (tape is not necessary). Remove the cover to expose the two
screws that hold the thermostat to the wall and remove the rest of the thermostat.
U
s
i
n
g
t
h
e
p
u
s
h
b
u
t
t
o
n
t
e
r
m
i
n
a
l
s
Figure 1 shows a screwdriver depressing the push button
connector. The silver gate is opened for the wire to be inserted.
Releasing the button traps the wire and makes the connection.
Remove approximately 3/8 inch (1cm) of insulation from the
wire to be inserted. Use a small screwdriver (not provided) or similar
tool to push down on the square push button. Insert the wire in the
insertion space and release the push button. Verify the connection
by gently pulling on the wire. Do not force excessive wire down into
the connector. If the stripped wire end is longer than 3/8 inch, cut
Figure 1
the end so there is no bare wire sticking out when properly inserted.
4
©2023 Micro-Air Corp
July 3, 2023, revision 1.4

| General | Details |
|---|---|
| Name | Micro-Air 359 Touchscreen Thermostat Instruction Manual |
| Make | Micro-Air |
| Language | English |
| Filetype | PDF (Download) |
| File size | 0.5 MB |
 (1 votes, average: 5.00 out of 5)
 Loading...

micro-air EasyTouch 357 Multi Zone Replacement Thermostat Instruction Manual

Micro-Air EasyTouch RV 353 Touch Screen Thermostat Instruction Manual

Micro-Air EasyTouch RV 353 Thermostat Instruction Manual

micro-Air EasyTouch RV 351 Thermostat User Manual

Micro Air ETRV EasyTouch RV Thermostat Instruction Manual

micro-air EasyTouch RV 356 True Air RV Thermostat User Manual

micro-Air ASY-357-X02 EasyTouch 357 Touchscreen Thermostat User Manual

micro-Air EasyTouch 352 Thermostat User Manual

Micro-Air EasyTouch 355 Touch Screen Thermostat User Manual

Micro-Air 351 Air Conditioner Digital Thermostat User Guide


HEATIT Z-TRM6 Matt Z-Wave Thermostat User Guide

PURGEAR STC-8080H Digital Thermostat User Guide

TECH CONTROLLERS EU-R-12b Wireless Room Thermostat User Manual

TECH CONTROLLERS EU-R-8b PLUS Wireless Two Position Room Thermostat User Manual

emerald AC Link Smart Thermostat Owner’s Manual

MI-HEAT WT8 WiFi Smart Thermostat User Manual

SALUS TS600 Wireless Temperature Sensor Thermostat User Guide
bryant ecobee3 Lite Smart Thermostat User Guide

Danfoss Ally Cheap Radiator Thermostat Owner’s Manual

STELPRO ST402PFF Programmable Electronic Thermostat Owner’s Manual