
heatmiser Slimline-RF V3 Programmable Wireless Thermostat Instructions





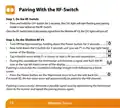









Pairing With the RF-Switch 16 Amp
Feature 10 Mode 02 not suitable for RF-Switch 16 Amp unit.
Step 1, On the RF-Switch 16 Amp:
•
Press and hold the Pair button for 5 seconds, the Pair light will start flashing and pairing
mode is now active on the RF-Switch.
Once the RF-Switch detects the pairing signal from the Slimline-RF V3, the Pair light will turn off.
Step 2, On the Slimline-RF V3
•
•
Turn Off the thermostat by, holding down the Power button for 3 seconds...........
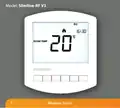
Now hold down the H button for 3 seconds unit you see P1 in the top right hand
corner of the display....................................................................................................................
Tap H button once while P1 is shown to start a 99 second countdown...................
•
•
During the countdown the thermostat will transmit a signal and flash the RF
icon at the top left hand corner of the display....................................................................
If pairing is successful, the countdown will jump straight to 00 followed by a blank
screen.
•
Press the Power button on the thermostat once to turn the unit back On..............
If pairing is unsuccessful, eliminate a possible signal issue by repositioning the thermostat
closer to the receiver and repeat the pairing process again.
16
Model: Slimline-RF V3

| General | Details |
|---|---|
| Name | heatmiser Slimline-RF V3 Programmable Wireless Thermostat Instructions |
| Make | heatmiser |
| Language | English |
| Filetype | PDF (Download) |
| File size | 0.35 MB |
 (1 votes, average: 5.00 out of 5)
 Loading...

heatmiser neoStat Touch-e Touchscreen Electric Floor Heating Thermostat Owner’s Manual

heatmiser DS1-V2 Thermostat Owner’s Manual

heatmiser neoStat-e Electric Floor Heating Thermostat Instructions

heatmiser neoStat-Pro Smart Thermostat Instruction Manual

heatmiser Slimline-B V3 Programmable Room Thermostat Owner’s Manual


Roth Minishunt Room Thermostat Installation Guide

Drayton RF710 Digital Wireless Room Thermostat Installation Guide

aube TH114-AF-GA Non-Programmable Thermostat Owner’s Manual

BUDDERFLY BTS-U2 Thermostat User Manual

Honeywell RLV450 Programmable Thermostat User Guide

Honeywell TH5220D1003 Heater Thermostat Owner’s Manual

White-Rodgers 1F83-277 Heating & Air Conditioning Auto Changeover Heat Pump Thermostat User Manual

Aprilaire S86WMUPR Programmable Wi-Fi Multi Stage Universal Thermostat Installation Guide

sinope TH1124NP Non Programmable Thermostat for Electric Heating Owner’s Manual

OJ ELECTRONICS UTN-4991 Non Programmable Thermostat Owner’s Manual