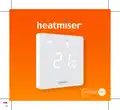
heatmiser neoStat-Pro Smart Thermostat Instruction Manual


neo

| General | Details |
|---|---|
| Name | heatmiser neoStat-Pro Smart Thermostat Instruction Manual |
| Make | heatmiser |
| Language | English |
| Filetype | PDF (Download) |
| File size | 0.52 MB |


heatmiser neoStat Touch-e Touchscreen Electric Floor Heating Thermostat Owner’s Manual

heatmiser Slimline-RF V3 Programmable Wireless Thermostat Instructions

heatmiser DS1-V2 Thermostat Owner’s Manual

heatmiser neoStat-e Electric Floor Heating Thermostat Instructions

heatmiser Slimline-B V3 Programmable Room Thermostat Owner’s Manual

heatmiser neoStat-Pro Smart Thermostat Instruction Manual Overview
Summary of Contents
- Page 1: Page 1
- Page 2: Page 2
- Page 3: Table of contents Optional settings Cooling and dew point Re-calibrating the thermostat What is a programmable room thermostat? Installation procedure Set up & pairing Error codes Remote probe connections What is a mesh network? Approach sensor
- Page 4: What is a programmable room thermostat? A programmable room thermostat is both a programmer and a room thermostat. A programmer allows you to set “On” and “Off” periods to suit your own lifestyle. A room thermostat works by sensing the air temperature, switching on the heating when the air temperature falls below the thermostat setting. A programmable room thermostat lets you choose what times you want the heating to be on, and what temperature it should reach while it is on. It will allow you to select different temperatures in your home at different times of the day to meet your particular needs and preferences. Setting a programmable room thermostat to a higher temperature will not make the room heat up any faster. How quickly the room heats up depends on the design and size of the heating system. Similarly, reducing the temperature setting does not affect how quickly the room cools down. Setting a programmable room thermostat to a lower temperature will result in the room being controlled at a lower temperature, and saves energy.
- Page 5: To set and use your programmable room thermostat, find the lowest temperature settings that you are comfortable with at different times. Set the room thermostat to a low temperature, such as 18°C, and then increase it by 1°C each day until comfortable. Any adjustment above the comfortable setting will waste energy and increase costs. You can temporarily adjust the heating program by overriding the set temperature. Programmable room thermostats require a free flow of air to sense temperature and must not be covered or blocked. Nearby electric fires, televisions, and lamps may interfere with the thermostat's functionality. This unit is only programmable when paired with a neoHub.
- Page 6: Installation procedure includes important steps for mounting the thermostat at eye level. Read the instructions fully to get the best from the product. Avoid installing near a direct heat source as it will affect functionality. Do not push hard on the LED panel to prevent irreparable damage. The neoStat PRO requires a back box of 35mm minimum depth for flush mounting. Step 1 involves loosening the screw from the bottom face of the thermostat to separate the front from the back plate. Step 2 requires placing the thermostat front panel in a safe location and terminating the thermostat as shown in the diagrams. Step 3 is to securely screw the thermostat back plate into the back box. Step 4 involves clipping the front of the thermostat onto the back plate and securing it with the retaining screw.
- Page 7: Page 7
- Page 8: Set up and pairing To pair the neoHub with the neoApp, follow these steps. Connect the neoHub to your router with the Ethernet cable provided. Connect the power supply to the neoHub. The router will automatically assign an IP address to the neoHub, the Link LED will light up RED once the neoHub has connected to your network. Once connected to the Heatmiser cloud server, the Link LED will turn GREEN. Connect your smartphone or tablet device to the same WiFi network as your router. Download the FREE Heatmiser neoApp from the Apple App Store or Google Play Store and register an account. Once you have registered your account, press Sign In, then press Add Location. Press the connect button on the neoHub to add the location to your account. The next step is to join the neoStat PRO to the neoHub.
- Page 9: When the neoStat PRO successfully connects to the neoHub, the MESH symbol will be permanently displayed and a confirmation will show on the app. In the app, press ADD ANOTHER for additional zones or press FINISH to complete setup. You only have to pair the hub to your account once. To pair any additional neoStats, select ZONES, edit, then ADD ZONE. NeoStats work using a mesh network, meaning they can send and receive signals via other thermostats on the network. This communication method extends the communication range while offering increased network stability compared with standard RF thermostats. The Mesh symbol indicates when the device is communicating with the neoHub; if it disappears, this indicates connection to the neoHub has been lost. The neoStat PRO uses proximity to detect when you are about to use the touch keys. As you approach the neoStat, the touch keys and backlight will light up. This feature can be useful if you need to adjust the set temperature in a dark room.
- Page 10: Page 10
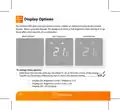
- Page 11: LED display features various symbols indicating different statuses and functions. The mesh symbol shows a connection to the neoHub. The dew point indicator signifies when the floor reaches dew point temperature, leading to a shutdown of cooling. Frost protection is activated when the corresponding symbol is displayed. The snowflake symbol indicates active cooling. The flame symbol appears when the thermostat calls for heat and flashes during optimum start. Holiday mode is indicated when the thermostat is set to away mode. The floor limit symbol shows when the floor probe has reached the configured temperature limit. A sensor warning flashes when the neoStat-PRO fails to receive a signal from a wireless sensor or window/door switch. The set indicator displays when changes are being made to the current set point. Touch keys allow users to change the set temperature and enable frost protection. The display shows the current sensor temperature and can be set to degrees Celsius or Fahrenheit.
- Page 12: Display options allow for either ambient temperature or a blank display. The display shows full brightness during user interaction and dims or goes blank after inactivity. To change display options, hold down the tick key until a number appears in the center of the display. Use the Up/Down keys followed by the tick to select the desired setting. Brightness Level 1 (Medium) is indicated by 01. Brightness Level 2 (Low) is indicated by 02. Display Off is indicated by 03 and is the default setting.
- Page 13: Temperature display options are available for the neoStat PRO, including built-in air sensor, floor sensor, or both. When using both sensors, the room temperature is displayed by default. To view the current floor temperature, press and hold the Down arrow and Tick keys for 5 seconds. The floor temperature will be displayed momentarily before reverting back to room temperature.
- Page 14: Comfort levels explained When paired to a neoHub, the neoStat PRO offers three program mode options: Weekday/Weekend programming, 7 Day programming, and 24 Hour programming. By default, the neoStat PRO is a non-programmable thermostat. When thermostats are connected to the mesh network, the program mode for the system is configured using the neoApp. The thermostat is pre-programmed with a set of comfort levels, but these can be changed easily. Heating defaults: 07:00 - 21°C (Wake), 09:00 - 16°C (Leave), 16:00 - 21°C (Return), 22:00 - 16°C (Sleep). Cooling defaults: 07:00 - 23°C (Wake), 09:00 - 26°C (Leave), 16:00 - 23°C (Return), 22:00 - 26°C (Sleep). For Weekday/Weekend programming, the four comfort levels are the same for Mon-Fri, but can be different for Sat-Sun. For 7 Day programming, each day of the week can be set differently. In 24 hour mode, all days are programmed with the same comfort levels. To access and customise these comfort levels, please refer to the mobile app.
- Page 15: Temperature control allows you to adjust the set temperature using the Up / Down keys. Pressing either key displays the word SET along with the desired temperature value. Use the Up / Down keys to adjust the SET value. Press Tick to confirm settings and return to the main display. When used as a programmable thermostat, the new set temperature is maintained only until the next programmed comfort level. The thermostat will revert back to the programmed levels at that time.
- Page 16: Frost mode toggles ON/OFF with each press of the Tick button. In frost mode, the neoStat displays the frost icon and activates heating if the room temperature drops below the set frost temperature. If heating is activated in frost mode, the flame symbol will be displayed. To cancel frost protect mode, press Tick again. Frost protection mode is enabled.
- Page 17: Holiday function reduces the set temperature to the frost protection temperature setting. The thermostat maintains this temperature for the duration of the holiday. It automatically returns to program mode upon your return. To unlock the neoStat Pro, press Tick once and enter the four-digit pin number. Use the Up/Down keys to enter the first two digits of the pin. Use the Up/Down keys to enter the second two digits of the pin. The display will unlock and return to the main screen. To reset the device to factory default settings, hold down all three keys. Every icon will show on the display during the reset process. Refer to page 9 for illustrations related to the reset process.
- Page 18: Optional settings are available for the neoApp only. Many settings are inaccessible until the thermostat is paired to a Neohub system. Switching differential allows you to increase the thermostat's switching differential, with a default of 1°C. Frost protect temperature is maintained in Frost Mode, with a default of 12°C suitable for most applications. Output delay can be set from 00 to 15 minutes to prevent rapid switching, with a default of 00 meaning no delay. Temperature up/down limit allows you to restrict the use of temperature adjustment keys, even when the thermostat is locked. Sensor selection enables the neoPro to detect remote probe connections, allowing configuration changes via the neoApp. You can select between air temperature only, floor temperature, or both for sensor configuration. When both sensors are enabled, the floor sensor acts as a limiting sensor to prevent overheating. In cooling mode, the thermostat calculates dew point temperature using air, floor, and humidity sensors. The thermostat will stop cooling once the floor approaches dew point.
- Page 19: Floor temp limit allows setting a floor limiting temperature between 20-45°C, with a default of 28°C. The unit must not be used to control electric underfloor heating. Cool enable allows the thermostat to actively cool when in cooling mode. Optimum start delays the heating system's start to avoid unnecessary heating and ensure warmth at the programmed time. The thermostat calculates how long the heating needs to raise the building temperature by 1°C based on the rate of change. Rate of change indicates the number of minutes for a 1°C temperature rise, with a default setting of 20 minutes. Program mode includes non-programmable, weekday/weekend, 7-day programming, or 24-hour options. Weekday/weekend mode allows programming of 4 comfort levels for weekdays and weekends. 7-day program mode enables independent programming of 4 comfort levels for each day. 24-hour mode programs all days the same, repeating continuously.
- Page 20: Cooling and dew point (neoApp only) When used with the neoHub and HC-Switch, this thermostat can be used for underfloor cooling. In this mode, the neoStat PRO will show a snowflake icon when active. A floor sensor must be fitted in order to monitor the floor temperature. The thermostat can calculate the dew point cut off to help prevent condensation from forming on a tiled floor. By default, cooling is disabled and is indicated by dashes on the display when the system is set to cooling mode. To enable cooling, enter the zone settings menu in the app.
- Page 21: Re-calibrating the thermostat If you need to re-calibrate the thermostat, follow these steps. Press and hold the Up / Down keys for 10 seconds. The tick key will blink once. Use the Up / Down keys to change the offset. Tap the Tick button to store and return to the main display. To remove any previously stored offset, a complete factory reset is required. Error Codes When terminated for thermostat operation the screen will display an error code if a fault is detected. E0 = The internal sensor has developed a fault. E1 = The remote FLOOR probe has not been connected. E1 = The remote FLOOR probe has not been wired correctly. E1 = The remote FLOOR probe is faulty. E2 = The remote AIR probe has not been connected. E2 = The remote AIR probe has not been wired correctly. E2 = The remote AIR probe is faulty.
- Page 22: Remote probe connections allow for up to two probe connections, remote floor and remote air. The thermostat automatically detects and uses remote probe connections. Probe types include remote floor sensor and remote air thimble sensor, both using NTC thermistor 10K3A1. For input connections, use RT1 and negative terminals for the floor sensor. For the air sensor, use RT2 and negative terminals. If a probe connection is incorrect and the device is not paired to a neohub, a factory reset is required after corrections.
- Page 23: Wiring diagram for neoStat to boiler S/L. 230VAC connection details. Consult boiler makers diagram for connection. Live 230V supply in. Switched live to boiler. Neutral connection required. Installation must be performed by a qualified electrician. Compliance with local installation regulations is necessary.
- Page 24: Wiring diagram for neoStat to boiler voltfree. 230VAC connections are required. Consult boiler makers diagram for proper connection. Room thermostat connections are labeled LS and LR. This product must only be installed by a qualified electrician. Installation must comply with local regulations. Live connections require a 230V supply in. Neutral connections are necessary for proper operation. Ensure correct wiring to avoid electrical issues. Follow safety guidelines during installation.
- Page 25: Wiring diagram for neoStat to valve. 230VAC connection details. Consult boiler makers diagram for connection. Live 230V supply in and neutral connections. LS and LR are normally the room thermostat connections. Heating valve connection instructions. Installation must be performed by a qualified electrician. Compliance with local installation regulations is required.
- Page 26: Wiring diagram for neoStat to UH8 and optional remote probe connections. This product must only be installed by a qualified electrician and comply with local installation regulations. neo Series.
- Page 27: Page 27
- Page 28: Hereby, Heatmiser UK Ltd. declares that the radio equipment type is in compliance with Directive 2014/53/EU. RF Frequency: 2.4ghz 9.18dBm. Rev.1.2.

Honeywell RTH2510 Digital 7-day Thermostat Owner’s Manual

Danfoss VIIDH102 Living Connect Intelligent Radiator Thermostat User Guide

Roth 1135006445 Wireless Room Thermostat Touchline 230 V Instruction Manual

Honeywell PRO 4110D Programmable Thermostat Installation Guide

Honeywell Home T2 Programmable Thermostat Installation Guide

HEATIT 54 304 59 DIN Smart Thermostat Installation Guide

GENERAL LIFE 270S RF Room Thermostat User Manual

KETOTEK F0155 WiFi Thermostat Instruction Manual

GREYSTONE TLOSF24X01 TLOS Series Outside Low Limit Thermostat Instruction Manual

tecnoswitch TE300ME Mechanical Thermostat User Guide