heatmiser neoStat-Pro Smart Thermostat Instruction Manual


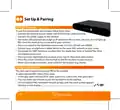


Set Up & Pairing
Pairing the neoHub
To pair the neoHub with the neoApp, follow these steps.
•
•
•
Connect the neoHub to your router with the Ethernet ca
Connect the power supply to the neoHub.
The router will automatically assign an IP address to the neoHub, the Link LED will light up
RED once the neoHub has connected to your network.
•
•
•
Once connected to the Heatmiser cloud server, the Link LED will turn GREEN.
Connect your smartphone or tablet device to the same WiFi network as your router.
Download the FREE Heatmiser neoApp from the Apple App Store or Google Play Store
and register an account.
•
•
•
Once you have registered your account, press Sign In, then press Add Location.
Press the connect button on the neoHub to add the location to your account.
When successfully connected, enter a title for the location (e.g. Home).
Pairing the neoStat Pro
The next step is to join the neoStat PRO to the neoHub.
To add a neoStat PRO, follow these steps;
•
•
•
In the app, select ADD NEOSTAT, enter a preset or custom title, then press NEXT.
You now have two minutes to join the neoStat Pro to the neoHub.
On the neoStat PRO, hold both tick and up keys until the mesh symbol appears
flashing on the display........................................................................................................................
7
neo
Series
| General | Details |
|---|---|
| Name | heatmiser neoStat-Pro Smart Thermostat Instruction Manual |
| Make | heatmiser |
| Language | English |
| Filetype | PDF (Download) |
| File size | 0.52 MB |


heatmiser neoStat Touch-e Touchscreen Electric Floor Heating Thermostat Owner’s Manual

heatmiser Slimline-RF V3 Programmable Wireless Thermostat Instructions

heatmiser DS1-V2 Thermostat Owner’s Manual

heatmiser neoStat-e Electric Floor Heating Thermostat Instructions

heatmiser Slimline-B V3 Programmable Room Thermostat Owner’s Manual


Danfoss RMT-230 Room Thermostat Installation Guide

CANPOL BABIES 77-053 4 in 1 Bottle Warmer and Sterilizer with Thermostat User Manual

COPELAND ST55 Sensi Smart Thermostat Instruction Manual

PRO1 T701 Digital Non Programmable Thermostat Instruction Manual

AJAX108846 White Smart Wifi Thermostat Instruction Manual

GENERAL LIFE HT300 RF Digital Room Thermostat User Manual

SANGAMO CHPWIFI Fort Programmable Thermostat User Guide

Danfoss RET230 HCW-1 Electronic Heat Cool Thermostat User Manual

BEOK CONTROLS TDR89 ZIGBEE Thermostat User Guide

GENERAL LIFE Mitra 260S RF Wireless Room Thermostat User Manual