
SANGAMO CHPWIFI Fort Programmable Thermostat User Guide




C H P W I F I
F o r t P r o g r a m m a b l e T h e r m o s t a t
w i t h R F a n d W i F i
Q U I C K S T A R T G U I D E


| General | Details |
|---|---|
| Name | SANGAMO CHPWIFI Fort Programmable Thermostat User Guide |
| Make | SANGAMO |
| Language | English |
| Filetype | PDF (Download) |
| File size | 0.52 MB |
 (1 votes, average: 5.00 out of 5)
 Loading...

SANGAMO CHPWIFI Fort Programmable Thermostat User Guide Overview
Summary of Contents
- Page 1: Quick start guide for programmable thermostat with RF and WiFi.
- Page 2: Features Product overview Thermostat functions Thermostat configuration Thermostat installation Installation plan A Installation plan B Pairing the thermostat and receiver Product description, preparation for use & installation instructions
- Page 3: Large LED display Touch button Permanent user settings, and program settings during power loss One button “Holiday” mode Programming periods; 7 day individual, 5/2 split (Monday - Friday, Saturday & Sunday) 6 separate time/temperature periods per day Key lock facility Low battery indication Frost protection Optional intelligent function; optimal start
- Page 4: Product overview Wireless icon indicates pairing status with the receiver. Frost protection icon alerts to potential freezing conditions. Call for heat icon signals heating demand. Programming mode icon shows when the thermostat is in programming mode. Low battery alert notifies when battery needs replacement. Room temperature or setting temperature display shows current or desired temperature. WiFi status indicator provides connection information. Default programming schedule can be configured within the ClickSmart+ app. Manual call for heat is initiated by pressing and holding the control button. Network connection status is indicated by different colored LEDs.
- Page 5: Thermostat functions include switching between ON and standby modes, with frost protection active in standby. The key lock function allows users to lock or unlock keys for security. Frost protection activates when the room temperature falls below 5°C, sending a call for heat until it rises above 8°C. Open window/door detection turns down heating if the temperature drops 1.5°C in 3 minutes, resuming normal operation when conditions improve. A low power alert notifies users to change batteries when critically low on power. Optimal start enables the thermostat to preheat the space before the scheduled time. Fault alerts indicate damage to the internal sensor. Operating modes include schedule mode, which follows a set schedule, and boost mode, which maintains heat until the desired temperature is reached. Manual mode allows users to set a specific temperature until manually changed. Users can toggle between schedule and manual modes for flexibility in temperature control.
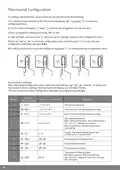
- Page 6: Thermostat Configuration To configure the thermostat using its controls, you will need to enter the configuration menu. You can adjust the setting by pressing the appropriate buttons. Pressing the designated button will save current settings and exit to the configuration menu. To restore factory settings, press and hold both specified buttons. This will remove any custom configuration settings and programming settings. Temperature calibration has a factory default range of -4°C to +4°C. Start heating conditions are based on the relationship between room temperature and setting temperature. The number of programming periods per day can be set to various options. The intelligent function includes an optimal start feature. The thermostat LED display option can be toggled on or off via the app.
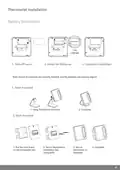
- Page 7: Thermostat installation involves battery installation and mounting options. For battery installation, remove the cover, install AA batteries, and ensure correct polarity. Desk mounting requires hanging the thermostat on the stand. Wall mounting involves placing the backboard on the installation box, securing the backplate with bolts, and attaching the thermostat to the backplate. Complete the installation process.
- Page 8: Page 8

Emerson ST55 Sensi Wi-Fi Programmable Thermostat Installation Guide

tado 104388 Smart Thermostat

VIVE TP-S-955WH Programmable Thermostat Instruction Manual

GENERAL LIFE HT220 Smart Digital Room Thermostat User Manual

Roth Minishunt Plus Wireless Room Thermostat Installation Guide

neptronic TFC54F3X1 Fan Coil Thermostat Installation Guide

INTIEL DT-3.1 Programmable Differential Thermostat User Manual

Honeywell TH2320WF4010 FocusPRO Smart Thermostat User Guide

EPH CONTROLS HRT Battery Operated Non Programmable Thermostat Installation Guide

GREYSTONE TLDCB24J01 Flexible Copper Duct Average Low Limit Thermostat Instruction Manual