heatmiser neoStat-Pro Smart Thermostat Instruction Manual


•
•
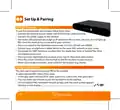
When the neoStat PRO successfully connects to the neoHub the MESH symbol will be
permanently displayed and a confirmation will show on the app.
In the app, press ADD ANOTHER for addtional zones or press FINISH to complete setup.
Please note, you only have to pair the hub to your account once.
To pair any additional neoStats, select ZONES, edit, then ADD ZONE.
What is a Mesh Network
NeoStats work using a mesh network, meaning neoStats have the ability to send &
receive signals via other thermostats on the network. This signal is relayed from one
thermostat to another until it reaches its destination. This communication method
extends the communication range whilst offering increased network stability when
compared with standard RF thermostats.
The Mesh symbol is shown when the device is communicating with the neoHub, if the
mesh symbol disappears this indicates connection to the neoHub has been lost.
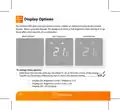
Approach Sensor
The neoStat PRO uses proximity to detect when you are about to use the touch
keys. As you approach the neoStat, the touch keys and backlight will light up.
This can be useful if you need to adjust the set temperature in a dark room.
neo
8
| General | Details |
|---|---|
| Name | heatmiser neoStat-Pro Smart Thermostat Instruction Manual |
| Make | heatmiser |
| Language | English |
| Filetype | PDF (Download) |
| File size | 0.52 MB |


heatmiser neoStat Touch-e Touchscreen Electric Floor Heating Thermostat Owner’s Manual

heatmiser Slimline-RF V3 Programmable Wireless Thermostat Instructions

heatmiser DS1-V2 Thermostat Owner’s Manual

heatmiser neoStat-e Electric Floor Heating Thermostat Instructions

heatmiser Slimline-B V3 Programmable Room Thermostat Owner’s Manual


EMOS P56201BUF Floor Heating Thermostat User Guide

heatit Z-Temp2 Wireless Thermostat Instruction Manual

VENSTAR Fan Coil Thermostat T2100 / T2150 User Guide

EPH CONTROLS RFR RF Room Thermostat Instruction Manual

Danfoss Heating Solutions WT-T BasicPlus2 Room Thermostat Installation Guide

SHANGHAI TR9B Ultra Large Colorful Screen Capacitive Touch LCD Smart Thermostat User Guide

SALUS CONTROLS BTR230 Non Programmable Thermostat User Guide

VILPE WIVE 100 Intake Vent Plus Thermostat

Danfoss 088U0210 CF-RS Standard Room Thermostat Instruction Manual
Honeywell Home RTH Series T5 Smart Thermostat Installation Guide