Home > heatmiser > heatmiser Slimline-RF V3 Programmable Wireless Thermostat Instructions

heatmiser Slimline-RF V3 Programmable Wireless Thermostat Instructions

imline-RF V3  
GeneralDetails
Nameheatmiser Slimline-RF V3 Programmable Wireless Thermostat Instructions
Makeheatmiser
LanguageEnglish
FiletypePDF (Download)
File size0.35 MB
Download PDF
1 Star2 Stars3 Stars4 Stars5 Stars (1 votes, average: 5.00 out of 5)
Loading...
heatmiser neoStat Touch-e Touchscreen Electric Floor Heating Thermostat Owner’s Manual
heatmiser DS1-V2 Thermostat Owner’s Manual
heatmiser neoStat-e Electric Floor Heating Thermostat Instructions
heatmiser neoStat-Pro Smart Thermostat Instruction Manual
heatmiser Slimline-B V3 Programmable Room Thermostat Owner’s Manual

heatmiser Slimline-RF V3 Programmable Wireless Thermostat Instructions
Get the free PDF manual for the heatmiser Slimline-RF V3 Programmable Wireless Thermostat Instructions and access setup steps, usage instructions, and troubleshooting tips. 👉 View online or download now to keep your thermostat running smoothly!
heatmiser Slimline-RF V3 Programmable Wireless Thermostat Instructions Overview
Summary of Contents

  • Page 1: Page 1
  • Page 2: Model: Slimline-RF V3 Wireless Series
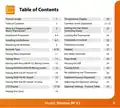
  • Page 3: Table of contents Comfort levels explained Setting the hot water Switching times What is a programmable room thermostat? Locking the thermostat Temperature control Temperature hold Installation procedure Installing the batteries Replacing the batteries
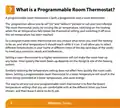
  • Page 4: What is a programmable room thermostat? A programmable room thermostat is both a programmer and a room thermostat. The programmer allows you to set “On” and “Setback” periods to suit your own lifestyle. The room thermostat works by sensing the air temperature, switching on the heating when the air temperature falls below the thermostat setting. A programmable room thermostat lets you choose what times you want the heating to be on, and what temperature it should reach while it is on. It will allow you to select different temperatures in your home at different times of the day to meet your particular needs and preferences. Setting a room thermostat to a higher temperature will not make the room heat up any faster. How quickly the room heats up depends on the design and size of the heating system. Similarly, reducing the temperature setting does not affect how quickly the room cools down. Setting a programmable room thermostat to a lower temperature will result in the room being controlled at a lower temperature and saves energy. The way to set and use your programmable room thermostat is to find the lowest temperature settings that you are comfortable with.
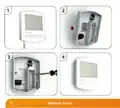
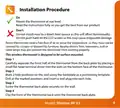
  • Page 5: Installation procedure Mount the thermostat at eye level. Read the instructions fully so you get the best from our product. Do not install near to a direct heat source as this will affect functionality. Do not push hard on the LCD screen as this may cause irreparable damage. Room thermostats need a free flow of air to sense the temperature, so they must not be covered by curtains or blocked by furniture. This wireless thermostat is designed to be surface mounted. Carefully separate the front half of the thermostat from the back plate. Mark 2 hole positions on the wall using the backplate as a positioning template. Screw the thermostat back plate securely on the wall. Clip the front of the thermostat back onto the thermostat back plate.
  • Page 6: Page 6
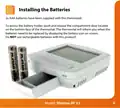
  • Page 7: Installing the batteries requires 2x AAA batteries. To access the battery holder, push and release the compartment door on the bottom face of the thermostat. The thermostat will indicate when the batteries need to be replaced by displaying the battery icon on screen. Do not use rechargeable batteries with this product. Model: Slimline-RF V3
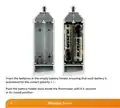
  • Page 8: Insert the batteries in the empty battery holder, ensuring that each battery is orientated for the correct polarity + / -. Push the battery holder back inside the thermostat until it is secured in its closed position.
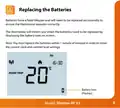
  • Page 9: Replacing the batteries is necessary for the thermostat to operate correctly. The thermostat will display a battery icon when the batteries need replacement. You must replace the batteries within 1 minute of removal to retain current settings.
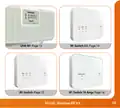
  • Page 10: Receiver type is important for sending a wireless signal to switch on heating or hot water. Select the receiver type from the list on pages 9 and 10. Follow the pairing instructions on the relevant page. To control heating only, configure feature 10 on the Slimline-RF to mode 00 or 01. To control heating and hot water, configure feature 10 to mode 02.
  • Page 11: Model: Slimline-RF V3
  • Page 12: Pairing menu explained Feature P1 - Pairing: to the RF-Switch V1 & V2, RF-Switch 16 Amp & UH8-RF V2. Feature P2 - Setting the UH8-RF address: This is the number set on the rotary dials inside the UH8-RF unit, the zone number & zone type. Feature P3 - Failsafe: If the receiver fails to receive a signal from the Slimline-RF V3 within a 40 minute period, it will activate the output for 12 minutes every hour. Pairing to RF-Switch 1&2 & UH8-RF V2 commences countdown from 99 – 00 seconds. Pairing to UH8-RF 00 – 99 = Receiver address/zone no. & type. 00 = Disabled 01 = Enabled (Default). Failsafe: Turn off the thermostat by holding down the Power button for 3 seconds. Now hold down the H button for 3 seconds until you see P1 in the top right hand corner of the display. Repeatedly press Clock to select the desired P1, P2 or P3 setup pages.
  • Page 13: Pairing with the UH8-RF V2 Wiring Centre You can pair the Slimline-RF V3 to multiple channels on the UH8-RF V2. Press and hold the pairing button on the desired channel until the output indicator LED flashes. Pairing mode is now active on the UH8-RF V2. Once the UH8-RF V2 detects the pairing signal from the Slimline-RF V3, the output light will turn off. Turn off the thermostat by holding down the Power button for 3 seconds. Hold down the H button for 3 seconds until you see P1 in the top right hand corner of the display. Tap the H button once while P1 is shown to start a 99 second countdown. During the countdown, the thermostat will transmit a signal and flash the RF icon at the top left hand corner of the display. If pairing is successful, the countdown will jump straight to 00 followed by a blank screen. If pairing is unsuccessful, eliminate a possible signal issue by repositioning the thermostat closer to the receiver and repeat the pairing process again.
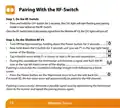
  • Page 14: Pairing with the UH8-RF Wiring Centre Take note of the numbers set on the rotary switches (UH8-RF ID numbers 01-99). Each UH8-RF on the system needs to have a different ID number. Set your first UH8-RF to 01. Turn off the thermostat by holding down the Power button for 3 seconds. Hold down the H button for 3 seconds until you see P1 in the top right hand corner of the display. Press the Clock button once to change P1 to P2 on the display. Use the Up/Down keys to change the large digits to match the Rotary Switch on the UH8-RF. Use the Up/Down keys to change the small digits to select a Zone number on the UH8-RF. Use the Up/Down keys to select either “rA” for radiator zone or “UF” for underfloor heating, followed by A to store configuration. If in mode 02, the hot water timer will automatically be paired to the HW channel.
  • Page 15: Pairing with the RF-Switch V2 involves two main steps. On the RF-Switch V2, press and hold the CH1 or CH2 button for 5 seconds to activate pairing mode. Once the RF-Switch V2 detects the pairing signal from the Slimline-RF V3, the CH1/2 light will turn off. On the Slimline-RF V3, turn off the thermostat by holding down the Power button for 3 seconds. Hold down the H button for 3 seconds until P1 appears in the display. Tap the H button once while P1 is shown to start a 99-second countdown. During the countdown, the thermostat will transmit a signal and flash the RF icon. If pairing is successful, the countdown will jump to 00 followed by a blank screen. Press the Power button on the thermostat once to turn the unit back on. If pairing is unsuccessful, reposition the thermostat closer to the receiver and repeat the pairing process.
  • Page 16: Pairing with the RF-Switch involves two main steps. On the RF-Switch, press and hold the CH1 button for 5 seconds to activate pairing mode. The CH1 light will flash, and once the RF-Switch detects the pairing signal from the Slimline-RF V3, the light will turn off. On the Slimline-RF V3, turn off the thermostat by holding down the Power button for 3 seconds. Hold down the H button for 3 seconds until P1 appears in the display. Tap the H button once while P1 is shown to start a 99-second countdown. During the countdown, the thermostat will transmit a signal and flash the RF icon. If pairing is successful, the countdown will jump to 00 followed by a blank screen. Press the Power button on the thermostat once to turn the unit back on. If pairing is unsuccessful, reposition the thermostat closer to the receiver and repeat the process.
  • Page 17: Pairing with the RF-Switch 16 Amp requires specific steps for successful connection. Press and hold the Pair button on the RF-Switch for 5 seconds to activate pairing mode. The Pair light will flash during the pairing process. Once the RF-Switch detects the Slimline-RF V3 signal, the Pair light will turn off. To prepare the Slimline-RF V3, turn off the thermostat by holding the Power button for 3 seconds. Hold down the H button for 3 seconds until P1 appears on the display. Tap the H button once while P1 is shown to start a 99 second countdown. During the countdown, the thermostat will transmit a signal and the RF icon will flash. If pairing is successful, the countdown will jump to 00 followed by a blank screen. If unsuccessful, reposition the thermostat closer to the receiver and repeat the process.
  • Page 18: Page 18
  • Page 19: LCD display features include various icons and indicators that provide information about the thermostat's status and settings. The RF icon flashes when the thermostat communicates with the receiver. The day indicator displays the current day. The frost icon is shown when the thermostat is in frost protection mode. The flame icon appears when the thermostat is calling for heat and flashes during the Optimum Start function. The temperature hold is displayed when manually overriding the program. The room temperature indicates the current temperature sensor mode. The set indicator shows when changes are made to programs or temperature set points. The holiday indicator is displayed when the programmer is in holiday mode. The battery level indicates when the batteries require replacement. The model is Slimline-RF V3.
  • Page 20: Setting the clock involves several steps. With the thermostat turned on, press the Clock key twice. Use the Up/Down keys to set the hours. Press H to confirm settings. Use the Up/Down keys to set the minutes. Press H to confirm settings. Use the Up/Down keys to set the day of the week. Press A to confirm settings and return to the main display. Note: When configured in programmable mode with hot water control, press the clock key three times to enter the clock setting screen.
  • Page 21: Temperature display information is driven by two different inputs: the sensor measurement and the target temperature you have set. Room temperature is the current temperature in your home. Set temperature is the temperature you are trying to achieve. Model: Slimline-RF V3
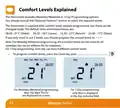
  • Page 22: Comfort levels explained The thermostat provides weekday/weekend or 7 day programming options. You should consult the “Optional Features” section to select the required mode. The thermostat is supplied with comfort levels already programmed, but these can be changed easily. The default times and temperatures are: 08.00 - 21°C (Wake) 09.30 - 16°C (Leave) 16.30 - 22°C (Return) 23.00 - 17°C (Sleep) If you only want to use 2 levels, you should program the unused levels to --.-- For weekday/weekend programming, the 4 comfort levels are the same for all weekdays but can be different for the weekends. For 7 day programming, each day can have 4 different comfort levels. To program comfort levels, press the Clock key once. For 7 day programming, only Mon is displayed in the day indicator field.
  • Page 23: Use the Up/Down keys to enter the required WAKE time. Press H to confirm settings. Use the Up/Down keys to enter the required WAKE temperature. You will now see “LEAVE” displayed on screen. Repeat the programming steps for each period until complete. For unused periods enter --.-- and the thermostat will ignore the setting. Press A to confirm settings and return to main display. In 7 Day programming mode you can repeat for each day independently. In Weekday/Weekend programming mode you will see Sat Sun displayed on screen and can repeat for the weekend. To change the programming mode please refer to pages 33 & 34.
  • Page 24: Setting the hot water switching times involves pressing the Clock key twice. If the thermostat is set up for weekday/weekend programming, Mon-Fri will be displayed on screen. For 7-day programming, Mon will be displayed on screen. Use the Up/Down keys to enter the required start time for Hot Water Time 1. Press H to confirm settings. Use the Up/Down keys to enter the required end time for Hot Water Time 1. Repeat the programming steps for each switching time, entering --.-- for any unused periods. Note: Only applicable when configured in programmable with hot water control.
  • Page 25: Locking the thermostat The thermostat has a keypad lock facility. To activate the lock, press and hold the A and Down keys together for 10 seconds. You will see the lock symbol appear on screen. To unlock, repeat the steps above until the lock symbol disappears. The keypad lock indicator is only displayed when the lock is active.
  • Page 26: Temperature control allows you to adjust the set temperature using the Up/Down keys. Pressing either key displays the word SET along with the desired temperature on the screen. You can use the Up/Down keys to adjust the SET value. Press A to confirm settings and return to the main display. The override will be maintained until the next programmed comfort level. Set temperature and set icon are displayed. The document pertains to a wireless series.
  • Page 27: Temperature hold function allows manual override of the current operating program. Press H to commence temperature hold. Use the Up/Down keys to enter the required hold time. Press H to confirm settings. Use the Up/Down keys to enter the required hold temperature. Press A to confirm settings and return to main display. The hold for indication is displayed on screen. The time will countdown the set duration and then revert to the normal program. To cancel temperature hold, reduce the hold time to 00:00 hours.
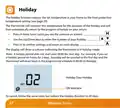
  • Page 28: The holiday function reduces the set temperature to the frost protection temperature setting. The thermostat maintains this temperature for the duration of the holiday and automatically returns to the program schedule upon your return. Press H three times to see the suitcase on screen. Use the Up/Down keys to enter the number of days for the holiday. Press A to confirm settings and return to the main display. The display will show a suitcase indicating the thermostat is in holiday mode. A holiday period does not start until 00:00 the next day. To cancel, reduce the holiday duration to 00 days.
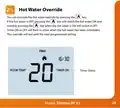
  • Page 29: Hot water override allows you to switch the hot water ON or OFF by pressing the key. If the hot water is OFF, pressing the key will turn it ON. Pressing the key when the hot water is ON will turn it OFF. Timer ON or OFF will flash to indicate when the hot water has been overridden. The override will remain in effect until the next programmed setting. Model: Slimline-RF V3
  • Page 30: Frost mode allows the thermostat to maintain a minimum temperature to prevent freezing. Pressing the power button once activates frost protect mode, indicated by a frost icon. The thermostat will only heat if the room temperature drops below the set frost temperature. Users can set the frost temperature using the up/down keys and the A button, with a selectable range of 7°C to 17°C. If heating is activated in frost mode, a flame icon will be displayed. To exit frost protect mode, press the power button again. The heating is indicated as on when the flame icon is displayed. When the flame icon is absent, the thermostat remains active without heating. To completely turn off the thermostat, press and hold the power button, ensuring frost protection is disabled. Press the power button once to turn the thermostat back on.
  • Page 31: Re-calibrating the thermostat involves several steps. Press and hold the Power button to turn the thermostat OFF. Press and hold BOTH the Power and Down keys together until the temperature appears on the screen. Use the Up/Down keys to configure the new temperature. Press A to confirm settings. Press the Power button once to turn the thermostat back ON. The thermostat has a reset function to restore all settings to their factory defaults. To perform a factory reset, press and hold the Power button to turn the thermostat OFF. Press and hold the Power and Up keys together until the LCD powers up. When the icons have disappeared from the screen, the thermostat has been successfully reset.
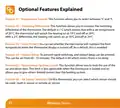
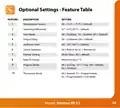
  • Page 32: Optional features explained Feature 01 - Temperature format: This function allows you to select between °C and °F. Feature 02 – Switching differential: This function allows you to increase the switching differential of the thermostat. Feature 03 – Frost protect: You can set whether the thermostat will maintain the frost temperature when the thermostat display is turned off. Feature 04 – Output delay: To prevent rapid switching, an output delay can be entered. Feature 05 – Temperature up/down limit: This function allows you to limit the use of the up and down keys. Feature 06 – Air sensor selection: You can select which sensor should be used - built-in sensor or remote air sensor.
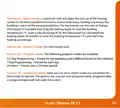
  • Page 33: Optimum start will delay the start up of the heating system to the latest possible moment to avoid unnecessary heating and ensure the building is warm at the programmed time. The thermostat uses the rate of change information to calculate how long the heating needs to raise the building temperature 1°C. The following program modes are available: 5/2 day programming, 7 day programming, and 24 hours. 5/2 day programming offers 4 levels for weekdays and 4 different levels for the weekend. 7 day programming provides 4 levels for each day. 24 hours programming includes 4 levels over a 24-hour period. You can set the thermostat to operate in manual, programmable, or programmable with hot water time clock mode. Model: Slimline-RF V3
  • Page 34: Adjusting the optional settings involves several steps. Press and hold the Power button to turn the thermostat off. Press and hold the Clock key until the display appears. Use the Clock key to cycle through the features. Use the Up/Down keys to change the setting. Press A to confirm settings. Press the Power button once again to turn the thermostat back on.
  • Page 35: Temperature format options include Celsius and Fahrenheit, with Celsius as the default. Switching differential settings range from 01° to 03°C, with 01°C as the default. Frost mode can be enabled or disabled, with enabled as the default setting. Output delay can be set from 00 to 15 minutes, with 00 as the default. Up/down limit settings range from 00° to 10°C, with 00°C as the default. Sensor selection includes built-in air or remote air, with built-in air as the default. Preheat setting can be adjusted from 00 to 03 hours, with 00 as the default. Rate of change indicates the minutes required to raise the temperature by 1°C. Program mode options include manual, programmable, or programmable with hot water, with manual as the default. The model is Slimline-RF V3.
  • Page 36: Page 36