
Home > CLIMATE MASTER > CLIMATE MASTER CXM2 Communicating Awc Thermostat Installation Guide
CLIMATE MASTER CXM2 Communicating Awc Thermostat Installation Guide


iGATE 2 COMMUNICATING (AWC) THERMOSTAT – IOM
Installation
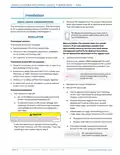
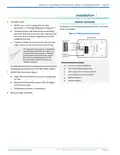
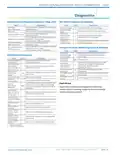
6. Connect wires.
WIRING DIAGRAM
a. Match your wire configuration to the
terminals on the base. Reference Diagram 1.
All excess wire should be pushed back into the wall
as far as possible.
b. Connect each wire individually by pushing
down on the quick connect tab, inserting the
wire into the connector opening, and then
releasing the tab.
Figure 1: Thermostat Connections
Thermostat
Unit Control
R or 24V
c. If remote indoor and/or outdoor sensors are
used, they may be connected at this time.
A+
A+
B-
B-
C
R
TIP: Use pliers to straighten wire before
inserting into new base. Be sure to cut
any excess wire so that the insulation
extends to the terminal block. When
the wire is installed properly to the
terminal block, there should be no
copper exposed.
C or Gnd
S1
S2
Remote
Sensor
Thermostat Connections
A+ Communications (Positive)
B– Communications (Negative)
22 AWG shielded wire is required when installing a
remote sensor further than 100 feet (30.5 meters).
C
R
24 V Common for Control Circuit
24 V Supply for Control Circuit
Remote Sensor
7. Attach the thermostat face.
a. Align the thermostat face using hinge guide
on top.
S1
S2
Remote Sensor
b. Rotate the thermostat down until tab aligns
with hole in base.
c. Install security screw if necessary.
8. Return power to system.
Part#: 97B0132N01 | Revised: Februar y 06, 2025
PAG E : 5
w w w. c l i m a te m a s te r. c o m

| General | Details |
|---|---|
| Name | CLIMATE MASTER CXM2 Communicating Awc Thermostat Installation Guide |
| Make | CLIMATE MASTER |
| Language | English |
| Filetype | PDF (Download) |
| File size | 1.03 MB |
 (1 votes, average: 5.00 out of 5)
 Loading...


White-Rodgers 1F97-1277 Big Blue Single Stage Thermostat User Manual

Drayton Wiser Smart Room Thermostat Instruction Manual

Honeywell TH6320WF2003 Lyric T6 Pro Wi-Fi Programmable Thermostat User Guide

OJ ELECTRONICS UTN-4991 Non Programmable Thermostat Owner’s Manual

Honeywell TH2320WF4011 FocusPRO Smart S200 Series Thermostat User Guide

Honeywell TH4110U Thermostat Installation Guide

Aprilaire S86WMUPR Programmable Wi-Fi Multi Stage Universal Thermostat Installation Guide

GENERAL HT250 Smart Room Thermostat User Manual

tecnoswitch TE300ME Mechanical Thermostat User Guide

Danfoss 014G0013 Z Wave Radiator Thermostat Installation Guide