Home > Honeywell > Honeywell TH4110U Thermostat Installation Guide

Honeywell TH4110U Thermostat Installation Guide
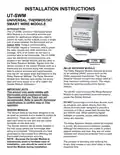
INSTALLATION INSTRUCTIONS  
UT-SWM  
UNIVERSAL THERMOSTAT  
SMART WIRE MODULE  
INTRODUCTION:  
The UT-SWM, Universal Thermostat Smart  
Wire Module is an innovative and low-cost  
solution for applications where you need to  
control as many as five outputs across a single  
pair of wires between the thermostat and an  
indoor AHU. Today’s communicating  
thermostats require a “common” wire to power  
the radio module and other electronics. On  
average, 30% of all homes do not have a  
common wire at the thermostat. The UT-SWM  
uses two advanced microprocessors; one  
located in the Sender Module and the other in  
the Relay Receiver Module. Signals from the  
device connect to the sender Module such as a  
thermostat are encoded along with checksum  
data to ensure accuracy and superimposed  
onto the 24 volt signal wires that transmit to the  
Relay Receiver Module. The Relay Receiver  
Module then decodes and verifies the binary  
data and turns relays on or off to match the  
Sender Module information.  
RECEIVER MODULE  
UT-SWM  
Sender Module  
SENDER MODULE  
RELAY RECEIVER MODULE  
The Relay Receiver Module receives its power  
by an external 24VAC source such as the  
HVAC equipment transformer. The Relay  
Receiver Module contains five relays rated at 1  
Amp maximum switching current. The relays  
mimic the switched inputs of the Sender  
Module.  
IMPORTANT NOTE:  
The 24VAC used to power the Relay Receiver  
Module is also transmitted down two wires to  
power the Sender Module.  
This product only works reliably with  
thermostats using mechanical relays.  
Thermostats that use Triacs are not  
recommended. Refer to specific thermostat  
specifications to confirm relay or Triac  
operation.  
DO NOT power high current draw devices such  
as actuators and valves directly from this  
device as it has been designed to provide a  
maximum of 0.5A to power field devices that  
are 500mA max. When switching higher  
voltages or currents, proper rated isolation  
relays are required.  
SENDER MODULE:  
The Sender Module has been designed to be  
as small as possible and is sealed to protect its  
electronics. There are eight color coded, 6”  
lead input wires on one end and two screw  
terminals on the other end.  
The Relay Receiver Module should be installed  
in a cool, dry environment wherever possible.  
Although the electronics are coated to protect  
against moisture and dust, they are not water  
resistant and should be protected from a harsh  
environment.  
The Sender Module can be easily installed in  
the wall cavity behind the thermostat after  
wiring is completed. This prevents any heat  
generated by the module from affecting the  
thermostat’s temperature accuracy.  
NOTE - Because the Sender Module is  
intentionally small to facilitate ease of  
installation, care should be used to not  
bend the Module during installation.  
The process of decoding and verifying the  
binary data creates a very short delay in relay  
response time.  
GeneralDetails
NameHoneywell TH4110U Thermostat Installation Guide
MakeHoneywell
LanguageEnglish
FiletypePDF (Download)
File size0.59 MB
Download PDF
1 Star2 Stars3 Stars4 Stars5 Stars (1 votes, average: 5.00 out of 5)
Loading...
Honeywell T6 Pro Programmable Thermostat User Manual
Honeywell D1-528 Direct Thermostat Installation Guide
Honeywell FocusPRO P200 Programmable Thermostat User Guide
Honeywell RCHT8610WF Series Smart Thermostat Installation Guide
Honeywell T9 Smart Thermostat Installation Guide
Honeywell TH2320WF4011 FocusPRO Smart S200 Series Thermostat User Guide
Honeywell TL116A Thermostat Installation Guide
T10 Pro Smart Thermostat with Redlink Room Sensor
Honeywell TH6320WF2003 Lyric T6 Pro Wi-Fi Programmable Thermostat User Guide
Honeywell RTH9580 Wi-Fi Color Touchscreen Programmable Thermostat User Guide

Honeywell TH4110U Thermostat Installation Guide
Get the free PDF manual for the Honeywell TH4110U Thermostat Installation Guide and access setup steps, usage instructions, and troubleshooting tips. 👉 View online or download now to keep your thermostat running smoothly!

Honeywell TH4110U Manual: Questions and Answers

Honeywell TH4110U specifications

Power supply24VAC +/- 20%
Power consumption0.15mA (No Relays)
Warranty1 Year

Full specifications, page 2

What is the maximum switching current rating for each relay in the Honeywell TH4110U?

Each of the five relays is rated at 1 Amp maximum switching current. Installation Guide, p. 1

How do I install the Sender Module of the UT-SWM behind my thermostat?

After wiring is complete, place the sealed Sender Module in the wall cavity behind the thermostat to prevent its heat from affecting temperature accuracy.

  1. Complete all wiring connections to the module's color-coded input wires and screw terminals.
  2. Position the module in the wall cavity behind the thermostat location.
  3. Handle carefully to avoid bending the intentionally compact module. Installation Guide, p. 1

Can I power high current draw devices like actuators and valves directly from the UT-SWM?

No. The device supplies maximum 0.5A for field devices rated 500mA max. For higher voltages or currents, use properly rated isolation relays. Installation Guide, p. 1

How do I wire the 24VAC and common connections on the UT-SWM Sender Module?

Connect the red 24VAC wire and black common wire to the two screw terminals on the Sender Module. Installation Guide, p. 1

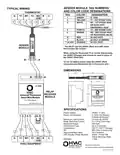
What does each color-coded wire on the UT-SWM Sender Module represent?

Wire ColorTerminal Tag and Function
GreenG - Fan
YellowY1 - 1st Stage Cool
WhiteW1 - 1st Stage Heat or Auxiliary/Emergency Heat
PurpleY2 - 2nd Stage Cool
BrownW2 - 2nd Stage Heat or Reversing Valve
RedR - 24VAC (Hot)

Installation Guide, p. 2

Should the UT-SWM Relay Receiver Module be installed in a specific environment?

Install the Relay Receiver Module in a cool, dry environment whenever possible. Although electronics are coated against moisture and dust, they are not water resistant and must be protected from harsh conditions. Installation Guide, p. 1

More Honeywell thermostat manuals