Home > nVent RAYCHEM > nVent RAYCHEM Green Leaf Programmable Thermostat Instruction Manual
nVent RAYCHEM Green Leaf Programmable Thermostat Instruction Manual


Green Leaf
Programmable Thermostat for Electrical Floor Heating
Installation Instruction

| General | Details |
|---|---|
| Name | nVent RAYCHEM Green Leaf Programmable Thermostat Instruction Manual |
| Make | nVent RAYCHEM |
| Language | English |
| Filetype | PDF (Download) |
| File size | 0.43 MB |


nVent RAYCHEM ETS-05 Electronic Thermostat Instruction Manual

nVent RAYCHEM RAYSTAT-EX-02 Mechanical Thermostat Installation Guide

nVent RAYCHEM Elexant 3500i Electronic Thermostat Installation Guide

nVent RAYCHEM RayStat-M2 Thermostat Instruction Manual

nVent RAYCHEM AT-TS-13 Surface Sensing Thermostat Instruction Manual

nVent RAYCHEM SENZ Wifi Programmable Floor Heating Thermostat User Guide

nVent RAYCHEM GM-TA Thermostat Instruction Manual

nVent RAYCHEM Green Leaf Programmable Thermostat Instruction Manual Overview
Summary of Contents
- Page 1: Green Leaf Programmable thermostat for electrical floor heating Installation instruction
- Page 2: Description Mounting and installation Using the thermostat The display Display in manual on/off programme Display in timer programme Setting the clock Programming the timer programme Installer menu Troubleshooting This appliance can be used by children aged from 8 years and above and persons with reduced physical, sensory or mental capabilities or lack of experience and knowledge if they have been given supervision or instruction concerning use of the appliance in a safe way and understand the hazards involved.
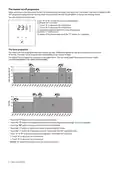
- Page 3: Connect the electrical power supply, the sensor, and the cold lead of the electrical floor heating system to the Green Leaf according to the electrical diagram. If you connect heating cables exceeding 13A for constant wattage or 10A for self-regulating cables, you must use a contactor with an integrated suppression device. For the earth connection of the floor heating, you must use a separate earth terminal connection block. Click the Green Leaf into the metallic support frame. Switch on the power again. The thermostat is compatible with nVent RAYCHEM QuickNet, T2Blue, T2Green, T2Black, and T2Red heating solutions. Self-regulating heating cables have an inrush current when the floor is cold. To guarantee the life time of the thermostat, the maximum load of the self-regulating application in nominal conditions is limited to 10A. A 13A self-regulating load will reduce the life time of the relay contacts and the installation will not be covered by the Total Care Warranty.
- Page 4: Using the thermostat The display Display in manual on/off programme The following icons are visible in the Manual ON/OFF. Active sensor display Heating display The heating display is flashing when the heating is on. Temperature The temperature on the display depends on the selected sensing mode. Installer menu Display in timer programme The actual day is displayed on the screen with the 3 letters.
- Page 5: The manual on/off programme allows the thermostat to start in manual mode using floor sensing. To switch from manual to timer programme, touch the designated button once. The Green Leaf can be programmed with four events per day, allowing different temperatures for each event. Days can be programmed independently or in clusters. The default timer programme can be adapted to user needs. Touch the button to set the clock and day of the week. Touch for three seconds to program the timer programme. Touch for five seconds to enter the installer menu. The adapted temperature remains valid until the next timer event. To switch off the thermostat, touch the button for two seconds.
- Page 6: Setting the clock involves touching the designated button to set the clock and day of the week. You can change the hours and minutes by touching the respective buttons. Validation is done by touching the designated button after each change. In case of battery drainage after a power failure, reprogramming the clock may be necessary. Programming the timer programme requires holding the button for three seconds. You can choose the day or sequence of days to program and validate your selection. Day sequences include individual days and combinations of days. For each event, you can change the hours, minutes, and temperature, validating each change. The same actions for event 1 must be repeated for events 2, 3, and 4. You can save changes and return to the timer programme at any time during programming. The complete procedure can be repeated to program other days or sequences of days.
- Page 7: Installer menu allows access to various settings. Touch the button for 5 seconds to enter the installer menu. Sensing mode selection includes floor sensing mode and room sensing mode. Display options include 12 or 24 hours format. Motion sensor activates display when approached within 5cm. Calibration offsets for floor and room sensors can be adjusted. Minimum and maximum temperature set points for floor and room sensors are configurable. Adjustable hysteresis and open window function settings are available. Calibration of floor sensor and room sensor can be performed using specific menus. Use a thermometer to ensure accurate calibration of sensors.
- Page 8: Troubleshooting In the event of damage or malfunction of one of the temperature sensors, the heating output cuts off and an error code is displayed. Error codes include: - ER1: Short circuit on floor sensor - ER2: Open circuit on floor sensor / Missing floor sensor - ER3: Short circuit on room sensor - ER4: Open circuit on room sensor - ER5: Occurs if the thermostat is set in Room Sensing Mode with the floor sensor installed. The floor sensor can be replaced, but if the room sensor malfunctions, the entire thermostat must be replaced. Technical Specification Supply voltage is 230VAC, +10%, –15%, 50Hz. Power consumption in standby is 3 VA with a maximum relay output of 230V and 13A resistive load. Ambient temperature for operation ranges from 0 to 40°C with 5-95% RH (non-condensing). Control modes include floor sensing, room sensing, room sensing with floor temperature limiter, and manual ON/OFF. Protection class is IP 21.
- Page 9: Page 9
- Page 10: Page 10
- Page 11: België / Belgique Italia Россия Bulgaria Lietuva/Latvija/Eesti Serbia and Montenegro Česká Republica Magyarország Schweiz / Suisse nVent reserves the right to change specifications without notice.

MODINE DFG Mild Temperature Thermostat Installation Guide

ENGO CONTROLS E901-RF Programmable Wireless Thermostat Instruction Manual

sensi 1F96U-42WF Series Touch 2 Smart Thermostat Installation Guide

GENERAL HT250 Smart Room Thermostat User Manual

SIEMENS TH192 HC Heating-Cooling Room Thermostat Instruction Manual

75F HyperStat All In one Commercial Thermostat User Manual

Lightwave DTS92E Honeywell Home Wireless Room Thermostat User Manual

REPTIZOO TC04 Timing Thermostat Instruction Manual

Vtech E-Smart W960 Thermostat Instruction Manual

network thermostat NetX X-Series Ethernet Thermostat Owner’s Manual