
Home > Pro1 Technologies > Pro1 Technologies T855iSH Wall Thermostat Instruction Manual
Pro1 Technologies T855iSH Wall Thermostat Instruction Manual
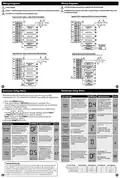
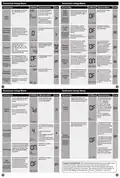
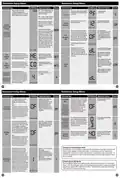
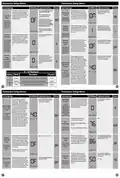
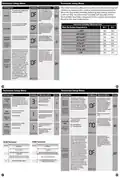
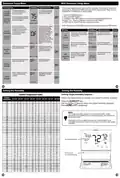
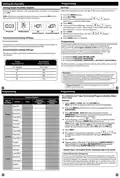
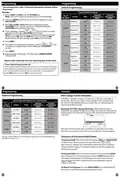


Technician Setup Menu
Technician Setup Menu
Tech Setup Steps
LCD Will Show Adjustment Options
Default
Tech Setup Steps
LCD Will Show Adjustment Options
Default
Keypad lockout with code
creation is displayed when
Keypad Lockout Code is turned on
(Basic, Partial or Full is selected).
OFF= Code is disabled and the
lock icon is used to lock and
unlock the display.
This feature allows you to display
temperatures in either Fahrenheit
or Celsius.
0000
˚F for Fahrenheit
˚C for Celsius
o
˚F or ˚C
˚F
F
ON = Create a 4 digit code that
locks and unlocks the display.
F OR C SET
You can select either a 12 or 24
hour clock setting.
Use the or key to
select 12 or 24 hour clock.
NOTE: In this tech setting, the
clock field will show all four
characters as 0s, with the first
0 blinking.
12 or 24
Hour Clock
Keypad
Lockout Code
Creation
12H
OFF
12
CLOCK SET
Select the numbers of the
code by using the
The pre-occupancy fan settings
will energize the fan before the
occupied time to provide ventila-
tion prior to scheduled occupancy
time periods. This feature only
You can select the
0000
and
pre-occupancy fan from OFF,
1, 2, or 3 hours. If 1, 2, or 3
is selected, the fan will turn
on that many hours prior to
the scheduled occupied time
period.
(Only displayed
if keypad lockout
is set to Basic,
buttons and switch between
numbers by using the “next”
and “previous”buttons. After
DONE is pressed, the created
code will be saved and will be
needed to activate or deacti-
vate keypad lockout functions.
The master code is 7761. The
master code will override any
created keypad lock code.
Pre
Occupancy
Fan
Partial, or Full)
OF
shows if the technician setup step
for time periods is set to 2C or 4C.
Use the and buttons to
adjust.
PRE-OCC FAN
The display light can be
configured to stay on all the
time or turn on when any key
is pressed. There are LOW and
HIGH selections for continuous ON
selection.
Use the and buttons
to select OFF, LOW, or HIGH.
KEY CODE
dL
OFF configures the display
light to come on when the
light key or any button is
pressed.
This feature allows you to set a
Heat
Setpoint
Limit
Use the or
key to
ALWAYS ON LIT
maximum heating setpoint limit.
The setpoint temperature cannot
be raised above this value.
select the maximum heat
setpoint and the minimum
cooling setpoint.
HE
90˚F
44˚F
HEAT LIMIT
LOW configures the display
light to stay on at a low
intensity constantly. When a
button is pressed, the display
light will transition to high
intensity.
This feature allows you to set a
minimum cooling setpoint limit.
The setpoint temperature cannot
be lowered below this value.
Use the or key to
select the minimum cooling
setpoint.
Cool
Setpoint
Limit
Display
Light
LOW
CO
COOL LIMIT
HIGH configures the display
light to remain on at high
intensity all the time.
This feature will select a
Use the and
buttons to select 0, 1, 2, 3,
4, 5 and 6.
temporary hold time frame for
the programmable mode of the
thermostat. When the setpoint
is changed, the thermostat will
enter into a temporary hold for
the number of hours selected
from this tech setting.
Temporary
Hold Hours
4
(Only displayed if
program option is
set to 5d or 7d)
4
dL
HARDWIRE ONLY
TEMP HOLDERS
2
1
22
Technician Setup Menu
Technician Setup Menu
Tech Setup Steps
LCD Will Show Adjustment Options
Default
Tech Setup Steps
LCD Will Show Adjustment Options
Default
Use the and buttons
to select ON or OF.
This feature allows you to put
your phone number in the
display. You can choose ON or
OFF.
If selected ON, you will see
the input screen after
pressing NEXT STEP. Use the
or button to select
the desired number and
the FAN or SYSTEM key to
move from one character to
another. See note below for
operation.
When this feature is enabled, the
economizer terminal is energized
in the WAKE, RETURN, SLEEP or
OCCUPIED time periods. This
Economizer
Mode
(This feature
cannot be used
Notes:
feature will remain disabled if
programming is OFF (0D). This
with non-
If contractor call number is selected
ON, the phone number entered will
show in the display if there has been a
continuous call for heating or cooling
for 24 hours or if the light button is
held down for 3 seconds. To remove
the phone number from the display,
hold the light button down for 3
seconds.
Contractor
Call Number
OFF
OF
OF
feature will use one of the
programmable
OFF
configurable terminals (O/B) to
PTAC mode, three
connect to the economizer.
stages of cool,
fresh air, of free
cooling mode)
ECONOMIZER
This setting provides the option to
select a terminal for Economizer
functions. The selected terminal
cannot be used for reversing valve
operations when the heat pump
setting is turned on.
Use the and buttons
to select O/B.
PHONE NUMBER
Economizer
Terminal
Designation
(Only displayed
if economizer is
turned on)
O
This feature will configure the
fan to run a selected number of
cycles per hour. Note: This mode
can be enabled or disabled at
anytime during normal operation
by selecting IAQ mode with the
fan key. Turning this feature on
Select OFF, 1, 2, 3 or 4 with the
or buttons. This sets
the number of cycles per hour
that the IAQ fan mode will
operate.
O
5
B
ECON TERMINAL
This setting selects the minimum
number of minutes that the fresh
air damper will be energized.
Use the and buttons
to select 5, 10, 15, 20, 25,
30, 35, 40, 45, 50, 55 or 60
IAQ Mode
Cycle
shows IAQ option in fan key.
OFF
Fresh Air
Minutes
OF
40
Notes:
minutes.
This programmable/selectable mode
will operate the fan 1-4 cycles per
hour, 1-45 minutes per cycle. Once
programmed in tech setup, to enable
this mode select “IAQ”with the fan
key. Disable this mode by selecting
“ON”or “AUTO”with the fan key.
FRESH AIR MIN
IAQ MODE CYCL
Contractor Call Number Note
This allows you to select the
minimum number of minutes
that the fan will run per IAQ
Select 1, 5, 10, 15, 20, 30 or
45 minutes.
When IAQ fan mode is
enabled, it will ensure the
fan runs at least the selected
number of minutes per IAQ
Mode Cycle.
If contractor call number is selected ON, the phone number entered will
show in the display if there has been a continuous call for heating or
cooling for 24 hours or if the light button is held down for 3 seconds. To
remove the phone number from the display, hold the light button down
for 3 seconds.
mode cycle. The thermostat will
keep track of fan runtime from
normal heat and cool operation. If
additional fan runtime is needed,
the thermostat will run the fan to
satisfy the IAQ mode minutes.
Notes: This programmable/selectable
mode will operate the fan 1-4 cycles
per hour, 1-45 minutes per cycle. Once
programmed in tech setup, to enable
this mode select “IAQ”with the fan
key. Disable this mode by selecting
“ON”or “AUTO”with the fan key.
This step will not appear if
previous step is set to “OFF”.
1
IAQ Minutes
Per Cycle
1
A Note about IAQ Mode
This programmable/selectable mode will operate the fan 1-4 cycles per
hour, 1-45 minutes per cycle. Once programmed in tech setup, to enable
this mode select “IAQ”with the fan key. Disable this mode by selecting
“ON”or “AUTO”with the fan key.
IAQ MODE MIN
23
24

| General | Details |
|---|---|
| Name | Pro1 Technologies T855iSH Wall Thermostat Instruction Manual |
| Make | Pro1 Technologies |
| Language | English |
| Filetype | PDF (Download) |
| File size | 0.59 MB |
 (1 votes, average: 5.00 out of 5)
 Loading...

Pro1 Technologies Pro1 T701i WiFi Thermostat Installation Guide

Pro1 Technologies T751 Non-Programmable Digital Thermostat Instruction Manual


VIMAR 30810.G View Wireless Connected Dial Thermostat Instruction Manual

SIEMENS RDH100RF/SET Wireless Room Thermostat with LCD User Guide

Danfoss Heating Solutions WT-T BasicPlus2 Room Thermostat Installation Guide

LATICRETE Strata Heat WiFi Thermostat Instruction Manual

vtech T961NN50 Universal Wired Thermostat User Guide

TECH CONTROLLERS EU-T-4.1n, EU-T-4.2n Wireless Thermostat User Manual

Thermafloor TF1 Programmable Radiant Floor Thermostat User Manual

sinope Smart Low Voltage Thermostat TH1400WF Installation Guide

Honeywell TC300 Commercial Thermostat Instruction Manual

REGIN RCFD-230C Fan Coil Room Thermostat Instructions