
Home > nVent RAYCHEM > nVent RAYCHEM RAYSTAT-EX-02 Mechanical Thermostat Installation Guide
nVent RAYCHEM RAYSTAT-EX-02 Mechanical Thermostat Installation Guide


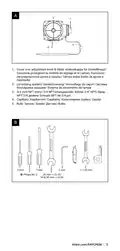






5. Установочный винт, который
крепит крышку, должен не
затрагивать крышку.
3. Instale o prensa-cabo, fixe-o no
lugar com firmeza e termine o
cabo de acordo com os padrões
requeridos.
6. Закройте крышку вручную.
4. Conecte o cabo como mostrado.
7. Затяните установочный винт,
который крепит крышку.
5. Certifique-se de que o parafuso de
retenção sem cabeça da tampa
permaneça afastado da tampa.
8. Если необходимо, подсоедините
внешнюю клемму заземления,
которая входит в комплект
поставки.
6. Feche a tampa com a mão
7. Aperte o parafuso de retenção
sem cabeça
ВНИМАНИЕ! Установочный винт,
который крепит крышку, должен
быть полностью затянут, чтобы
соответствовать требованиям
монтажа во взрывоопасной зоне.
ПРОВЕРЬТЕ: На месте ли
уплотнение кабельного ввода
(прокладочное кольцо). Прочность
затяжки гаек и корпуса сальника
кабельного ввода.
8. Onde necessário, conecte o
terminal de terra externo fornecido
AVISO: Certifique-se de que o
parafuso de retenção sem cabeça
seja apertado totalmente para
satisfazer os requisitos de aprovação
para área perigosa.
VERIFIQUE SE: O prensa-cabo (anel
isolante) está no lugar. O corpo
do prensa-cabo e as porcas estão
apertados com firmeza.
PORTUGUÊS
As conexões do cabo são contínuas.
1. Certifique-se de que o parafuso de
retenção sem cabeça da tacmpa
está frouxo, mas preso na placa.
2. Remova a tampa usando uma
chave de porca, se necessário.
14
|
nVent.com/RAYCHEM

| General | Details |
|---|---|
| Name | nVent RAYCHEM RAYSTAT-EX-02 Mechanical Thermostat Installation Guide |
| Make | nVent RAYCHEM |
| Language | English |
| Filetype | PDF (Download) |
| File size | 0.31 MB |
 (1 votes, average: 5.00 out of 5)
 Loading...

nVent RAYCHEM ETS-05 Electronic Thermostat Instruction Manual

nVent RAYCHEM Elexant 3500i Electronic Thermostat Installation Guide

nVent RAYCHEM RayStat-M2 Thermostat Instruction Manual

nVent RAYCHEM Green Leaf Programmable Thermostat Instruction Manual

nVent RAYCHEM AT-TS-13 Surface Sensing Thermostat Instruction Manual

nVent RAYCHEM SENZ Wifi Programmable Floor Heating Thermostat User Guide

nVent RAYCHEM GM-TA Thermostat Instruction Manual


PRO1 T731W Wireless PTAC Non-Programmable Thermostat Installation Guide

Honeywell Home DT4 Channel Wired Room Thermostat Instruction Manual
Robertshaw RS8210 Thermostat Installation Guide

tuya MTS700N Wireless Thermostat User Manual

hama 00176592 Smart Radiator Thermostat Instruction Manual

EUROSTER 2006TXRX Wireless Programmable Thermostat Installation Guide

Honeywell RTH8500 Wifi Thermostat User Manual

thermokon JOY SR 5DO Electronic Fancoil Thermostat User Guide

SALUS RT100 Electronic Room Thermostat Instruction Manual

EPH Controls TRFPi2 Programmable RF Thermostat Instruction Manual