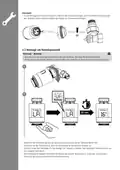
11. Press And Hold The Control Dial(In The App, Press 'add Secondary Device' → Confirm With 'led Is Already Flashing' → In The 'find Device' Screen In The App → The Search Takes Around 15 Seconds → Press 'done' Once Your Thermostats Have Been Found)
Get the free PDF manual for the hama 00176592 Smart Radiator Thermostat Instruction Manual and access setup steps, usage instructions, and troubleshooting tips. 👉 View online or download now to keep your thermostat running smoothly!
Page 2: Operating instructions Thank you for choosing a Hama product. Take your time and read the following instructions and information completely. Please keep these instructions in a safe place for future reference. If you sell the device, please pass these operating instructions on to the new owner. Controls and displays Control dial / On/Off button LED display WLAN connection Explanation of warning symbols and notes Risk of electric shock This symbol indicates a risk of electric shock from touching product parts carrying hazardous voltage. Warning This symbol is used to indicate safety instructions or to draw your attention to specific hazards and risks. Note This symbol is used to indicate additional information or important notes.
Page 3: Package contents 1 x radiator thermostat 2 x AA batteries 1 x adapter set WIFI heating control Add-On (00176592), Starter kit (00176593) 2 x radiator thermostats 1 x central control unit 4 x AA batteries 2 x adapter sets 1 x USB power supply unit
Page 4: Safety instructions The product is intended for private, non-commercial use only. Use the product only for the intended purpose. Protect the product from dirt, moisture and overheating and use it in dry rooms only. The product is intended only for use inside buildings. Only use the article under moderate climatic conditions. As with all electrical products, this device should be kept out of the reach of children. Do not operate the product outside the power limits specified in the technical data. Do not use the product in a damp environment and avoid splashing water. Do not modify the product in any way. Doing so voids the warranty. Do not open the device or continue to operate it if it becomes damaged.
Page 5: Getting started Inserting / changing the batteries Warning - Batteries When inserting batteries, note the correct polarity. Do not short-circuit batteries. Do not charge batteries. Do not burn batteries. Keep batteries out of the reach of children. Only use batteries that match the specified type. Remove the batteries from products that are not being used for an extended period. Remove spent batteries from the product and dispose of them without delay. Avoid storing, charging and using in extreme temperatures and at extremely low atmospheric pressures. Insert two new batteries of type AA, ensuring the correct polarity.
Page 6: Fitting the adapter Thanks to the union nut, the thermostat can be fitted to all valves with the thread dimensions M30 x 1.5 mm from the most common brands. With the adapters included in the extent of delivery, the device can also be fitted to radiator valves of type Danfoss RA, Danfoss RAV, Caleffi, and Giacomini. To fit the attachments, please follow the instructions below for the respective part. While fitting, ensure that the pins inside the adapter cover the same position as the notches on the valve. Fully attach the adapter appropriate for your valve. During fitting, you may need to use a screwdriver and bend the adapter slightly in the area of the screw bushing. On Danfoss RAV valves, the tappet extension must be placed on the valve pin before fitting. Please place the Caleffi adapter directly on the valve.
Page 7: To fit the Giacomini adapter, please first attach the top piece, then place the tappet extension on the valve pin, and then finally secure the piston to the thermostat. Never apply force during the fitting process. This can damage your device. Ensure that the radiator is switched off and has cooled down before starting to fit any attachments. Place the thermostat straight on the valve and tighten the union nut. Fit the thermostat so that the LED indicator remains visible for you. Press the control dial. The LA display starts to flash. The radiator thermostat now carries out an adaptation run. Once the adaptation run has been carried out, the display shows the current temperature. If it does not, carry out the above steps again.
Page 8: Fitting the central control unit involves several important steps. Only operate the product from a socket that has been approved for the device. Disconnect the product from the power supply using the On/Off switch or unplug the power cord. Ensure that the total power consumption of all connected devices does not exceed the power strip's maximum throughput rating. If not using the product for a prolonged period, disconnect it from mains power. Connect the enclosed micro-USB cable to the micro-USB socket and the USB power supply unit. Connect the power supply unit to a properly installed and easily accessible mains socket. The LEDs will start to flash once connected. To install the app, download the Hama Smart Solution app using the QR code. Follow the provided link for more information on the app.
Page 9: Integrating devices into the Hama Smart Solution app involves pairing the central control unit. To pair the radiator thermostat, first integrate the central control unit into the app. Ensure the central control unit is connected to the power supply and the LEDs are flashing. Open the app and select My home at the bottom left-hand edge of the screen. Tap the + at the top right-hand edge of the screen and select the category Heating control. Confirm in the app that the central control unit is flashing. Enter the name of your WiFi network and the password, then confirm with OK. Once successfully connected, the red LED lights up solid and the app confirms the connection. You can assign a different name to the central control unit if desired. Touch Done to complete the procedure.
Page 10: Now connect the radiator thermostats with the central control unit. To do this, select your central control unit in the app from the list of found devices. The following screen appears: radiator thermostat pairing. Turn the control dial on the radiator thermostat to the left until the display shows OF. The OF becomes visible if you look at the display from the direction of the control dial. If no OF appears, turn the dial in the opposite direction. If the display goes out, turn the dial slightly until the display lights up again.
Page 11: Press and hold the control dial for around 5 seconds until the OF display goes out and - - appears. In the app, press Add secondary device. Confirm with LED is already flashing. In the Find device screen in the app, you will now see all of the thermostats that the central control unit could find. The search takes around 15 seconds. Over large distances or if the connection is poor, this process may take up to 2 minutes. Press Done once your thermostats have been found.
Page 12: You can now rename your thermostats if you wish to by pressing on the pen symbol next to the device name. Press Done to end the integration process. Slide the Activate button at the bottom edge of the screen from right to left to enable the radiator thermostat control. You can now set and configure your radiator thermostat using the app. For simple temperature setting, there are four different operating modes available under Program for each day of the week. This gives you the option of pre-setting the temperature of your radiator automatically at various times of the day. Under Settings, you can activate the limescale protection, anti-frost protection, window open detection, child safety and temperature calibration functions. If the radiator valve is not opened for two or more weeks, this can cause limescale to build up in the valve. If the temperature falls below 5°C, the thermostat automatically activates the heating. If a window is opened while the heating is on, the radiator thermostat automatically stops the heating process if the temperature falls rapidly.
Page 13: Child safety Press and hold the control dial for approximately 5 seconds to activate the child safety function. LC appears in the display. Child safety can be disabled by pressing the control dial for 5 seconds. Temperature change during an operational heating program When a heating program is active, the temperature can be changed manually by turning the control dial. The manual change of temperature remains active until the next change of program mode. If the program mode then becomes active, the manual temperature is overridden. To immediately return the radiator thermostat to the temperature set in the heating program, press twice on the control dial while the display is lit up. On/Off If the temperature is set at <5°C, OF appears in the display. If the temperature is set at >30°C, ON appears in the display. If the thermostat has a wireless connection to the central control unit, this is shown in the display. Alarm If an error occurs in the sensor, Er appears in the display. Low battery alarm If the battery voltage is low, the symbol appears in the controller display. The app notifies the user about the low battery level via a push message. For frost protection reasons, the controller opens the valve 100%. New version (V2) For frost protection reasons, the controller opens the valve 30%. Once a low battery voltage is reached, it is strongly recommended that the batteries are replaced to ensure smooth operation. Outward mode Outward mode can be activated in the app. As soon as this is activated, LH appears on the display. If this mode is active, the set temperature is automatically dialled down to 16°. Display turning First move the dial to the OF position. Then, by pressing the control dial 5 times, the display can be rotated around 180°. Note - Pairing restart Press and hold the button on the central control unit for around 5 seconds. You can, as described in Section 4.6, start a further pairing attempt. Thermostat restart Press and hold the control dial on the radiator thermostat for around 5 seconds until - - appears on the LED display. You can now, as described in Section 4.6, start a further pairing attempt.
Page 14: Control via voice assistants The following voice commands are supported: Switch on / off Alexa / OK Google, switch the heating on Adjust the temperature Alexa / OK Google, set the heating to 25 degrees Alexa / OK Google, set the heating five degrees warmer Extended usage options with scenarios Scenarios and automated sequences that can be created in the app allow various combination options and usage options for these products. Programming is always carried out via the app and will be offered / suggested to you on an individual basis.
Page 15: Technical data Power supply to the central control unit Power supply to the radiator thermostat Connection of the radiator thermostat 5V 1A 2 x AA batteries M30 x 1.5
Page 16: Care and maintenance requires disconnecting the device from the mains before cleaning. Only clean the product with a slightly damp, lint-free cloth and avoid aggressive cleaning agents. Hama GmbH & Co KG assumes no liability for damage from improper installation, use, or failure to observe instructions. Contact Hama Product Consulting for questions about the product. Electrical and electronic devices and batteries must not be disposed of with household waste. Consumers must return devices and batteries to designated collection points or points of sale at the end of their service lives. Recycling and reusing materials contribute to environmental protection. Hama GmbH & Co KG declares compliance with Directive 2014/53/EU for specific radio equipment types. The frequency band for the equipment is 2.4 GHz. Maximum radio-frequency power transmitted is less than 100mW.
Page 17: Bedienungsanleitung Vielen Dank, dass Sie sich für ein Hama Produkt entschieden haben. Bedienungselemente und Anzeigen umfassen Drehregler, Ein/Aus-Taste, LED-Display, WLAN-Verbindung, Mode, Heizphase, niedriger Batteriestand, Temperatur, blaue Status LED, rote Status LED, Reset/Pearing und Micro USB Buchse. Nehmen Sie sich Zeit und lesen Sie die folgenden Anweisungen und Hinweise zunächst ganz durch. Bewahren Sie diese Bedienungsanleitung an einem sicheren Ort auf, um bei Bedarf darin nachschlagen zu können. Sollten Sie das Gerät veräußern, geben Sie diese Bedienungsanleitung an den neuen Eigentümer weiter. Erklärung von Warnsymbolen und Hinweisen umfasst die Gefahr eines elektrischen Schlages. Dieses Symbol weist auf eine Berührungsgefahr mit nicht isolierten Teilen des Produktes hin. Warnung wird verwendet, um Sicherheitshinweise zu kennzeichnen oder um Aufmerksamkeit auf besondere Gefahren zu lenken. Hinweis wird verwendet, um zusätzliche Informationen oder wichtige Hinweise zu kennzeichnen.
Page 18: Packungsinhalt 1x Heizkörper Thermostat 2x AA Batterien 1x Adapter-Set WIFI HEATING CONTROL Add-On (00176592), Starter kit (00176593) 2x Heizkörper Thermostate 1x Zentrale 4x AA Batterien 1x USB-Netzteil
Page 19: Sicherheitshinweise Das Produkt ist für den privaten, nicht-gewerblichen Haushaltsgebrauch vorgesehen. Verwenden Sie das Produkt ausschließlich für den dazu vorgesehenen Zweck. Schützen Sie das Produkt vor Schmutz, Feuchtigkeit und Überhitzung und verwenden Sie es nur in trockenen Räumen. Das Produkt ist nur für den Gebrauch innerhalb von Gebäuden vorgesehen. Benutzen Sie das Produkt nicht in Bereichen, in denen elektronische Produkte nicht erlaubt sind. Lassen Sie das Produkt nicht fallen und setzen Sie es keinen heftigen Erschütterungen aus. Nehmen Sie keine Veränderungen am Produkt vor. Dadurch verlieren Sie jegliche Gewährleistungsansprüche. Halten Sie Kinder unbedingt von dem Verpackungsmaterial fern, es besteht Erstickungsgefahr. Entsorgen Sie das Verpackungsmaterial sofort gemäß den örtlich gültigen Entsorgungsvorschriften. Öffnen Sie das Produkt nicht und betreiben Sie es bei Beschädigungen nicht weiter.
Page 20: Inbetriebnahme Batterien einlegen/wechseln Beachten Sie unbedingt die korrekte Polarität der Batterien und legen Sie diese entsprechend ein. Bei Nichtbeachtung besteht die Gefahr des Auslaufens oder einer Explosion der Batterien. Verwenden Sie ausschließlich Akkus oder Batterien, die dem angegebenen Typ entsprechen. Reinigen Sie vor dem Einlegen der Batterien die Batteriekontakte und die Gegenkontakte. Entfernen und entsorgen Sie verbrauchte Batterien unverzüglich aus dem Produkt. Mischen Sie alte und neue Batterien nicht, sowie Batterien unterschiedlichen Typs oder Herstellers. Vermeiden Sie Lagerung, Laden und Benutzung bei extremen Temperaturen und extrem niedrigem Luftdruck. Legen Sie zwei neue Batterien vom Typ AA ein und achten Sie dabei auf korrekte Polarität. Warten Sie ca. 30 Sekunden bis die Anzeige „LA“ dauerhaft leuchtet. Das Thermostat kann nun am Heizkörper montiert werden.
Page 21: Montage des Adapters Das Thermostat kann an allen Ventilen mit dem Gewindemaß M30 x 1,5 mm der gängigsten Hersteller montiert werden. Mit den im Lieferumfang enthaltenen Adaptern ist das Gerät auf Heizkörperventile vom Typ Danfoss RA, Danfoss RAV, Caleffi und Giacomini montierbar. Achten Sie bei der Montage darauf, dass die Zapfen im Inneren des Adapters eine deckungsgleiche Position zu den Einkerbungen am Ventil haben. Setzen Sie den zu Ihrem Ventil passenden Adapter vollständig auf. Bei der Montage verwenden Sie ggf. einen Schraubendreher und biegen den Adapter im Bereich der Schraubendurchführung leicht auf. Nach dem Aufrasten auf den Ventilkörper befestigen Sie die Adapter mit der beiliegenden Schraube und Mutter. Auf Ventile des Typs Danfoss RAV muss vor der Montage die Stößelverlängerung auf den Ventilstift aufgesetzt werden. Den Caleffi-Adapter bitte direkt auf das Ventil setzen.
Page 22: Für die Montage des Giacomini-Adapters bitte erst den Aufsatz befestigen, dann die Stößelverlängerung auf den Ventilstift setzen und abschließend den Kolben am Thermostat befestigen. Wenden Sie bei der Montage keine Gewalt oder hohe Kräfte an. Dies kann Ihr Gerät beschädigen. Achten Sie darauf, dass der Heizkörper ausgeschaltet und abgekühlt ist, bevor Sie mit der Montage beginnen. Setzen Sie das Thermostat gerade auf das Ventil auf und ziehen Sie die Überwurf-Mutter fest. Montieren Sie das Thermostat so, dass die LED-Anzeige für Sie weiterhin sichtbar ist. Drücken Sie auf den Drehregler. Die Anzeige „LA“ beginnt zu blinken. Das Heizkörper-Thermostat führt nun eine Adaptier-Fahrt durch. Nach erfolgreicher Adaptier-Fahrt zeigt das Display die aktuelle Temperatur an. Sollte dies nicht erfolgen, führen Sie die zuvor beschriebenen Schritte erneut durch.
Page 23: Montage Zentrale Betreiben Sie das Produkt nur an einer dafür zugelassenen Steckdose. Die Steckdose muss in der Nähe des Produktes angebracht und leicht zugänglich sein. Trennen Sie das Produkt mittels des Ein-/Ausschalters vom Netz – wenn dieser nicht vorhanden ist, ziehen Sie die Netzleitung aus der Steckdose. Achten Sie bei Mehrfachsteckdosen darauf, dass die angeschlossenen Verbraucher die zulässige Gesamtleistungsaufnahme nicht überschreiten. Trennen Sie das Produkt vom Netz, wenn Sie es längere Zeit nicht benutzen. Verbinden Sie das beiliegende Micro-USB-Kabel mit der Micro-USB-Buchse und dem USB-Netzteil. Verbinden Sie das Netzteil mit einer ordnungsmäßig installierten und leicht zugänglichen Netzsteckdose. Die LEDs beginnen zu blinken. Installation der App Laden Sie die App „Hama Smart Solution“ mithilfe des QR-Codes herunter und installieren Sie diese.
Page 24: Einbinden von Geräten in die Hama Smart Solution App Um das Heizkörper-Thermostat mit der Hama Smart Solution App zu verbinden, müssen Sie zuerst die Zentrale in die Hama Smart Solution App einbinden. Achten Sie darauf, dass die Zentrale an das Stromnetz angeschlossen ist und die LEDs blinken. Öffnen Sie die App und wählen Sie am unteren linken Bildschirmrand „Mein Zuhause“. Berühren Sie anschließend am oberen rechten Bildschirmrand „+“ und wählen Sie die Kategorie „Heizungssteuerung“. Bestätigen Sie in der App, dass die Zentrale blinkt. Geben Sie anschließend den Namen Ihres WiFi Netzwerks und das Passwort ein. Bei erfolgreicher Verbindung leuchtet die rote LED dauerhaft und die App bestätigt, dass die Zentrale verbunden wurde. Nun können Sie ihr noch einen eigenen Namen geben. Berühren Sie „Fertigstellung“. Der Vorgang wird abgeschlossen.
Page 25: Verbinden Sie nun die Heizkörper-Thermostate mit der Zentrale. Wählen Sie hierfür in der App aus der Liste der gefundenen Geräte Ihre Zentrale. Es wird folgender Bildschirm angezeigt: Pairing Heizkörper Thermostat. Drehen Sie den Drehregler des Heizkörper-Thermostats solange nach links, bis das Display dauerhaft „OF“ anzeigt. Das „OF“ wird sichtbar, wenn Sie aus der Richtung des Drehreglers auf das Display schauen. Erscheint kein „OF“, drehen Sie den Regler in die andere Richtung. Erlischt das Display, drehen Sie leicht am Drehregler, sodass das Display wieder aufleuchtet.
Page 26: Drücken und halten Sie den Drehregler für ca. 5 Sekunden, bis die Anzeige „OF“ erlischt und „- -“ sichtbar wird. Drücken Sie in der App auf „Untergerät hinzufügen“. Bestätigen Sie mit „LED blinkt bereits“. Im folgenden „Gerät suchen“-Bildschirm in der App werden Ihnen nun alle Thermostate angezeigt, die die Zentrale finden konnte. Die Suche dauert ca. 15 Sekunden. Bei großer Entfernung oder schlechter Verbindung kann dieser Vorgang bis zu 2 Minuten dauern. Drücken Sie auf „Fertigstellung“, wenn Ihre Thermostate gefunden wurden.
Page 27: Sie haben nun die Möglichkeit, Ihre Thermostate umzubenennen, wenn Sie auf das Stift-Symbol neben dem Gerätenamen drücken. Drücken Sie auf „Fertigstellung“, um den Einbindungsprozess zu beenden. Schieben Sie den Aktivieren-Button am unteren Bildschirmrand von rechts nach links, um die Steuerung des Heizthermostats freizuschalten. Sie können nun Ihr Heizkörper-Thermostat mithilfe der App einstellen und konfigurieren. Zur einfachen Temperatureinstellung stehen Ihnen unter „Programm“ für jeden Tag vier verschiedene Betriebsmodi zur Verfügung. Dadurch haben Sie die Möglichkeit, die Temperatur Ihres Heizkörpers zu verschiedenen Uhrzeiten des Tages automatisch voreinzustellen. Unter Einstellungen können die Funktionen Kalkschutz, Anti-Frost-Schutz, Fenster-Auf-Erkennung, Kindersicherung und Temperaturkalibrierung aktiviert werden. Wird das Heizkörper-Ventil innerhalb von zwei Wochen oder länger nicht geöffnet, kann dies zu Verkalkungen des Ventils führen. Im Aus-Modus wird auf dem Display angezeigt. Wird während des Heizens ein Fenster geöffnet, beendet das Heizkörper-Thermostat automatisch das Heizen, wenn die Temperatur schnell sinkt.
Page 28: Kindersicherung Drücken und halten Sie den Drehregler für ca. 5 Sekunden, um die Kindersicherung zu aktivieren. Im Display wird „LC“ angezeigt. Deaktivieren Sie die Kindersicherung, indem Sie den Drehregler für 5 Sekunden gedrückt halten. Temperaturänderung während laufendem Heiz-Programm Bei aktivem Heiz-Programm kann die Temperatur durch Drehen des Drehreglers manuell geändert werden. Im Display blinkt kurz. Die manuelle Änderung der Temperatur bleibt bis zur nächsten Änderung des Programmmodus aktiv. Wird kein angezeigt, befindet sich das Thermostat im manuellen Modus. Um das Heizkörper-Thermostat sofort auf die im Heiz-Programm eingestellte Temperatur zurückzusetzen, drücken Sie bei leuchtendem Display zweimal auf den Drehregler. An/Aus Wenn für die Temperatur <5°C eingestellt ist, wird im Display „OF“ angezeigt. Wenn für die Temperatur >30°C eingestellt ist, wird im Display „ON“ angezeigt. Das Thermostat hat zwei Modi. Der Programmmodus wird im Display angezeigt. Alarm Tritt ein Fehler am Sensor auf, wird im Display „Er“ angezeigt. Niedriger-Akkustand-Alarm Ist die Batteriespannung niedrig, wird das Symbol am Display des Reglers angezeigt. Die App informiert per Pushnachricht über den niedrigen Batteriestand. Ist die Batteriespannung sehr niedrig, beginnt das Symbol am Display des Reglers zu blinken. Neue Version (V2) Aus Frostschutzgründen öffnet der Regler das Ventil zu 30%. Sobald eine niedrige Batteriespannung erreicht ist, wird dringend empfohlen die Batterien zu wechseln. Auswärts-Modus Der Auswärts-Modus kann in der App aktiviert werden. Ist dieser Modus aktiv, wird die eingestellte Temperatur automatisch auf 16° heruntergeregelt. Display-Drehen Zuerst den Regler in OF Stellung bringen, danach kann durch 5-maliges Drücken des Drehreglers das Display um 180° gedreht werden. Hinweis – Pairing-Neustart Drücken und halten Sie bei der Zentrale für ca. 5 Sekunden die Taste. Drücken und halten Sie beim Heizkörper-Thermostat für ca. 5 Sekunden den Drehregler bis „- -“ auf der LED-Anzeige dargestellt wird.
Page 29: Steuerung über Sprachassistenten Es stehen folgende Sprachbefehle zur Verfügung: An-/Ausschalten Temperatur einstellen Erweiterte Nutzungsmöglichkeiten durch Szenen Durch Szenen und Automationen, die in der App angelegt werden können, ergeben sich viele Kombinations- und Nutzungsmöglichkeiten dieser Produkte. Die Programmierung erfolgt immer über die App und wird Ihnen individuell angeboten/vorgeschlagen.
Page 30: Technische Daten Stromversorgung Zentraleinheit Stromversorgung Heizkörper-Thermostat Anschluss Heizkörper-Thermostat 5V 1A 2x AA Batterien M30 x 1,5
Page 31: Wartung und Pflege Trennen Sie das Gerät vor der Reinigung und bei längerem Nichtgebrauch vom Netz. Reinigen Sie dieses Produkt nur mit einem fusselfreien, leicht feuchten Tuch und verwenden Sie keine aggressiven Reiniger. Haftungsausschluss Die Hama GmbH & Co KG übernimmt keinerlei Haftung oder Gewährleistung für Schäden, die aus unsachgemäßer Installation, Montage und unsachgemäßem Gebrauch des Produktes resultieren. Service und Support Bitte wenden Sie sich bei Fragen zum Produkt gerne an die Hama-Produktberatung. Entsorgungshinweise Elektrische und elektronische Geräte sowie Batterien dürfen nicht mit dem Hausmüll entsorgt werden. Der Verbraucher ist gesetzlich verpflichtet, elektrische und elektronische Geräte sowie Batterien am Ende ihrer Lebensdauer an den dafür eingerichteten, öffentlichen Sammelstellen oder an die Verkaufsstelle zurückzugeben. Konformitätserklärung Hiermit erklärt die Hama GmbH & Co KG, dass der Funkanlagentyp [00176592, 00176593] der Richtlinie 2014/53/EU entspricht. Frequenzband/Frequenzbänder 2,4 GHz Abgestrahlte maximale Sendeleistung < 100mW