SALUS WQ610RF Wireless Slim Programmable Thermostat Installation Guide
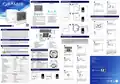

Button Functions
WQ610RF Wiring Diagram
8
7
WQ610 / WQ610RF Thermostat
WQ610RF Receiver
VOLT FREE
Receiver
WQ610 / WQ610RF
TX thermostat
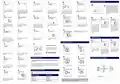
If you select NO, thermostat will use
dafult settings and revert to normal
screen.
Once you have properly connected your
thermostat with the OpenTherm terminals
the OT message will be shown on the
screen. For more Opentherm details, go
to the Opentherm: Configuration section.
5
7
6
8
OPENTHERM
2
3
1
4
1. MENU - enter the menu options, press and hold
for 3 seconds to return to main screen without
saving changes.
5. ON - When in Manual Mode, ON will
turn the boiler on.
6. OFF - When in Manual Mode, OFF
will turn the boiler off.
7. AUTO - Receiver operates in automatic
mode according to the thermostat.
8. MANUAL - Receiver output is
controlled by the On/Off slide switch.
Accessing Advanced Settings Menu
TX thermostat
Receiver
Advanced Settings allow the installer / landlord to adjust the thermostat to suit individual installation
requirements. Do not adjust the settings unless you are competent to do so. The Advanced Settings may be
locked by the creation and activation of a 4 digit PIN code. Please keep your PIN safe and secure.
2. DOWN
-
through the menus.
decrease the temperature and move
3. UP - increase the temperature and move through
the menus.
2
1
4. TICK
-
confirm changes and enter menus.
Press and hold for 3 seconds to exit User Menu
and save changes. Press and hold to cancel
BOOST feature or temporary override (whilst in
normal screen).
230 V
Installer’s Quick Guide
N
L
LCD Icon Description
TX thermostat
COM
NO
Introduction
Press MENU.
Using UP or DOWN, navigate to Advanced
submenu and press TICK.
1
2
3
4
The SALUS QuantumWQ610 andWQ610RF thermostats are Boiler Plus compatible thermostats,
designed specifically to control central heating boilers and also in the case of the RF versions,
electrical panel heaters. They have our new load compensation (ITLC) software with Volt free
switch and also Opentherm 4.0 connections, so you can choose the method of control to suit
your boiler / installation. Please note that the Boilers need to have an OpenTherm Association
license to be fully compatible with WQ610 range(should you wish to connect to the OpenTherm
terminals A and B). Please verify if this requirement is met with your Boiler Manufacturer.
MAX
16 (5) A
4
3
N
L
Please ensure the boiler has 230 V switching before wiring in this way.
13
12
11
Power Up and Configuration
5
The WQ610RF thermostat contains a re-chargeable Lithium battery. When the battery level
is below 10%, the thermostat will display “PLEASE RE-CHARGE BATTERY”. Please re-charge
for a full 24 hours using a standard Micro USB charger. Thermostat operation will not be
affected during the charging period
Product Compliance
Press TICK to enter Daylight Saving Time
Menu.
Using UP or DOWN, select ON or OFF.
Press TICK to confirm.
10
9
8
7
6
This product complies with the essential requirements and other relevant provisions of the following EU
Directives:RED:2014/53/EUandRoHS2011/65/EU.FulltextoftheEUDeclarationofConformityisavailableon:
1. Menu/Settings description
2. Clock 24hr/AM/PM
3. Temperature unit
7. Holiday mode indicator
8. Temporary override mode
9. Settings icon
6
5
WQ610RF: 2405-2480MHz; <14dBm
4. Heating indicator (icon is animating
when there is heating demand)
5. RF Connection indicator
6. Current Temperature / Setpoint
Temperature
10. Battery indicator
11. Schedule program number
12. Schedule mode icon
13. Day indicator/ SET information
1
2
Safety Information
Use in accordance with national and EU regulations. Use the device as intended, keeping it in
a dry condition. Product is for indoor use only. Installation must be carried out by a qualified
person in accordance with national and EU regulations.
WQ610 Thermostat Terminals Description
Press TICK to select the type of heating
control you prefer.
ITLC helps to improve system efficiency
and end user comfort. Default is ITLC
Radiators (disabled if Opentherm
connected). Press TICK to confirm or
DOWN to see the next option.
WARNING! Always ensure the AC mains power is switched off before installing or working
on any components.
Terminal
Description
A/B
NO
OpenTherm Communication Wires only
Volt free connection (Switch)
Volt free connection (Common)
Supply (230 V AC)
To activate thermostat, press TICK button
for 3 seconds (RF version) only.
Language ”ENGLISH” is flashing, press
UP or DOWN, choose your language, then
TICK to confirm.
Technical Specification
COM
L;N
WQ610
Thermostat
WQ610RF
Thermostat
Head Office:
SALUS Controls
Units 8-10
Northfield Business Park
Forge Way
Parkgate
Rotherham
S60 1SD
Email: sales@salus-tech.com
3
4
Thermostat supply
230V AC
Lithium Battery (Rechargable)
WQ610RX Receiver Terminals Description
Thermostat rating max
OpenTherm terminals
3 (1) A
A / B
-
-
Terminal
B / A
Description
Voltage free
OpenTherm Communication Wires only
Volt free connection (Switch)
Volt free connection (Common)
Supply (230 V AC)
Outputs
-
NO / COM terminals
NO
Temperature range
5°C – 35°C
0.5°/ 0.1°C
0.5°C
5°C – 35°C
0.5°/0.1°C
0.5°C
COM
Using UP or DOWN, choose the time
format between 24 hr and 12 hr format.
Using UP or DOWN, set the hour and
then press TICK, which will then move
to minutes, that can be changed in the
same way.
Thermostat display accuracy
Thermostat display resolution
ErP control class
L; N
Class V
Class V
WQ610 Wiring Diagram
Radio Frequency
--
2.4 GHz
5
6
DO NOT connect to OpenTherm terminals unless your boiler is OpenTherm Association approved and
has the OpenTherm Logo.
Dimension [mm]
86 x 86 x 27 [mm]
86 x 86 x 11[mm]
SALUS Controls is a member of the Computime Group.
WQ610 Receiver
Maintaining a policy of continuous product development SALUS Controls plc reserve
the right to change specification, design and materials of products listed in this brochure
without prior notice.
Receiver supply
Receiver rating max
OpenTherm terminals
Outputs
230 V AC
16 (5) A
A / B
Using UP or DOWN, set the month and
then press TICK, which will then move
to days, that can be changed in the same
way.
Using UP or DOWN, set the year and then
press TICK.
Voltage free NO / COM terminals
2.4 GHz
Radio frequency
Dimension [mm]
Issue Date: Feb 2020
V007
98 x 98 x 32[mm]

| General | Details |
|---|---|
| Name | SALUS WQ610RF Wireless Slim Programmable Thermostat Installation Guide |
| Make | SALUS |
| Language | English |
| Filetype | PDF (Download) |
| File size | 1.16 MB |
 (1 votes, average: 5.00 out of 5)

SALUS IT800 WIFI Smart Thermostat Installation Guide

SALUS 091FLRF Wireless Room Thermostat User Guide

SALUS Thermostat Sensor TS600 User Guide

SALUS Thermostat and Smart Plug Installation Guide

SALUS Wired Thermostat Installation Guide

SALUS Wired Digital Thermostat – Non-programmable HTRS230 User Manual

SALUS RT520 Radiator Thermostat User Guide

SALUS Programmable Wired Thermostat VS30W/VS30B Installation Guide

SALUS RT310 Thermostat User Manual

SALUS Thermostat RT520 User Manual

SALUS WQ610RF Wireless Slim Programmable Thermostat Installation Guide Overview
Summary of Contents
- Page 1: Button functions include MENU, ON, OFF, AUTO, and MANUAL. The WQ610 and WQ610RF thermostats are designed to control central heating boilers and electrical panel heaters. The thermostat contains a rechargeable Lithium battery that should be charged for 24 hours when the battery level is below 10%. Advanced settings allow adjustments to suit individual installation requirements and may be locked with a 4-digit PIN code. Safety information states that the device should be used in accordance with national and EU regulations and installed by a qualified person. The product complies with essential requirements of EU Directives, including RED and RoHS. Thermostat operation can be affected by the connection to OpenTherm terminals, which require the boiler to be OpenTherm Association approved. The display allows for the selection of time format and setting of hours and minutes. Warnings indicate that AC mains power must be switched off before installation or maintenance. The document includes technical specifications such as temperature range, display accuracy, and dimensions.
- Page 2: The pairing between the thermostat and the receiver is already done at the factory. However, should you need to re-pair the units then this can be done using the User Menu. Before pairing, the Receiver should be unplugged, then plugged back in. During the pairing process, the distance between the Thermostat and the Receiver should be at least 1m. This option is only for electrical radiators. To change the settings for DHW and/or CH - press MENU and go to ADVANCED SETTINGS. This option will allow you to lock your advanced settings using your access PIN. Using UP or DOWN, enter the PIN code number. Turn the receiver OFF and ON twice to reset. Your thermostat will indicate that the connection has been tested successfully and will return to normal operation. OpenTherm is a method of control used by modern heating systems. If an Opentherm fault is detected on the boiler, the thermostat will display the above messages.

sensi Lite Zigbee Smart Thermostat Installation Guide

Beca BAC-003 Smart ZigBee Thermostat User Guide

GENERAL LIFE MITRA 260S RF Digital Room Thermostat User Manual

emos P5616OT Wireless Thermostat Instruction Manual

Dimplex X3D Wireless Programmable Thermostat Instruction Manual

GENERAL LIFE MITRA 250S Digital Room Thermostat User Manual

VIVE COMFORT TP-S-755 Cool Programmable Thermostat Instruction Manual

Roth 1135006445 Wireless Room Thermostat Touchline 230 V Instruction Manual

PRO1 T701 Digital Non Programmable Thermostat Instruction Manual

Sygonix 2735095 Wireless Indoor Thermostat Instruction Manual