SALUS WQ610RF Wireless Slim Programmable Thermostat Installation Guide
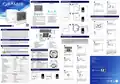

WQ610RF: Pairing with the Receiver
8
19
20
7
1
2
1
The pairing between the thermostat and the
receiver is already done at the factory. However,
should you need to re-pair the units then this can
be done using the User Menu. The link may also
be tested from the User Menu to show pairing link
has been successful. Before pairing, the Receiver
should be unplugged, then plugged back in.
During the pairing process, the distance between
the Thermostat and the Receiver should be
at least 1m.
ON
This option is only for electrical radiators.
Press TICK to confirm or DOWN to see the
next option.
This is
a
simple ON/OFF algortihm
This screen display will be displayed
when OT is connected. To change the
settings for DHW and/or CH - press
MENU and go to ADVANCED SETTINGS.
Using UP or DOWN, navigate to HW
SETPOINT and press TICK.
Press TICK and enter installer’s phone
number using UP and DOWN buttons.
Allows you to create a PIN which may
be used to limit access to your settings.
Using UP or DOWN, create your PIN ac-
cess, then TICK to confirm.
AUTO
control based on the set point. Using UP
or DOWN, you can select the SPAN value.
Press TICK to confirm or DOWN to go to
next option.
22
21
9
10
3
4
2
4
3
Using TICK, then UP and DOWN you can
select FROST value . (5 - 17 degrees C).
Press TICK to confirm or DOWN to see the
next option.
Using TICK, then UP and DOWN you can
set the maximum and the minimum
room temperature.
This option will allow you to lock your
advanced settings using your access
PIN. Using UP or DOWN, create your lock
advanced settings, then TICK to confirm.
Using UP or DOWN, enter the PIN code
number. Press TICK to confirm every
digit.
Press TICK to enter menu. Using UP or
DOWN, set the maximum opentherm
central heating temperature.
Turn the receiver OFF and ON
twice to reset. Ensure receiver
switches are ON and AUTO.
Red LED should be flashing.
Enter thermostat MENU and
scroll down until you will see
“PAIR WITH RECEIVER” option.
Select YES to proceed with
Pairing.
Now your thermostat is
looking for the receiver. A 10
minute counter will appear on
the screen.
Upon connecting to the
receiver, the thermostat will
display the message “PAIRING
SUCCESSFUL” and return to
normal operation afterwards.
The red LED will stop flashing
when the pairing is successful.
Using UP or DOWN, adjust the
temperature and then press TICK.
12
23
24
11
5
Using UP or DOWN, set the value then press TICK for 3
sec to confirm and exit to main screen.
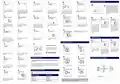
WQ610RF: Testing Link
If you think that the temperature
displayed on the thermostat is not
accurate due to its location, you can
calibrate it using this menu with values
between -3.5 / +3.5 degree.
This will start your boiler early to impro-
ve energy saving.
This option will allow you to set the
displayed temperature accuracy .
The temperature display accuracy can
be 0.5 or 0.1
2
3
1
OpenTherm related errors:
13
14
25
Temporary Manual Override
1
2
For overriding the schedule to bring the
HEAT on, use the UP button to increase the
temperature and press TICK to accept the
change.
Now your thermostat is
sending a TEST message to the
receiver with the expectation
of receiving a response. While
testing, both red and green
LED will be intermittently
flashing.
Enter MENU and scroll down
until you find „TEST LINK”
option. Press TICK button to
continue.
Your thermostat will indicate
that the connection has been
tested successfully and will
return to normal operation.
This setting will be valid until
the next scheduled program.
This will stop your boiler early to improve
energy saving.
Press TICK to allow installer or landlord
to set service reminder and lock
temperature level.
Use your created PIN to lock access
to advanced settings menu.
SERVICE REQUEST ERROR
LOCKOUT RESET ERROR
3
4
15
16
OpenTherm: Configuration
Additional installation notes for WQ610:
This menu will only be visible if your boiler is OpenTherm compatible and you have connected to
terminals A and B.
OpenTherm is a method of control used by modern heating systems. Instead of switching a boiler on and off at
intervals, modulating control allows the amount of heat provided by the boiler to be controlled to match the
varying demand from the thermostat. This means the customer has greater system efficiency, energy saving
and room comfort from our heating controls.
LOW WATER PRESSURE ERROR
GAS FLAME FAULT ERROR
Using UP or DOWN, you can select YES
and press TICK to confirm,or you can
select NO and go to point 20.
Using UP or DOWN, select the number of
days service alert should last for.
Greifen Sie
OBEN UND
UNTEN
5
6
zum
Trennen der
beiden Teile
Temperature Values for Opentherm
17
18
Please note that below values can be manually set only if the boiler allows it.
CH (Central Heating)
MIN TEMP: 25 °C
HW (Hot Water)
MIN TEMP: 40 °C
AIR PRESSURE FAULT ERROR
WATER OVER TEMPERATURE ERROR
MENUE /
Using UP or DOWN, select the warning
period before the service alert will be
activated, then press TICK.
MAX TEMP: 80 °C
MAX TEMP: 80 °C
Using UP or DOWN, select the lock
temperature and then press TICK.
If an Opentherm fault is detected on the boiler, the thermostat will display the above
messages. These errors are not related to the thermostat.
DEFAULT TEMP: 75 °C
DEFAULT TEMP: 60 °C
| General | Details |
|---|---|
| Name | SALUS WQ610RF Wireless Slim Programmable Thermostat Installation Guide |
| Make | SALUS |
| Language | English |
| Filetype | PDF (Download) |
| File size | 1.16 MB |


SALUS IT800 WIFI Smart Thermostat Installation Guide

SALUS 091FLRF Wireless Room Thermostat User Guide

SALUS Thermostat Sensor TS600 User Guide

SALUS Thermostat and Smart Plug Installation Guide

SALUS Programmable Wired Thermostat VS30W/VS30B Installation Guide

SALUS Wired Thermostat Installation Guide

SALUS Wired Digital Thermostat – Non-programmable HTRS230 User Manual

SALUS RT520 Radiator Thermostat User Guide

SALUS RT310 Thermostat User Manual

SALUS Thermostat RT520 User Manual


namron 4512737 Touch Zigbee 16A Thermostat Instruction Manual

DEVI 532 Electronic Thermostat Installation Guide

KETOTEK KT3200 Plug In Thermostat Day Night Temperature Controller Instruction Manual

Honeywell Home ElitePRO S1200 Smart Thermostat User Guide

Haswill Electronics AL8010H Thermostat User Guide

Danfoss CET B-RF ATC Cylinder Thermostat Installation Guide

STELPRO ST302P Programmable Electronic Thermostat Owner’s Manual

HITACHI ATW-RTU-11 Wireless Thermostat Instruction Manual

LUXPRO PSD111+ Series Thermostat Instruction Manual

EUROTRONIC Sparmatic COMET Programmable Energy-Saving Radiator Thermostat User Manual