Home > SALUS > SALUS Thermostat RT520 User Manual

SALUS Thermostat RT520 User Manual

RT520 THERMOSTAT - FULL USER MANUAL  
GeneralDetails
NameSALUS Thermostat RT520 User Manual
MakeSALUS
LanguageEnglish
FiletypePDF (Download)
File size1.76 MB
Download PDF
1 Star2 Stars3 Stars4 Stars5 Stars (1 votes, average: 5.00 out of 5)
Loading...
SALUS IT800 WIFI Smart Thermostat Installation Guide
SALUS 091FLRF Wireless Room Thermostat User Guide
SALUS Thermostat Sensor TS600 User Guide
SALUS Thermostat and Smart Plug Installation Guide
SALUS Programmable Wired Thermostat VS30W/VS30B Installation Guide
SALUS Wired Thermostat Installation Guide
SALUS Wired Digital Thermostat – Non-programmable HTRS230 User Manual
SALUS RT520 Radiator Thermostat User Guide
SALUS RT310 Thermostat User Manual
SALUS iT500 Internet Thermostat Installation Guide

SALUS Thermostat RT520 User Manual

Get the free PDF manual for the SALUS Thermostat RT520 User Manual and access setup steps, usage instructions, and troubleshooting tips. 👉 View online or download now to keep your thermostat running smoothly!
SALUS Thermostat RT520 User Manual Overview

Summary of Contents

  • Page 1: RT520 thermostat - full user manual
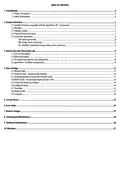
  • Page 2: Introduction Product compliance Safety informations Product overview Example of boilers compatible with the OpenTherm OT+ 4.0 protocol Package content Proper thermostat location Connection description Before you start (first power up) LCD icon description Button description First power up sequence and configuration User settings Manual mode Schedule mode - programming schedule BOOST mode - hourly temperature override (+Hr) Control and Heat/Cool settings Time/Date Holiday mode Factory reset Error codes Battery change Cleaning and maintenance Technical informations Warranty
  • Page 3: Product overview The RT520 room thermostat switches the heating system on and off as necessary by sensing the air temperature. Turning a room thermostat to a higher setting does not make the room heat up any faster. The heating system will not work if a time switch or programmer has switched it off. The best way to set the room thermostat is to find the lowest comfortable temperature and leave it alone. Adjustments above the comfortable setting will waste energy and increase costs. Thermostatic radiator valves (TRVs) can allow for different temperatures in individual rooms. Room thermostats need a free flow of air to function properly and should not be obstructed. The thermostat is compatible with OpenTherm OT+ 4.0 version. OpenTherm protocol enables two-way communication between the heating boiler and the thermostat, increasing energy efficiency. Make sure your gas combi boiler is compatible with OT + 4.0 communication protocol.
  • Page 4: Example of boilers compatible with the OpenTherm OT+ 4.0 protocol includes various models from different companies. Vokera offers models such as E-Tec S, E-tec Plus, and Linea HE. Alpha Heating provides models like E-tec and Evoke. Viessmann has multiple models including Vitodens 100W and Vitodens 200-W. Vaillant features models like i25 and i29 Condensing Combination Boilers. Worcester offers Greenstar models, including CDi Classic and Highflow CDi. Intergas has models such as Rapid and Rapid Plus. Navien provides NCB and Avanta models. Ravenheat includes Quinta Pro and Gas 110 Eco. Vokera also has models like Verve and Vision System, which operate in heating mode only.
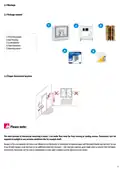
  • Page 5: Montage Package content RT520 thermostat Back housing 2x AA batteries Short instruction Mounting screws Proper thermostat location The ideal position for thermostat mounting is about 1.5m under floor level, far from heating or cooling sources. The thermostat cannot be exposed to sunlight or extreme conditions like drafts.
  • Page 6: Connection description Boiler connection Pump / Valve connection KL08NSB underfloor heating wiring center connection Boiler connection details include contacts for ON/OFF thermostat. Power supply is 230V. Voltage-free output is indicated by NO, COM, NC. OpenTherm communication wire is represented by A, B. 230V AC voltage output is denoted by SL. Maximum of 6 per zone for connections. Symbols explanation provides clarity on the components.
  • Page 7: Before you start (first power up) LCD icon description includes various indicators such as text bar, temperature unit, and heating mode status. The button description outlines the functions of each button, including MENU/RETURN, SELECT, UP, DOWN, BOOST, and MANUAL. The LCD screen can be activated by using any button.
  • Page 8: First power up sequence and configuration Make the receiver connections and power the receiver before inserting the batteries into the thermostat. After inserting the batteries, the thermostat will power up. Choose your language and then press to confirm. Set the time format and then press. Set the hour and then press. Set the year and then press. Set the month and then press. Set the minutes and then press. Set the day and then press. Select the week format and then press to confirm.
  • Page 9: - Press to confirm. - Enable or disable DST (Daylight Saving Time). - When OpenTherm is connected, the device software will automatically adjust to the OpenTherm settings. - Select your temperature accuracy.
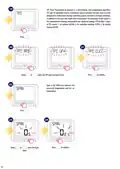
  • Page 10: TPI (Time Proportional & Integral) is a self-learning, time-proportional algorithm. TPI type of regulation ensures economical system operation through more accurate temperature maintenance during controlling process and limits overload conditions. The advantage of this system is the minimization of energy consumption and significant savings. RT520 offers 3 types of TPI control: for radiator, for underfloor heating, and for electric heating. Span is the difference between the measured temperature and the set temperature.
  • Page 11: The optimization function is an energy-saving algorithm used for efficient control of the heating device, ensuring better thermal comfort at certain times of the day. When the OPTIMUM START function is active, the thermostat sends a heating signal to the heat source beforehand so that the preset temperature in the room is reached at the time specified in the schedule. When the OPTIMUM STOP function is active, the thermostat, taking into account the inertia of the system, switches off the heat source earlier, keeping the temperature set in the schedule. The thermostat will go to the main screen.
  • Page 12: OpenTherm - Hot Water configuration RT520 can be configured in Hot Water OPENTHERM system. To configure it follow steps below: Press the button. Using the navigation buttons, navigate to the Hot Water submenu. Using the adjustment buttons, adjust the temperature and then press the button. The thermostat will return to the main screen. Press any button. The text bar indicates that hot water is in operation.
  • Page 13: User settings In manual mode, the thermostat maintains a constant temperature set by the user. A hand icon is displayed when manual mode is active. To set temperature use the appropriate button. Confirm your choice using the designated button. The thermostat will maintain the temperature until manual change or manual mode exit. To exit manual mode, press and hold the button for 3 seconds.
  • Page 14: Schedule mode allows users to set temperature setpoints for specific periods of time. Programmed schedules should utilize all time periods. Users can select the program type: 5+2 for working days and weekends, All for the entire week, or Individual for a daily schedule. Confirmation is required after selecting the program type. Users can set the hour and minutes for each schedule. Temperature settings can also be adjusted for each time period. The process should be repeated for all time periods.
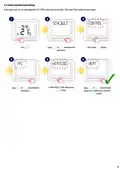
  • Page 15: Switching between manual and schedule mode allows users to control the thermostat settings. To switch modes, follow specific steps involving button presses. A hand icon indicates that the thermostat is in manual mode. Pressing and holding the button will revert the thermostat to schedule mode. The process involves a sequence of button presses and holding for a few seconds. Ensure to follow the steps carefully for successful mode switching. The manual mode provides direct control over the thermostat settings. Schedule mode allows for automated temperature adjustments. Understanding the mode switching process is essential for effective thermostat use. Users should familiarize themselves with the button functions for smooth operation.
  • Page 16: BOOST mode is an hourly temperature override function. It is available in both automatic and manual mode. The temperature can be changed for a specified number of hours, up to 9 hours. After the set time, the thermostat returns to the previous operating mode. Press the +Hr button to set the desired hour for BOOST mode. The thermostat will maintain the temperature setpoint for the specified duration. To stop BOOST mode, hold the button for 3 seconds or press +Hr until “+0” appears. Confirm the stop by pressing the button. Temporary override can be set by pressing the buttons multiple times. Confirm the temporary override by pressing the button.
  • Page 17: Control and heat/cool settings allow users to set the control algorithm and mode. Users can choose between TPI, SPAN, or Optimize. Steps include pressing a button to enter the settings. Navigation between parameters is done using specific buttons. Confirmation of the heat/cool option is required. Users can move between parameters to make selections.
  • Page 18: Landlord settings is a pin code protected feature that allows the landlord to set a service reminder on the thermostat. The first PIN code entry is also the setting of a new PIN code which must be entered each time to enter the landlord menu. Please remember to write down your pin code so that you can use the landlord menu later without any hassle. Using the menu, select ON to enable the service reminder. Select the due date and then press to confirm. Select the warning period and then press to confirm. Select the lock temperature and then press to confirm. To confirm and exit this option, use the appropriate button. Move to the next landlord options as needed. Enter the pin code to access landlord settings.
  • Page 19: - Using the controls, move to the MAX temperature setpoint value. - Confirm the selection and proceed to the next option. - The thermostat will revert to the SERVICE option. - To return to the main screen, wait 10 seconds or press the button. - Use the controls to set the correct MIN temperature setpoint value. - Confirm the selection to finalize the setting.
  • Page 20: To set time/date follow steps below: Press to enter Time/Date settings. Using or move between parameters. Using or choose to set the hour. Using or set the time format. Using or set the minutes. Using or set the day. Using or set the year. Using or set the month. Thermostat will go to the main screen with saving all the settings. Using or enable or disable DST (Daylight Saving Time).
  • Page 21: Holiday mode is a special program temperature setpoint which thermostat will maintain for specified days. To set holiday mode, press the appropriate button to enter the settings. Use the navigation buttons to move between holiday mode parameters. Set the year, month, and day for the start of holiday mode. Repeat the steps to set holiday mode’s final day. Set the hour and minutes for the holiday mode. To abort holiday mode, press any button and confirm holiday stop. The plane icon will disappear, and the thermostat will return to the previous work mode. According to the set period of time, the plane icon will appear on the main screen indicating holiday mode is active. Set the temperature to be maintained during holiday mode.
  • Page 22: To choose language follow steps below: Press to enter parameters. Using or move between language settings. Thermostat will go to the main screen with saving the changes. Press to confirm. Using or choose your language.
  • Page 23: Factory reset To reset the RT520 thermostat to its factory default settings, press and hold buttons for 5 seconds. The thermostat has been reset. User settings will not be deleted. Error codes The thermostat will display errors only when connected to the boiler by OPENTHERM terminals. Refer to the boiler manual for different error codes. Battery change Turn the thermostat over to access the back. Insert the batteries, paying attention to their polarity.
  • Page 24: Cleaning and maintenance The RT520 thermostat requires no special maintenance. Periodically, the outer casing can be wiped clean using a dry cloth. There are no user serviceable parts within the unit; any servicing or repairs could only be carried out by Salus Controls or their appointed agents. Technical informations Power supply: 2 x AA batteries. Rating max: OpenTherm (A / B) or voltage free relay (NC / COM / NO). Output signal: Temperature range 5 - 33.5°C. Display temperature accuracy: 0.1°C or 0.5°C. Control algorithm: TPI or Hysteresis: 0.25°C or 0.5°C. Communication: Wired. Dimension [mm]: 95 x 118 x 26.
  • Page 25: Warranty SALUS CONTROLS warrants this product to be free from any defects in material or workmanship and to perform as specified for a period of five years from the date of installation. SALUS CONTROLS reserves the sole responsibility for breach of this warranty by repairing or replacing the defective product. This product includes software that matches the distributor’s identification at the time of sale. The manufacturer/distributor provides a guarantee covering all functions and specifics of the product in accordance with this marking. The distributor’s warranty does not cover the correct operation of the functions and features available as a result of a product software update. The full warranty conditions are available at www.salus-controls.eu.
  • Page 26: Importer information is provided for QL Controls Sp. z o.o. Sp. k. The producer is Salus Limited, located in Hong Kong. SALUS Controls is part of the Computime Group. The company maintains a policy of continuous product development. Specifications, design, and materials may change without prior notice. The document version is 3, issued on 19 March 2021. The soft version is 2.2.