PURMO M16MI419 Advanced Thermostat Instruction Manual


EN MAINTENANCE MANUAL
ADVANCED THERMOSTAT
Reduced version
M16MI419 - A06-06/18

| General | Details |
|---|---|
| Name | PURMO M16MI419 Advanced Thermostat Instruction Manual |
| Make | PURMO |
| Language | English |
| Filetype | PDF (Download) |
| File size | 1.02 MB |


PURMO M16MI419 Advanced Thermostat Instruction Manual Overview
Summary of Contents
- Page 1: Maintenance manual for the advanced thermostat. This is a reduced version of the manual. Model number: M16MI419 - A06-06/18.
- Page 2: Operation Power ON/Standby mode Selecting the operating mode Boost feature Gauge consumption, energy savings Child anti-tamper, keypad lock/unlock 7 day and daily programme integrated, energy savings Open window detection, energy savings Restoring factory settings Technical specifications
- Page 3: Operation Power on/standby mode Buttons overview Press the button to put the device in operation, in Auto mode. The device makes 2 short beeps to notify that it is in operation, in Auto mode. Press the button to put the device in standby mode. The device makes 1 short beep to notify that it is in standby mode. The button allows you to adapt the operating schedule of your device to your needs. In Automatic Mode, the device will automatically change from Comfort mode to Eco mode. Important: In Auto, Comfort, Eco and Standby mode, backlight turns off automatically after 20 seconds. Your device has been programmed and is executing Comfort and Eco mode orders in line with the settings.
- Page 4: The Boost can stop for 2 different reasons. Orders sent by the pilot wire will only be applied in Auto mode. Comfort mode operates 24 hours a day to achieve the set temperature. Eco mode lowers the temperature without resetting the Comfort Mode temperature. Frost protection mode maintains a minimum temperature of 7°C to protect against cold weather. The Boost mode can be enabled at any time, regardless of the current operating mode. A comfort setting temperature lower or equal to 19°C is recommended. The device display indicates the energy consumption level with color codes. To activate Boost mode, press the designated button for the desired temperature setting. You can modify the Boost duration from 0 to the maximum authorized duration during the first minute.
- Page 5: Day and daily programme Integrated, energy savings Setting the comfort mode temperature Automatic programming with self-learning process You can access the Comfort temperature setup from the Auto and Comfort Mode. The device will analyze occupancy cycles to determine and implement a weekly programme. The algorithm will perpetually learn and adapt to changes in your occupancy patterns. The first week of operation is a learning week during which the device memorizes your habits. To ensure the auto-programming is optimized, ensure the presence detection sensor is not interrupted. When the product is in Frost protection mode or standby mode for more than 24 hours, learning and optimization stop.
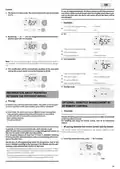
- Page 6: To change and/or allocate programmes, press the appropriate button. In day and daily programme mode, you can program your device by setting one of the five programmes for each day of the week. The device is delivered with the self-learning mode enabled, which will tailor itself to your occupancy cycles after an initial learning period. You can set the Comfort mode temperature to your required level. The Eco mode operates 24 hours a day with temperature-lowering parameters available for adjustment. P1 programme operates in Comfort mode from 06:00 to 22:00 and in Eco mode from 22:00 to 06:00. P2 programme operates in Comfort mode from 06:00 to 09:00 and from 16:00 to 22:00, with Eco mode during other hours. P3 programme operates in Comfort mode during specific hours and Eco mode during the remaining hours. If the default time schedules for P1, P2, and P3 do not suit your routines, you can change them. Modifications to P1, P2, or P3 schedules will apply to all days of the week for which they were set.
- Page 7: Press or to select P1 for 5 seconds to make changes. The programme set for day 1 (1= Monday, 2 = Tuesday, etc.) will flash. The P1 start time (which by default is 06:00) will flash. Choose the programme you want for this day and save by pressing or. The programme assigned to the second day of the week (Tuesday) will flash. The P1 end time (which by default is 22:00) will flash. Repeat the procedure described previously for each day of the week. Press to exit the programming mode and return to auto mode. To exit the programming mode, press twice. This function allows you to change the setting temperature temporarily until the next scheduled change in temperature.
- Page 8: Automatic activation (factory settings) By pressing certain buttons, you can change the desired temperature temporarily. The device detects a temperature fall caused by an opened window or door. This temperature drop triggers the change to frost protection mode. The cursor corresponding to the operating mode blinks during temporary changes. Frost protection mode can be switched on by pressing a button for a few seconds. The device shows a meter on the display during a lower temperature cycle due to an opened window. Open window detection is sensitive to temperature variations and can be disturbed by various factors. Occupancy detection is also sensitive to temperature variations and light, potentially disturbed by nearby objects. The device optimizes heating management by detecting movement and adjusting temperature settings. To ensure proper operation, do not block the sensor’s field of view.
- Page 9: Information about remote control Your device can be controlled by a central control unit through a pilot wire. You can only control the device by pilot wire in the Auto mode. When presence is detected in the room, the device automatically returns to the initial mode. A pilot wire control system allows for externally imposed temperature setpoint lowering. If several lowering requests appear simultaneously, priority is given to the lowest temperature setpoint. When a signal is sent from the pilot wire, the self-learning optimization function is suspended. The detection zone is divided into active and inactive areas. Orders sent by the pilot wire are executed by the device’s electronic controller. The Stop order corresponds to the load shedding. Do not use load shedding by a power fail.
- Page 10: In case of programmed Boost, the Boost activation will take precedence over others orders received except when the standby (stop) order is present on the pilot wire. The device is in Auto mode. By pressing the buttons, you can change temporarily the desired temperature up to 18°C. This modification will be automatically cancelled at the next order sent by the central control unit or the transition to 00:00. In Comfort, Eco and Frost protection modes, only orders of the occupancy sensor and those of the open window sensor will be considered. In Auto mode, the device can receive different orders coming from 7 day and daily programming, 6-order pilot wire, open window detector, and occupancy detector. Your device can be managed by a wireless RF remote control. If an occupancy absence of more than 72 hours is detected, switching to frost protection takes precedence unless a load shedding order is present on the pilot wire. During the programmed passage in period Eco, if a presence is detected in the room, it will be taken into account and the appliance automatically switches to Comfort mode. During the programmed passage to the Comfort mode period, the absence detection system is temporarily suspended for 30 minutes.
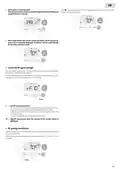
- Page 11: The blower is in pairing mode. Proceed to the remote control pairing. When both blower and remote control are linked, the symbol appears and is constantly displayed. The blower returns automatically to the frost protection mode. You can check the RF transmission performance between the blower and the remote control. To view the RF reception level, press for 5 seconds. Low RF transmission level indicates the need to improve RF transmission performance. Ensure the RF transmission is not interrupted and move the remote control closer to the blower. You can cancel the RF transmission between the blower and the remote control at any time. Press simultaneously for 5 seconds to cancel the RF pairing.
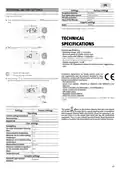
- Page 12: Restoring factory settings Occupancy detection Dual optimization feature PIN code protection Factory settings General specifications: Operating voltage: 230V +/-10% 50Hz. Maximum power of 1500W, resistive load. Compliance declaration: we hereby declare under our sole responsibility that the products described in these instructions comply with the provisions of Directives and harmonized standards. The following factory values will be effective: Comfort setting temperature 19°C

SALUS IT800 WIFI Smart Thermostat Installation Guide

HITACHI ATW-RTU-11 Wireless Thermostat Instruction Manual

Google Cloud 2024 Nest Learning Thermostat Instructions

Regulus TP18 LCD Electronic Thermostat User Manual

SALUS 091FLRF Wireless Room Thermostat User Guide

sinope TH1134ZB Smart Line Voltage Thermostat Installation Guide

SALUS AT10 Pipe-Fitted Thermostat User Guide

AuVerte 003001.C508 Thermostat Installation Guide

hager TX320 Room Thermostat User Manual

SunTouch SunStat CommandPlus Programmable Thermostat Instruction Manual