hager TX320 Room Thermostat User Manual


TX320
TX320
20
20
2
2
2
2
Thermostat d’ambiance
Notice nstructions
Room thermostat
User iuctions
4
4
2
2
20
20
2
2
2
2
4
4
2
2
1
4
2
5
3
6
1
4
2
5
3
6
2
4
2
4
max.
min.
max.
min.
20
20
20
20
OPE
OPEN
2
2
20
20
4
4
CLOS
CLOSE
1
1
8
2
2
2
8
2
V1.6.3
V1.6.3
6
6
1
1
Raccordement du bus et des entrées
Connection of BUS and inputs
Bn,.:
Bn,.:
E3
E3
E2
E3
E3
E2
tebis
tebis
Usage
E2
E1
CO M
E2
E1
CO M
E1
E1
CO M
CO M
BUS
5
9
7
8
5
7
8
BUS
Fonctionnement
The thermostat TX320 KNX/EIB is used for
controlling the temperature in individual rooms
of functional and private buildings.
Le thermostat KNX/EIB TX320 a été conçu
pour contrôler la température ambiante dans les
locaux d’habitation et les bureaux. Il s’agit d’une
régulation continue PID.
The thermostat should be used in dry rooms.
10
11
9
10
11
Fonctionnement des entrées :
Functionality of inputs :
Les entrées E1, E2, permettent d’interfacer des
contacts libres de potentiel avec le bus KNX/EIB
(par exemple boutons poussoirs, interrupteurs ou
automatismes conventionnels).
L'entrée E3 permet de raccorder une sonde de
température sol (référence EK 087).
Configuration
Inputs (E1-E2) are used to interface contacts
free of potential with EIB/KNX bus, such as
pushbuttons, switches or conventional
automatisms.
The input E3 allows a floor temperature probe
to be connected. (reference EK 087).
The particular functions of each product
depend on the configuration and the set-up.
Ce thermostat a été conçu pour être utilisé
uniquement dans des locaux non humides.
Installation of thermostat
Montage du thermostat :
TX 100 V1.6.3 or higher: detailed description
is included in User’s Instructions supplied
with the configurator.
1. Gently pull-off the temperature
selector.
1. Retirer doucement le bouton de
réglage de la température.
4
4
3
2
5
6
3
2
5
6
Configuration
1.
2
.
∞
C
1.
2
.
∞
C
OPEN
OPEN
CLOSE
CLOSE
TX 100 V1.6.3 ou supérieure : description
détaillée dans la notice livrée avec le
configurateur.
ETS : application software TL 320A,
database and description available from the
manufacturer.
Les fonctions précises de ces entrées dépendent de la
configuration et du paramétrage.
1.
2.
1.
2.
2. A l’aide d’un petit tournevis, tourner
le dispositif de verrouillage sur la
position " OPEN ".
OPEN
2. Turn the latch with a small
screwdriver to position “OPEN”.
OPEN
ETS : logiciel d'application TL 320A, base
de données et descriptif disponibles chez
le constructeur.
Raccorder le câble bus : rouge + / noir –
(respecter la polarité).
Connect the bus cable to the bus line
(red + / black –). (Note the polarity!)
CLOSE
CLOSE
Description of thermostat
18
2
18
2
16
16
3. Carefully place thermostat
on the guiding rails and
push to the left until
mounting base is
3. Placer le thermostat sur
son socle de manière à
.
Description du thermostat
Adressage physique
Entering the physical address
3
4
3
4
3
4
3
4
2
5
2
5
2
5
2
5
6
6
6
6
∞
C
∞
C
ce que les ergots soient
bien positionnés puis
pousser vers la gauche
(maintenir le thermostat
dans l’axe).
Bouton
d’adressage
physique.
Set physical
address.
20
covered.
Do not tilt thermostat!
1.
2.
1.
2.
20
OPEN
OPEN
LED de
programmation.
4. Turm latch with a small
screwdriver to position “CLOSE”.
Programming
LED.
CLOSE
CLOSE
4. Tourner le dispositif de verrouillage
sur la position " CLOSE ".
18
2
18
2
16
16
Push button for operating modes or
presence.
5. Place temperature selector
on the unit.
5. Remettre en place le bouton de
réglage de la température.
4
4
3
3
2
2
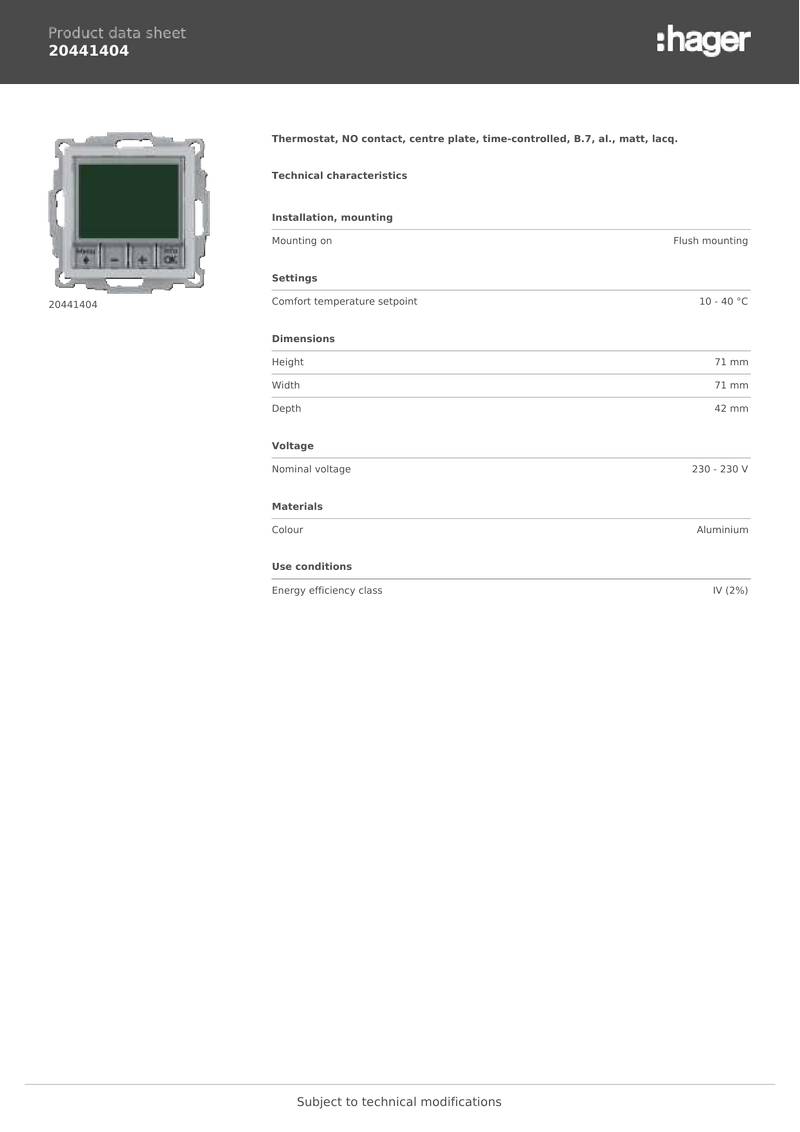
Caractéristiques techniques
Alimentation électrique : bus KNX/EIB - 30VsTBTS
1
.
2
.
1
.
2
.
Technical characteristics
Power supply:
OPE
CLOSE
CLOSE
Sélecteur du mode de fonctionnement
ou bouton présence.
comfort mode
standby mode
bus KNX/EIB - 30Vs SELV
< 10 mA
Consommation :
Température de fonctionnement : 0 °C —> +45 °C
< 10 mA
Power consumption:
Operating temperature:
Storage temperature:
Protection type:
Démontage
Démontage du thermostat :
reduction mode (in the night)
frost protection
0 °C —> +45 °C
-20 °C —> +60 °C
IP21
Mode confort
Mode Eco
Température de stockage :
Degré de protection :
Degré de pollution
-20 °C —> +60 °C
IP21
De-Installation
De-installation of thermostat
1. Retirer doucement le bouton de
réglage de la température.
Mode réduit (nuit)
Hors-gel
red/blue LED:
red = heating
blue = cooling
out = demanding temperature is reached.
4
4
3
2
3
2
1.
2.
1.
2.
2
1500V
3
Pollution category:
Rated impulse voltage:
Overvoltage Category:
Insulation class:
Softwarestruktur:
Ecodesign class:
Voltage and current declared for the
needs of EMC emissions tests:
Action type:
Communication media KNX :
Configuration mode KNX :
2
1500V
OPEN
OPEN
CLOSE
CLOSE
1. Draw off temperature selector.
Tension de choc :
LED Rouge/bleu :
Catégorie de surtension :
Classe d'isolation :
Classe de logicel :
3
III
2. A l’aide d’un petit tournevis,
tourner le dispositif de
verrouillage sur la position
" OPEN ".
1.
2.
1.
2.
rouge = chauffage
bleu = climatisation
éteinte = température souhaitée atteinte.
III
OPEN
OPEN
Temperature selector.
class A
IV
klasse A
IV
Classe d'ecodesign :
CLOSE
CLOSE
2. Loosen latch to position “OPEN”.
Tension et courant d'émission
des essais CEM :
Action de type :
Mode de transmission KNX :
Mode de configuration KNX :
Produit indépendant pour montage
en sailli ou boite d'encastrement.
18
2
18
2
Bouton de réglage de la température.
1
6
1
6
Installation
30V - 10mA
2
TP1
30V - 10mA
2
TP1
3. Pousser le thermostat
vers la droite et le
4
3
4
3
4
3
3
4
Installation
2
5
2
5
2
5
2
5
6
6
6
∞
C
6
∞
C
∞
C
retirer de son socle
(maintenir le
thermostat dans l’axe).
3. Push thermostat to the
right and left the unit.
Do not tilt thermostat!
Smode
Smode
Independent product for surface mounting or flush
mounting box.
1
.
1
.
N
MON
N
MON
Démontage du socle :
E
P
E
P
T
T
AG
O
AG
E
O
2
.
2
.
E
3
.
3
.
- Appareil à installer uniquement par un
installateur électricien.
- Respecter les règles d’installation TBTS.
De-installation of mounting base
o
.
o
.
k
.
k
.
- This device must be installed only by
a qualified electrician.
- Conform to TBTS installation rules.
1. A l’aide d’un tournevis plat,
appuyer sur les fentes à droite
du socle et retirer le cache.
1. Press-in spring at cover of the
mounting base and lift it off.
Comment éliminer ce produit
(déchets d’équipements électriques et électroniques).
2. Dévisser le socle puis le retourner.
2. Loosen screws and reverse base
unit.
Correct Disposal of This product
(Waste Electrical & Electronic Equipment).
(Applicable dans les pays de l’Union Européenne et aux autres pays
européens disposant de systèmes de collecte sélective).
(Applicable in the European Union and other European countries with separate
collection systems).
Ce symbole sur le produit ou sa documentation indique qu’il ne doit pas être
éliminé en fin de vie avec les autres déchets ménagers. L’élimination
incontrôlée des déchets pouvant porter préjudice à l’environnement ou à la
santé humaine, veuillez le séparer des autres types de déchets et le recycler
de façon responsable. Vous favoriserez ainsi la réutilisation durable des
ressources matérielles.
This marking shown on the product or its literature indicates that it should not
be disposed with other household wasted at the end of its working life. To
prevent possible harm to the environment or human health from uncontrolled
waste disposal, please separate this from other types of wastes and recycle it
responsibly to promote the sustainable reuse of material resources.
3. A l’aide d’un tournevis de taille
adéquate,ouvrir les bornes et
retirer les fils.
3. To pull out wire use an
appropriate screwdriver
to release spring clamp!
V
4
2
4
2
2
V
2
V
2
4
2
4
2
V
0
3
0
3
Installation
Connection - Installation
Montage
Raccordement - Montage
Les particuliers sont invités à contacter le distributeur leur ayant vendu le
produit ou à se renseigner auprès de leur mairie pour savoir où et comment ils
peuvent se débarrasser de ce produit afin qu’il soit recyclé en respectant
l’environnement.
Household users should contact either the retailer where they purchased this
product, or their local government office, for details of where and how they can
take this item for environmentally safe recycling.
Réglage de la température
Temperature
5-6mm
Bouton de réglage de la température pour régler
la consigne confort entre 10 et 28°C.
Il est possible de limiter mécaniquement cette
plage (par ex 18 à 23°C). Suivre les instructions
ci-dessous.
Temperature control knob in order to adjust
the comfort setting between 10 and 28°C.
It is possible to limit this temperature range
mechanically (e.g. 18 to 23°C), follow the
instructions below.
Business users should contact their supplier and check the terms and
conditions of the purchase contract. This product should not be mixed with
other commercial wastes of disposal.
Les entreprises sont invitées à contacter leurs fournisseurs et à consulter les
conditions de leur contrat de vente. Ce produit ne doit pas être éliminé avec
les autres déchets commerciaux.
1
2
3
4
5-6mm
Usable throughout Europeå and in Switzerland
Utilisable partout en Europeå et en Suisse
1
2
3
4
6LE004189B
02
6LE004189B

| General | Details |
|---|---|
| Name | hager TX320 Room Thermostat User Manual |
| Make | hager |
| Language | English |
| Filetype | PDF (Download) |
| File size | 2.61 MB |
 (1 votes, average: 5.00 out of 5)

hager 75643134 KNX Glass Sensor 3g Thermostat Owner’s Manual
hager 20441404 Thermostat Owner’s Manual

hager TX320 Room Thermostat User Manual Overview
Summary of Contents
- Page 1: Thermostat d’ambiance Room thermostat User instructions The thermostat TX320 KNX/EIB is used for controlling the temperature in individual rooms of functional and private buildings. The thermostat should be used in dry rooms. Inputs (E1-E2) are used to interface contacts free of potential with EIB/KNX bus, such as pushbuttons, switches or conventional automatisms. The input E3 allows a floor temperature probe to be connected. The particular functions of each product depend on the configuration and the set-up. This thermostat has been designed for use only in non-humid rooms. Installation of thermostat TX 100 V1.6.3 or higher: detailed description is included in User’s Instructions supplied with the configurator. Connect the bus cable to the bus line (red + / black –). (Note the polarity!) This device must be installed only by a qualified electrician. Temperature control knob in order to adjust the comfort setting between 10 and 28°C.
- Page 2: Raumthermostat Bedienungsanleitung Der KNX/EIB-Regler TX320 ist zur Regelung der Temperatur in Wohn- und Büroräumen geeignet. Es handelt sich um eine stetige PID-Regelung. Die Temperaturregler sind nur für trockene Räume geeignet. Die Eingänge (E1-E2) fungieren als Schnittstelle zwischen spannungsfreien Kontakten und dem EIB/KNX-Bus. Eingang E3 dient zum Anschluss eines Bodentemperaturfühlers. Montage des Reglers: Temperatur-Drehknopf abziehen. Schließen Sie das Bussystem an die Busleitung an: rot + / schwarz – (Polung beachten). Die spezifischen Funktionen dieser Produkte hängen von der Konfiguration und den Parametereinstellungen ab. Die genaue Entsorgung dieses Produkts sollte umweltfreundlich erfolgen.

finder 7T Series Enclosure Thermostat User Guide

Hotwire Heating HWGL2 Dual Device Thermostat Instruction Manual

Digital Touch Thermostat Troubleshooting User Guide

BEOK BOT306RF-WIFI Thermostat Owner’s Manual

ENGO CONTROLS EASY-24W 24V Wired Thermostat User Guide

RITTAL SK 3114.200 Digital Enclosure Internal Temperature Display and Thermostat Instructions

ENGO CONTROLS E10-B Wi-Fi Thermostat User Guide

Micro-Air 351 Air Conditioner Digital Thermostat User Guide

Honeywell Home T10 Smart Home Thermostat Instructions

shadow-caster SCM-Series Thermostat Instruction Manual