Dimplex X3D Wireless Programmable Thermostat Instruction Manual


EN
NL
Wireless programmable thermostat
Draadloos programmeerbare thermostaat

| General | Details |
|---|---|
| Name | Dimplex X3D Wireless Programmable Thermostat Instruction Manual |
| Make | Dimplex |
| Language | English |
| Filetype | PDF (Download) |
| File size | 1.65 MB |


DIMPLEX ML2TA 2KW Convector Heater With Thermostat Instruction Manual

Dimplex DWT431W Non-Programmable Thermostat 4000W Owner’s Manual

Dimplex X3D Wireless Programmable Thermostat Instruction Manual Overview
Summary of Contents
- Page 1: Wireless programmable thermostat
- Page 2: Installation Description Wireless association Configuration Correcting the temperature measured Temperature displayed in auto mode Control type Energy saving mode ON/OFF button display in standby mode Backlighting
- Page 3: Defining the economy setting Defining the frost protection setting Behavioural indicator Programming AUTO mode Party mode Absence mode External override Information button Locking access to the settings
- Page 4: Installation instructions for the thermostat include placing it in the main room or center of the home. It should be wall-mounted or on accessible furniture at a height of 1.50 m. The thermostat must be positioned away from heat sources and draughts. It is important not to install the thermostat on a wall in contact with the outdoors or in unheated rooms.
- Page 5: Description AUTO mode Comfort mode Economy mode Temperature setting Frost protection mode Date and time setting/Programming Active setting Wireless transmission Party mode Absence mode
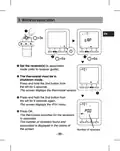
- Page 6: Wireless association Set the receiver(s) to association mode. The thermostat must be in shutdown mode. Press and hold the 2nd button from the left for 5 seconds. The screen displays the thermostat version. Press and hold the 2nd button from the left for 5 seconds again. The screen displays the rF01 menu. Press OK. The thermostat searches for the receivers to associate. The number of receivers found and associated is displayed in the centre of the screen.
- Page 7: Configuration The thermostat must be in shutdown mode. Press and hold the 2nd button from the left for 5 seconds. The screen displays the thermostat version. Press OK. The screen displays the CF01 menu. Choose your selection or setting with + and -. Press OK to validate and go to the next setting. To exit the mode, turn the selector knob. CF01 - Correcting the temperature measured can be set from -5°C to +5°C. Example: the temperature displayed by the unit is 19°C and the actual temperature (thermometer) is 20°C, set +1°C.
- Page 8: CF04 - Control type Chrono-proportional (PI) control ON/OFF control CF05 - Energy saving mode Display switches off after 10 seconds if nothing is pressed Display switches off between midnight and 5am Display always on CF06 - ON/OFF button display in standby mode Not displayed in standby mode Displayed in standby mode CF07 - Backlighting Disabled Enabled (switches off after timer)
- Page 9: Configuration CF08 - Opening detection function If a door/window magnetic contact is associated with the receiver, the heating will switch to frost protection when the window is opened. CF09 - Presence detection function If a motion detector is associated with the receiver, the temperature will be lowered automatically in the event of an extended absence. CF10 - Value of the max. comfort setting Can be set from 22°C to 30°C. Default value: 28°C. CF11 - Programming format Programming in 1 h steps. Programming in 1/2 h steps.
- Page 10: CF12 - Time display format 12 (AM/PM) 24 CF13 - Automatic change to summer/winter time If CF13 = 0, the date setting will not be proposed. CF15 - Display of the symbol Symbol always steady even for a presence detection event Symbol flashes if there is a presence detection event CF16 - Display of the symbol (heating request) Symbol not displayed Symbol displayed
- Page 11: Configuration Display of the symbol Symbol steady if there is a presence detection event Symbol flashes if there is a presence detection event Display of the consumption If the display of the consumption is enabled, specify the power of the heating elements Select the heating element Specify its power in Watts Confirm with OK
- Page 12: Setting the clock involves turning the selector knob to PROG. Enter the minutes and confirm with OK. Enter the hour and confirm with OK. Enter the day and confirm with OK. Enter the month and confirm with OK. Enter the year and confirm with OK. Turn the selector knob to AUTO to exit the mode. The date setting cannot be proposed.
- Page 13: Setting the temperatures (settings) If you remain in one of these modes, the thermostat will operate permanently in relation to this setting (no programming). Defining the comfort setting Turn the selector knob to set the comfort temperature (5°C to max. Comfort). Confirm with OK. Defining the economy setting Turn the selector knob to set the economy temperature (5°C to max. Comfort). Confirm with OK. Defining the frost protection setting Turn the selector knob to set the frost protection temperature (5°C to max. Comfort). Confirm with OK.
- Page 14: Behavioural indicator When the settings are adjusted, the colour of the screen changes or an indicator is displayed according to the selected temperature. Green indicates up to 19°C (reduced consumption). Orange indicates from 19.5°C to 24°C (average consumption). Red indicates from 24.5°C to max. comfort (high consumption). To benefit from this function, activate the backlighting function according to the thermostat model.
- Page 15: Programming involves turning the selector knob to PROG. The programming for each day is a comfort period from 6am to 11pm. You can create different economy and comfort periods using the buttons. An example of comfort periods is from 6am to 8am and 5pm to 11pm. Press up to set the time to 06:00. Press up to set the time to 17:00. Programming can be made in steps of 1 hour or 1/2 hour.
- Page 16: Press OK to validate and go to the next day. Press up to 00:00. Press up to 23:00. Pressing OK for 3 seconds confirms the program and copies it over to the next day. Start again for each day of the week.
- Page 17: AUTO mode allows the thermostat to follow the daily program. The symbol indicates a heating request. The automatic program can be temporarily suspended by Party Mode override, Absence mode, or a window magnetic contact if activated. When suspended, the heating goes to Frost Protection. Absence detection can also trigger a lower heating setting. Absence 1.5 sets the temperature to -1.5°C. Absence 3.5 sets the temperature to -3.5°C. Absence 48 h activates Frost Protection. Various symbols indicate presence detection, heating requests, party mode, external overrides, spent battery, absence mode, measured temperature, outdoor temperature, and active door/window magnetic contact.
- Page 18: Party mode can temporarily suspend the automatic programme by applying a temperature setting chosen for a programmed duration. The duration can be set from 30 minutes to 12 hours. To activate Party mode, press the AUTO button. Set the required temperature and confirm with OK. Set the required duration and confirm with OK. The countdown starts after setting the duration. Return to AUTO mode and its settings at the end of the countdown by pressing the C button.
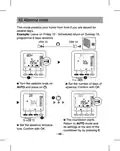
- Page 19: Absence mode protects your home from frost if you are absent for several days. Example: Leave on Friday 10 - Scheduled return on Sunday 19, programme 9 days absence. Turn the selector knob on AUTO and press on. Set the number of days of absence. Confirm with OK. The countdown starts. Return to AUTO mode and its settings at the end of the countdown by pressing C. Set the absence temperature. Confirm with OK.
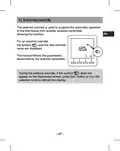
- Page 20: External override The external override is used to suspend the automatic operation of the thermostat from another wireless transmitter. For an external override, the symbol and the new override value are displayed. Thermostat follows the parameters demanded by the external transmitter. During the external override, if the symbol does not appear on the thermostat screen, press the i button or turn the selection knob to refresh the display.
- Page 21: The Information button enables the following information to be known: actual temperature setting or temperature measured, outside temperature, and total consumption of the associated heating elements. Repeatedly press the button to display this information. To reset the reading counter, press the button three times.
- Page 22: Locking access to the settings Press and hold the i button for 5 seconds. The symbol appears. In locked mode, only the On/Off and Information buttons are accessible. To enable the beeps again, press the i button for 5 seconds. The symbol appears. Off mode The thermostat emits a series of 3 beeps. In this mode, heating is shut down. To exit the shutdown mode, press again on the button. Only the i button can be accessed.
- Page 23: Return to initial settings Automatic reset of parameters to factory setting Press the left button and the i button simultaneously for 10 seconds until Init is displayed. Press and hold the OK button for 3 seconds. The Init information flashes. List of settings initialised: Temperature settings (Comfort 19°C, Economy 15.5°C, Frost protection 7°C), Opening detection function (CF08=1), Presence detection function (CF09=0).
- Page 24: Initialisation of all the parameters resets all the configuration parameters, settings, and programming. Only the date and time are kept. To enter shutdown mode, press the left button and the i button simultaneously for 20 seconds. After 10 seconds, the screen displays Init, and you should keep pressing until ALL is displayed. Press and hold the OK button for 3 seconds. The Init and ALL information flashes, indicating that the values and settings are initialised.
- Page 25: Remove the wireless association. The thermostat must be in shutdown mode. Press and hold the 2nd button from the left for 5 seconds. The screen displays the thermostat version. Press and hold the 2nd button from the left for 5 seconds again. The screen displays the rF01 menu. Press + to display rF03, then press OK. The number of receivers found and associated is displayed in the centre of the screen. Press OK for 5 seconds. The thermostat removes the wireless associations until 00 is displayed.
- Page 26: Changing the batteries From the moment the symbol is displayed on the screen, you have 3 months to change the batteries. Troubleshooting The screen displays the symbol. The batteries are spent. Replace the batteries. A receiver does not receive information from the thermostat. The radio range may be insufficient. Disconnect all your receivers, apart from the one causing the problem. The thermostat must be in shutdown mode. Press and hold the 2nd button from the left for 5 seconds. The screen displays the thermostat version. Press and hold the 2nd button from the left for 5 seconds again. The screen displays the rF01 menu. Press + to display rF02. The screen displays a number from 0 to 4 (4 being the maximum range). If the number is too low, modify the installation.
- Page 27: Technical characteristics Power according to model: Two 1.5 V LR03/AAA alkaline batteries (supplied), 5-year life under normal use. Two 1.5 V, 1.5 Ah LR03/AAA lithium batteries (supplied), 10-year life under normal use. Class III insulation. 868 MHz transmission frequency, class 1 (standard EN 300 220). Wireless remote control device. Wireless range from 100 to 300 metres outside, varies depending on the associated equipment. Dimensions: 81 x 135 x 22 mm. Protection index: IP 30. Wall-mounted on base. Storage temperature: -10°C to +70°C.
- Page 28: Inhoudsopgave Installatie Omschrijving Radioverbinding Configuratie Instelling van de klok Instellen van de gewenste temperaturen Comfort-instelpunt instellen
- Page 29: Economy-instelpunt instellen Antivries-instelpunt instellen Gedragindicator Programmering Automatische modus Party modus Afwezigheidsmodus Externe afwijking Informatietoets Toegang tot instellingen vergrendelen
- Page 30: Installatie Plaats de thermostaat in het belangrijkste vertrek of in het midden van uw woning. Monteer de thermostaat tegen een wand of op een toegankelijk rekje of meubel op een hoogte van 1,5 m. Zorg ervoor dat de thermostaat afgeschermd is van warmtebronnen en tocht. Monteer de thermostaat niet op een buitenmuur of een muur die in contact staat met een onverwarmde ruimte.
- Page 31: Omschrijving Automatische modus Comfortmodus Temperatuur-instelling Spaarmodus Antivriesmodus Instelling datum en uur / Programmering Uur Dag Gemeten of insteltemperatuur Stand-by modus: Na een bepaalde tijd van inactiviteit gaat het product in stand-by modus. Om het product terug uit de stand-by modus te halen, drukt u op een toets of draait u aan het wieltje.
- Page 32: Radioverbinding Zet de ontvanger(s) in de verbindingsstand. De thermostaat moet zich in de modus Uit bevinden. Druk 5 seconden op de tweede toets van links. Op het scherm wordt de versie van de thermostaat weergegeven. Druk nogmaals 5 seconden op de tweede toets van links. Op het scherm wordt het menu RF01 weergegeven. Druk op OK. De thermostaat zoekt naar ontvangers. Het aantal gevonden en gekoppelde ontvangers wordt in het midden van het scherm weergegeven.
- Page 33: Configuratie De thermostaat moet zich in de modus Uit bevinden. Druk 5 seconden op de tweede toets van links. Op het scherm wordt de versie van de thermostaat weergegeven. Druk op OK. Op het scherm wordt het menu CF01 weergegeven. Maak uw keuze of stel in met + en -. Druk op OK om te bevestigen en naar de volgende instelling te gaan. CF01 - Correctie van de gemeten temperatuur. Regelbaar van -5 tot +5°C. Bijvoorbeeld: als het toestel een temperatuur weergeeft van 19 °C en de werkelijke temperatuur 20 °C is, stelt u +1 °C in.
- Page 34: CF04 - Type instelling Instellen van PI (Proportionele integrale regeling) Instelling van het type Alles of niets CF05 - Energiebesparende modus Display schakelt na 10 seconden zonder actie uit. Display schakelt tussen middernacht en 5.00 uit Display altijd ingeschakeld CF06 - Weergave van toets ON/OFF in de standby-modus Symbool wordt niet weergegeven in de standby-modus Symbool wordt weergegeven in de standby-modus CF07 - Achtergrondverlichting Uitgeschakeld Geactiveerd (doven na vertraging)
- Page 35: Configuratie De functie detectie opening Als er een openingsdetector met een ontvanger is gekoppeld, dan zal de verwarming naar de antivriesmodus worden geschakeld als er een raam is geopend. De functie aanwezigheidsdetectie Als er een bewegingsdetector met een ontvanger is gekoppeld, dan zal de temperatuur automatisch worden verlaagd bij langere afwezigheid. Waarde van instelpunt comfort max Instelbaar van 22°C tot 30°C. Standaardinstelling: 28°C Formaat van programmering Programmering in stappen van 1 uur. Programmering in stappen van 1/2 uur.
- Page 36: CF12 - Tijdnotatie 12u (AM/PM) 24u CF13 - Automatische omschakeling zomer-/wintertijd Uitgeschakeld Ingeschakeld Als CF13 = 0, zal het instellen van de datum niet worden aangeboden. CF15 - Weergave van symbool Als CF08 = 1: Symbool altijd vast, zelfs bij detectie Symbool knippert bij detectie CF16 - Weergave van symbool (warmtevraag) Symbool wordt niet weergegeven Symbool wordt weergegeven
- Page 37: Configuratie Weergave van symbool Symbool vast bij detectie Symbool knippert bij detectie Weergave van verbruik Als de weergave van het verbruik geactiveerd is, voer dan het vermogen van de verwarmingselementen in Selecteer het verwarmingselement Specificeer vermogen Bevestigen door op OK te drukken
- Page 38: Instelling van de klok Draai de knop naar PROG. Stel het uur in en druk op OK. Stel de minuten in en druk op OK. Stel de dag in en druk op OK. Stel de maand in en druk op OK. Stel het jaar in en druk op OK. Draai de knop naar AUTO om de modus te verlaten. Het is mogelijk dat het instellen van de datum niet wordt aangeboden.
- Page 39: Instellen van de gewenste temperaturen Als u in deze modi blijft, dan zal de thermostaat werken volgens deze instellingen. Comfort-instelpunt instellen Draai de instelknop naar. Stel de temperatuur Comfort in (5°C tot Comfort max). Bevestig door op OK te drukken. Economy-instelpunt instellen Draai de instelknop naar. Stel de temperatuur Economie in (van 5 tot 19°C). Bevestig door op OK te drukken. Antivries-instelpunt instellen Draai de instelknop naar. Stel de temperatuur Antivries in (van 5 tot 10°C). Bevestig door op OK te drukken.
- Page 40: Gedragindicator Bij het instellen van de instelpunten, afhankelijk van het model van de thermostaat, zal de kleur van de display veranderen of zal er een indicator worden weergegeven, afhankelijk van de gekozen temperatuur. Groen tot 19 °C (Laag verbruik) Oranje van 19,5 °C tot 24 °C (Gemiddeld verbruik) Rood van 24,5 °C tot Comfort max. (Hoog verbruik) Om te profiteren van deze functie, afhankelijk van het thermostaatmodel, activeer de functie achtergrondverlichting (CF05).
- Page 41: Programmering Draai de knop naar PROG. Tijdens de inbedrijfstelling, de programmering voor elke dag is een comfortperiode van 6u tot 23u. U kunt uw verschillende Economie- en Comfortperiodes instellen. Voorbeeld: Comfort van 6.00 tot 8.00 uur en van 17.00 tot 23.00 uur. Druk op tot 06.00. Druk op tot 17.00. Druk op 8.00 tot. De programmering kan worden gedaan in 1 uur of 1/2 uur.
- Page 42: Instelpunt toegewezen aan de periode. Druk op OK om te bevestigen en naar de volgende dag te gaan. Druk op tot 0.00. Druk op tot 23.00. Door gedurende 3 seconden op OK te drukken, kunt u de programmering van de dag kopiëren naar de volgende dag (COPY-functie). Begin opnieuw voor elke dag van de week.
- Page 43: Automatische modus volgt het programma van de dag. Het symbool duidt op een warmtevraag. Het automatische programma kan tijdelijk worden opgeschort door afwijkingen zoals de party-modus en afwezigheidsmodus. Detectie van een open venster schakelt de verwarming over naar vorstbeveiliging. Afwezigheidsdetectie kan de verwarming verlagen afhankelijk van de duur van afwezigheid. Bij afwezigheid van 1u30 wordt het instelpunt met 1,5°C verlaagd. Bij afwezigheid van 3u30 wordt het instelpunt met 3,5°C verlaagd. Bij afwezigheid van 48 uur gaat het instelpunt naar vorstbeveiliging. Symboolindicaties omvatten verzoek om verwarming, party-modus, en aanwezigheiddetectie. Andere symbolen geven informatie over batterijstatus, gemeten temperatuur, en draadloze transmissie.
- Page 44: Party modus Via de Party-modus kan u het automatisch programma tijdelijk opschorten door een gekozen insteltemperatuur te hanteren voor een geprogrammeerde periode (van 30 minuten tot 12 uur). Druk op de toets om de gewenste temperatuur in te stellen. Bevestig door op OK te drukken. Stel de gewenste periode in. Bevestig door op OK te drukken. Het aftellen begint. Terugkeer naar de modus AUTO en de instellingen aan het einde van het aftellen of door te drukken op C.
- Page 45: Afwezigheidsmodus In deze modus kunt u uw woning in vorstvrije stand zetten als u meer dan een dag afwezig bent. Voorbeeld: vertrek op vrijdag de 10de - voorziene terugkeer op zondag de 19de, programmeer 9 dagen afwezigheid. Draai de knop naar AUTO en druk op. Stel het aantal dagen afwezigheid in. Bevestig door op OK te drukken. Het aftellen begint. Terugkeer naar de modus AUTO en de instellingen aan het einde van het aftellen of door te drukken op C. Stel de temperatuur bij afwezigheid in. Bevestig door op OK te drukken.
- Page 46: Externe afwijking maakt het mogelijk om de automatische werking van de thermostaat uit te stellen vanaf een andere draadloze zender. In geval van een externe afwijking worden het symbool en de nieuwe waarde weergegeven. De thermostaat volgt de parameters die door de externe zender worden gevraagd. Bij een externe afwijking, als het symbool niet op het scherm van de thermostaat wordt weergegeven, druk op de toets i of draai aan de knop om het scherm te vernieuwen.
- Page 47: Informatietoets Via de informatietoets (i) komt u de volgende informatie te weten: - gemeten temperatuur of huidige insteltemperatuur - buitentemperatuur - het totale verbruik van de gekoppelde verwarmingselementen Druk verschillende keren op de toets i om deze informatie weer te geven. Om de teller te resetten, drukt u op 3 seconden op de toets C.
- Page 48: Toegang tot instellingen vergrendelen. In de vergrendelde modus zijn alleen de toetsen Aan/Uit en Informatie toegankelijk. Om deze opnieuw te activeren, houdt u 5 seconden de toets i ingedrukt. Het symbool verschijnt. Druk op de toets om de modus 'Uit' te activeren. De detector laat 3 pieptonen horen. In deze modus staat de verwarming uit. Om de modus Uit te verlaten, druk opnieuw op de toets. De thermostaat laat een pieptoon horen. Alleen de toets i is toegankelijk.
- Page 49: Terugkeren naar fabrieksinstellingen Automatisch herstel van de oorspronkelijke instellingen Druk 10 seconden gelijktijdig op de linkertoets en de toets i totdat Init wordt weergegeven. Druk 3 secondes op de toets OK. De indicatie Init begint te knipperen. Lijst met oorspronkelijke instellingen: Insteltemperatuur (Comfort 19°C, Economie 15,5°C, Vorstbeveiliging 7°C) De functie Detectie opening (CF08=1) De functie Aanwezigheidsdetectie (CF09=0)
- Page 50: Alle instellingen herstellen In deze modus worden alle configuratie-instellingen, instellingen, programmering hersteld. Alleen de datum en het uur worden behouden. Druk 20 seconden gelijktijdig op de linkertoets en de toets i. Na 10 seconden wordt op het scherm Init weergegeven, houd de knoppen ingedrukt totdat ALL wordt weergegeven. Druk 3 secondes op de toets OK. Init en AL knipperen. De waarden en instellingen worden hersteld.
- Page 51: De thermostaat moet zich in de modus Uit bevinden. Druk 5 seconden op de tweede toets van links. Op het scherm wordt de versie van de thermostaat weergegeven. Druk nogmaals 5 seconden op de tweede toets van links. Op het scherm wordt het menu RF01 weergegeven. Druk op + om rF03 weer te geven, druk vervolgens op OK. Het aantal gevonden en gekoppelde ontvangers wordt in het midden van het scherm weergegeven. Druk gedurende 5 seconden op OK. De thermostaat wist haar draadloze verbindingen totdat er 00 wordt weergegeven.
- Page 52: Vervangen van de batterij U hebt ongeveer 3 maanden de tijd om de batterijen te vervangen. Het symbool op het scherm geeft aan dat de batterijen leeg zijn. Een ontvanger ontvangt geen informatie van de thermostaat. Het zendbereik kan ontoereikend zijn. Ontkoppel alle ontvangers, behalve deze met het probleem. De thermostaat moet zich in de modus Uit bevinden. Druk 5 seconden op de tweede toets van links om de versie van de thermostaat weer te geven. Druk nogmaals 5 seconden op de tweede toets van links om het menu RF01 weer te geven. Als het cijfer te laag is, wijzigt u uw installatie.
- Page 53: Technische kenmerken Vermogen afhankelijk van het model. Autonomie 5 jaar bij normaal gebruik met alkaline batterijen. Autonomie 10 jaar bij normaal gebruik met lithium batterijen. Klasse III isolatie. Emissiefrequentie 868 MHz, klasse I. Radiogestuurde afstandsbediening. Radiobereik 100 tot 300 meter in open veld. Afmetingen: 81 x 135 x 22 mm. Beschermingsindex: IP 30. Opslagtemperatuur: -10°C tot +70°C.
- Page 54: Page 54

GENERAL LIFE MITRA 260S RF Room Thermostat User Manual
NINGBO TC200 Smart WI-FI Thermostat Owner’s Manual

Danfoss CAS 178 Thermostat Installation Guide

GENERAL LIFE MITRA 260S Wired Room Thermostat User Manual

eve thermo 22088 Eve Radiator Thermostat User Manual

BEOK CONTROLS TDR89 ZIGBEE Thermostat User Guide

COLDBUSTER MWD5 Programmable Thermostat User Manual

ENGO CONTROLS E10-B Wi-Fi Thermostat User Guide

BEOK TGR85-EP Mirror Touch Screen Underfloor Heating Thermostat User Guide

Honeywell 69-2384ES-01 RTH111 Non Programmable Thermostat Installation Guide