
HEATIT Z-Temp3 is a Battery Operated Thermostat Instruction Manual
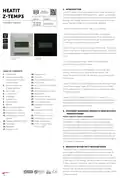

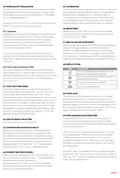


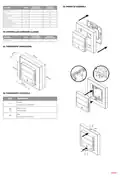
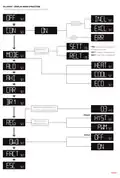


1. INTRODUCTION
PRODUCT
DOCUMENTS
HEATIT
Z-TEMP3
Installers manual
Heatit Z-Temp3 is a battery-operated thermostat designed for
controlling waterbased heating systems. Used in combination
with the Heatit Z-Water2, you can control your heating system
through the Z-Wave® network or via the buttons on the front
panel. The thermostat has a user-friendly interface.
Firmware version
Document version
FW 1.0
Article no.
2024-A
Document date
45 126 90
45 126 91
01.07.2024
Org. doc. date 01.07.2024
Heatit Z-Temp3 has 3 modes: Heat, Cool, and Eco.
The thermostat fits into System 55 frames, and may be
mounted alongside other equipment such as e.g dimmers or
light switches. Heatit Z-Temp3 can also be mounted directly
on the wall or placed freely, e.g. on a shelf.
Heatit Z-Temp3 can be set as a master thermostat. This means
that you can set the setpoint and mode on one unit, and it will
automatically send the setpoint and mode to other connected
units.
White RAL 9003
45 126 90
Black Matt
45 126 91
All communication between Heatit Z-Temp3 and the
controlled device is 100% wireless.
Heatit Z-Temp3 uses 2x AAA batteries, but you can also
connect the device to an external power source. The
Heatit Transformer 230VAC (45 126 48) is recommended for
this purpose.
TABLE OF CONTENTS
1. Introduction
18. Display icons
2. Statement regarding
products from multiple
manufacturers
19. Child lock
20. Open window detection
21. Error codes
Heatit Z-Temp3 can be associated with Heatit ZM Single Relay,
other Z-Wave relays, Heatit ZM Thermostat, Heatit Z-TRM6
Thermostat and other Z-Wave devices to control other types
of heating solutions.
3. Behavior within the
Z-Wave network
22. QR-Code Placement (DSK)
23. Security
4. Quick Start
24. Node Information Frame
25. Associations
5. Connections
6. Installation
26. Association Groups
27. Configuration Parameters
28. Command Classes
29. Supported Command
Classes
Heatit Z-Temp3 is a great choice for the restoration or
renovation of existing buildings, as it is easy to install without
the need for wiring. We recommend using multiple 230VAC
devices to create a mesh network.
7. Add/Remove
8. Factory Reset
9. Startup
10. Principles of regulation
11. Local settings menu
12. Display Menu structure
13. Temperature shown in
display
30. Controlled Command
Classes
2. STATEMENT REGARDING PRODUCTS FROM MULTIPLE
MANUFACTURERS
31. Thermostat dimensions
32. Thermostat controls
33. Order of assembly
34. Chart - Display Menu
Product info
Please read this before installation
This device may be used with all devices certified with the
Z-Wave Plus® certificate and should be compatible with
such devices produced by any manufacturer. Every primary
controller is different depending on the manufacturer, their
target audience and intended use/application. Please review
the functionalities implemented by the primary controller you
intend to use with our Z-Wave Plus certified device to ensure
that it provides the necessary controls to take full advantage of
our product’s capabilities.
14. Standby and main screen
15. Calibration
16. Brightness
17. Display on/off
3. BEHAVIOR WITHIN THE Z-WAVE NETWORK
This device may be operated within any Z-Wave® network
with Z-Wave-certified devices from other manufacturers. All
non-battery-operated nodes within the network will act as
repeaters regardless of manufacturer to increase the reliability
of the network. On delivery, the device does not belong to any
Z-Wave network. The device needs to be added to an existing
network to communicate with the other devices within it.
Devices may also be removed from a network. The add/
remove processes are initiated by the primary controller of the
Z-Wave network.


| General | Details |
|---|---|
| Name | HEATIT Z-Temp3 is a Battery Operated Thermostat Instruction Manual |
| Make | HEATIT |
| Language | English |
| Filetype | PDF (Download) |
| File size | 0.53 MB |
 (1 votes, average: 5.00 out of 5)
 Loading...

heatit Z-TRM6 DC Z Wave Electronic Thermostat Instruction Manual

HEATIT Z-TRM3 Thermostat User Guide

Heatit Z-TEMP2 Thermostat Installation Guide

heatit Z-TRM3 WiFi Thermostat Instruction Manual

4512673 Heatit ZM Thermostat 16A User Guide

HEATIT Z-TRM6 Matt Z-Wave Thermostat User Guide

HEATIT 54 304 59 DIN Smart Thermostat Installation Guide

HEATIT 54 305 41 WiFi6 Thermostat Installation Guide

HEATIT Z-TEMP3 Thermostat User Guide

heatit ET-7AW Touchscreen Programmable Thermostat User Manual

HEATIT Z-Temp3 is a Battery Operated Thermostat Instruction Manual Overview
Summary of Contents
- Page 1: INTRODUCTION Heatit Z-Temp3 is a battery-operated thermostat designed for controlling water-based heating systems. The thermostat has a user-friendly interface. Heatit Z-Temp3 has 3 modes: Heat, Cool, and Eco. All communication between Heatit Z-Temp3 and the controlled device is 100% wireless. Heatit Z-Temp3 uses 2x AAA batteries, but you can also connect the device to an external power source. Heatit Z-Temp3 can be associated with other Z-Wave devices to control other types of heating solutions. Heatit Z-Temp3 is a great choice for the restoration or renovation of existing buildings, as it is easy to install without the need for wiring. This device may be used with all devices certified with the Z-Wave Plus certificate. The device needs to be added to an existing network to communicate with the other devices within it. Devices may also be removed from a network.
- Page 2: Quick start instructions for adding the device within a 2 meter range from the gateway can minimize faults during the interview process. Insert the batteries or connect the supplied cable with the Heatit Transformer 230VAC. The Heatit Z-Temp3 does not stay in learn mode until it is included. Mount the device directly on the wall or on a junction box. There are two ways to add the device to a Z-Wave network. Method 1: Standard (Manual) add/remove mode is indicated on the device by rotating LCD segments on the display. Method 2: SmartStart (Automatic) allows products to be added to a Z-Wave network by scanning the Z-Wave QR-Code if your primary controller supports SmartStart inclusion. The thermostat offers versatile installation options, allowing it to be mounted on a wall, on a junction box, or placed at a preferred location. To perform a factory reset, enter the menu by holding the Center button for about 5 seconds and navigate to FACT. The primary controller/gateway has a mode for adding or removing devices, and the device may only be added or removed if the primary controller is in add/remove mode.
- Page 3: Calibration allows for minor adjustments to the temperature readout, which can be calibrated by 6°C using Parameter 4. The thermostat regulates temperature using readings from the internal sensor and can operate in hysteresis or PWM modes based on the setpoint temperature. Brightness of the display can be adjusted using the menu choice “BR1” or Parameter 9. Hysteresis values can be set between 0.3°C and 3.0°C using Parameter 7, with a default setting of 0.5°C. The display ON/OFF function can be enabled or disabled by holding the Left and Center buttons for 10 seconds. With PWM regulation, the thermostat operates based on duty cycles, turning on and off in percentage intervals. To enter the local settings menu, hold the Center button for 5 seconds, allowing navigation through options and submenus. The child lock function disables buttons on the display to prevent local access, indicated by “LOCK” when enabled. Open Window Detection reduces the thermostat setpoint upon detecting a rapid temperature drop from an open window. The temperature shown in standby can be altered with Parameter 8, allowing selection between setpoint and real-time temperature displays.
- Page 4: Error codes include various internal errors and Z-Wave errors, indicating potential issues with the unit. The QR-Code is essential for including a device using S2 security or SmartStart, containing the DSK for device addition. S2 security provides an additional layer of AES 128-bit encryption for Z-Wave communication to enhance security against hacking. The node information frame serves as the business card of a Z-Wave device, detailing its type and technical features. Associations allow Z-Wave devices to control one another, with specific groups for managing commands based on triggered events. Configuration parameters can alter device functionality to better meet user needs, although some parameters are read-only. The thermostat can control multiple relays, but only specific relays should be used for certain applications. Associations can be set and removed via Z-Wave commands, requiring reference to the primary controller for guidance. Temperature limits can be configured, allowing users to set minimum and maximum thresholds for thermostat operation. The display settings can be adjusted for brightness and what information is shown during standby, enhancing user interaction.
- Page 5: Thermostat Mode Command Class allows changing the operating mode of the thermostat. The accessible operating modes include OFF, Heating Mode, Cooling Mode, and ECO Mode. Temperature report interval can be set between 150 to 65535 seconds, with a default of 990 seconds. Humidity report interval is also adjustable from 150 to 65535 seconds, with a default of 990 seconds. The thermostat reports its operating state using the Operating State Command Class. Open window detection can be enabled or disabled. The device supports the Indicator Command Class, which can flash the backlight of the display. The battery Command Class reports the current battery level in specific instances. Protection Command Class allows disabling local control of the thermostat. The device supports multiple Command Classes, including those for security and association.
- Page 6: Order of assembly Insecure on Secure inclusion Secure on Association Configuration Thermostat mode Thermostat operating state Thermostat setpoint Thermostat controls
- Page 7: Chart - display menu structure Hold the middle button for 5 seconds to enter menu. TDS: temperature displayed in standby mode. Setpoint temperature. Real time temperature for 2 seconds. Hold the middle button to set HYST value, from 0.3-3.0. Short hold to change the mode.
- Page 8: Error messages in display Failed to include Internal error: communication failed Z-Wave error Internal sensor error The product must be used with a security-enabled Z-Wave controller in order to fully utilize security/encryption. General display messages The device is maintenance-free. Indoor use only. Do not dispose of electrical appliances as unsorted municipal waste, use separate collection facilities. All electrical installations must be carried out by an authorized electrical installer.

Honeywell CT31 Low Voltage Thermostat Owner’s Manual

BEOK TGT79 Touch Screen Thermostat User Manual

BAXI uSense 2 Wired Smart Thermostat Installation Guide

Ebeco EB-Therm 55 Thermostat User Manual

EPH CDTP2 Room Thermostat Installation Guide

DELTA DORE Tywell 2050 Thermostat D’Ambiance Radio Installation Guide

Honeywell RLV4300 5-2 Programmable Thermostat Owner’s Manual

VIVE TP-N-751 Programmable Thermostat Installation Guide

LAE AC1-2W Digital Thermostat Instruction Manual

Quality Heating PRF-80 Touch Thermostat Instructions