
HEATIT Z-Temp3 is a Battery Operated Thermostat Instruction Manual





15. CALIBRATION
10.PRINCIPLES OF REGULATION
If the temperature sensor readout is not correct, you can make
minor changes to the temperature readout. The temperature
readings can be calibrated by 6°C using Parameter 4.
The calibration can also be performed from the menu using
CAR. The adjusted value will be displayed in the controller/
gateway indicating what the thermostat uses for regulation.
The thermostat uses temperature readings retrieved from the
internal sensor to regulate the temperature. The thermostat
will regulate the temperature using hysteresis or PWM, based
on the setpoint temperature.
To select either “HYST” or “PWM” you can find the “REG” menu
option or use Parameter 5 “Regulation mode.
16.BRIGHTNESS
Using the menu choice “BR1”, the brightness of the display
in Active state can be changed. “BR1” is also included in the
device as Parameter 9 (BR1).
10.1 Hysteresis
Hysteresis will turn on and off the load based on the hysteresis
value in comparison to the setpoint. You can make changes
to the thermostat hysteresis. You may choose hysteresis
values between 0.3°C and 3.0°C using Parameter 7. The
default setting is 0.5°C. When using waterbased heating we
recommend a hysteresis of 1.0°C.
17. DISPLAY ON/OFF (DON/DOFF)
The thermostat has a display ON/OFF function which decides
whether the display should turn completely off when in
Standby. To enable/disable this function, hold the Left and
Center buttons for 10 seconds. The display will show “DOFF”
when the function is activated and “DON” when the function is
disabled. When operating any button, the display will light up.
You may also change the hysteresis by entering the local
settings menu and holding the Center button for 2 seconds
when “REG” is displayed. Here you can choose values between
0.3 and 3.0.
18.DISPLAY ICONS
10.2 Pulse-width modulation PWM
ICON
DESCRIPTION
With PWM regulation enabled, the thermostat will regulate
based on duty cycles. The thermostat is turned on and off in
percentage intervals of the cycle. The amount of time the relay
will be on is based on how far the measured temperature is
from the setpoint.
This icon will be displayed while the relay is on and the
thermostat is in either Heating or Eco mode.
This icon will be displayed while the relay is on and the
thermostat is in Cooling mode.
This icon shows the current signal strength.
This icon shows the battery status.
11. LOCAL SETTINGS MENU
To enter the settings menu, hold the Center button for 5
seconds. The display will display “OFF”. You are now in the
settings menu. While in the settings menu, “SET” will be
displayed in the bottom right of the display. You can now scroll
up and down using the Left and Right buttons. Some options
have submenus. To navigate the submenus, press the Center
button once to enter or exit the submenu. Press the Left and
Right buttons to find your desired value and hold the Center
button for 2 seconds to confirm your selection. “STOR” will
appear to indicate settings are stored.
19. CHILD LOCK
The child lock function disables the buttons on the display,
preventing local access and operation. It will show “LOCK”
when attempting to operate it while the function is enabled. To
enable or disable the function, hold the Left and Right buttons
for 10 seconds. Enabling the function will show “LOCK” in the
display, disabling the function will show “OPEN”.
20.OPEN WINDOW DETECTION OWD
Open Window Detection (OWD) is a function which will
reduce the thermostat setpoint on detection of an open
window. This happens when the temperature sensor registers
a rapid temperature drop.
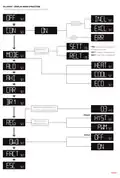
12. DISPLAY MENU STRUCTURE
See flowchart at the end of this manual.
13. TEMPERATURE SHOWN IN DISPLAY
By default, the temperature shown on the display while
in standby state is the setpoint. This may be altered with
Parameter 8:”Temperature display”. It may also be changed
by entering the local settings menu and holding the Center
button for 2 seconds when “MODE” is displayed. You can
choose between “SETT” and “RELT”. “SETT” is the Setpoint
temperature and “RELT” is the real-time temperature.
When OWD is active, the setpoint is reduced to 5°C in order
not to waste energy. OWD will automatically be cancelled
if OWD has been active for more than 1 hour, or if the
temperature increases by 3°C. OWD can also be cancelled
manually by increasing/decreasing the setpoint with the Left
and Right buttons.
By default, OWD is not enabled. The feature may be enabled
by selecting “OWD” from the menu. Choose between options
“OFF” and “ON”. It can also be enabled by setting Parameter 18
(Open window detection) to 1.
14.STANDBY AND MAIN SCREEN
When the thermostat remains untouched for a while, it will
automatically go to the standby screen. The standby will by
default show the setpoint temperature.
By pressing any button once, you will see the measured
temperature. By pressing the Left or Right button multiple
times, you will change the setpoint.

| General | Details |
|---|---|
| Name | HEATIT Z-Temp3 is a Battery Operated Thermostat Instruction Manual |
| Make | HEATIT |
| Language | English |
| Filetype | PDF (Download) |
| File size | 0.53 MB |
 (1 votes, average: 5.00 out of 5)
 Loading...

heatit Z-TRM6 DC Z Wave Electronic Thermostat Instruction Manual

HEATIT Z-TRM3 Thermostat User Guide

Heatit Z-TEMP2 Thermostat Installation Guide

heatit Z-TRM3 WiFi Thermostat Instruction Manual

4512673 Heatit ZM Thermostat 16A User Guide

HEATIT Z-TRM6 Matt Z-Wave Thermostat User Guide

HEATIT 54 304 59 DIN Smart Thermostat Installation Guide

HEATIT 54 305 41 WiFi6 Thermostat Installation Guide

HEATIT Z-TEMP3 Thermostat User Guide

heatit ET-7AW Touchscreen Programmable Thermostat User Manual


CYDATA DAISY Wi-Fi Enabled Thermostat Installation Guide

terneo bx Smart Thermostat Instruction Manual

HAVACO HTS Electronic Room Thermostat User Manual

PECO T372P Thermostat Instruction Manual

EMERSON 1F83C-11NP Single Stage Thermostat Owner’s Manual

GENERAL LIFE SENNA 300S Ignite Digital Room Thermostat User Manual

Danfoss RET230 HCW-1 Electronic Heat Cool Thermostat User Manual

ENGO CONTROLS E55-B, E55-W Wi-Fi Thermostat User Guide

beok-controls TOL47 Series Thermostat User Guide

Micro-Air EasyTouch RV 353 Thermostat Instruction Manual