
HEATIT Z-Temp3 is a Battery Operated Thermostat Instruction Manual





4. QUICK START
Adding the device within a 2 meter range from the gateway
can minimize faults during the Interview process.
1. Insert the batteries or alternatively connect the cable
supplied with the Heatit Transformer 230VAC
(Art. no. 45 126 48).
Note: The Heatit Z-Temp3 does not stay in Learn mode until it
is included.
2. Mount the device directly on the wall or on a junction box.
3. If using a power supply instead of batteris, Connect the wires
according to the description in Chapter ”Connections”.
Turn on the voltage.
There are two ways to add the device to a Z-Wave network.
4. Set the primary controller in add mode (security/non-
security).
7.1 Method 1: Standard (Manual)
Add/remove mode is indicated on the device by rotating
LCD segments on the display. It indicates this for 90 seconds
until a timeout occurs, or until the device has been added to/
removed from the network. Configuration mode can also be
cancelled by performing the same procedure used for starting
Configuration mode.
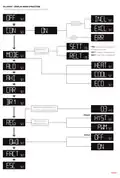
5. Hold the Center button until “OFF” is shown in the display
(approx. 5 seconds).
6. Press the ”+” button once to reach “CON”, and hold the
middle button “ “ until the display shows a rotating pattern.
7. The thermostat will display “INCL” when the thermostat is
successfully added.
NB! If adding/removing fails, Err (error) will appear.
1. Hold the Center button for 5 seconds.
The display will show “OFF”.
5. CONNECTIONS
2. Press the ”+” button once to see “CON” in the display.
3. Start the add/remove device process in your primary
controller.
The Heatit Z-Temp3 can be connected to a 2.7 to 3.3VDC
power supply via the optional cable, providing an alternative
to using batteries. The cable is supplied with the Heatit
Transformer 230VAC (Art. no. 45 126 48).
4. Start the configuration mode on the thermostat by holding
the Center button for approximately 2 seconds.
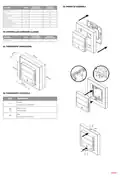
To access the batteries and power connector, or to mount the
device, hold the sides of the display and gently pull outwards
to detach the thermostat from the mounting plate.
The device is now ready for use with default settings.
NB! When the device is removed from the gateway, the
parameters are not reset. To reset the parameters, see Chapter
”Factory reset”.
If inclusion fails, please perform a ”remove device” process and
try again. If inclusion fails again, please see “Factory reset”.
7.2 Method 2: SmartStart (Automatic)
SmartStart enabled products may be added to a Z-Wave
network by scanning the Z-Wave QR-Code on the product
if your primary controller supports SmartStart inclusion. No
further action is required and the SmartStart product will be
added automatically after being powered on within range of
the primary controller.
Red cable 3VDC
Black cable 0VDC
6. INSTALLATION
Remove the thermostat from the frame and mounting plate.
Insert the 2x AAA batteries in the thermostat or connect
the connector on the back using the optional cable. The
thermostat offers versatile installation options, allowing it to be
mounted on a wall, on a junction box or placed at a preferred
location. For wall mounting, attach the mounting plate using
either screws or double-sided tape. If mounting on a junction
box, use screws. Once the mounting plate is in place, carefully
push the thermostat back onto the mounting plate.
8. FACTORY RESET
Enter the menu by holding the Center button for about 5
seconds, navigate in the menu with the ”+” button til you see
FACT. Press the Center button until you see “-- --” blinking in
the display, then hold for about 5 seconds to perform a reset.
You may also initiate a reset by holding the Right and Center
buttons for 55 seconds.
NB! Be careful when installing the batteries, ensuring their
polarity matches the indented markings on the plastic.
When either of these procedures has been performed, the
thermostat will perform a complete factory reset. The device
will display “RES” for 5 seconds while performing a factory
reset. When “RES” is no longer displayed, the thermostat has
been reset.
7. ADD/REMOVE
Please read this before installation
The primary controller/gateway has a mode for adding or
removing devices. Please refer to your primary controller
manual on how to set the primary controller in add/remove
mode. The device may only be added or removed from the
network if the primary controller is in add/remove mode.
When the device is removed from the network, it will NOT
revert to factory settings.
Please use this procedure only when the primary controller is
missing or otherwise inoperable.
9. STARTUP
After powering up the device for the first time, all parameters
will have default settings.

| General | Details |
|---|---|
| Name | HEATIT Z-Temp3 is a Battery Operated Thermostat Instruction Manual |
| Make | HEATIT |
| Language | English |
| Filetype | PDF (Download) |
| File size | 0.53 MB |
 (1 votes, average: 5.00 out of 5)
 Loading...

heatit Z-TRM6 DC Z Wave Electronic Thermostat Instruction Manual

HEATIT Z-TRM3 Thermostat User Guide

Heatit Z-TEMP2 Thermostat Installation Guide

heatit Z-TRM3 WiFi Thermostat Instruction Manual

4512673 Heatit ZM Thermostat 16A User Guide

HEATIT Z-TRM6 Matt Z-Wave Thermostat User Guide

HEATIT 54 304 59 DIN Smart Thermostat Installation Guide

HEATIT 54 305 41 WiFi6 Thermostat Installation Guide

HEATIT Z-TEMP3 Thermostat User Guide

heatit ET-7AW Touchscreen Programmable Thermostat User Manual


hager 75643134 KNX Glass Sensor 3g Thermostat Owner’s Manual

Danfoss AN527449268065en-000101 Thermostat Instruction Manual

Haswill Electronics STC-9200 Thermostat User Guide

TCL IPOWER Heat Mat Thermostat Instruction Manual

GENERAL FH10, FH10S Underfloor Heating Thermostat User Manual

homematic IP IP HmIP-eTRV-CL Radiator Thermostat Instruction Manual

Honeywell RTH2300 Thermostat User Guide

JBM 54342 Parts Cleaner Machine with Thermostat Instruction Manual

Honeywell TH9320WF Smart Thermostat 9000 Color Touchscreen Installation Guide

TOUPWELL TP808 WiFi Low Voltage Thermostat User Guide