
HEATIT Z-TEMP3 Thermostat User Guide
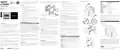


Heatit Z-Temp3 is a great choice for the restoration or
renovation of existing buildings, as it is easy to install without
the need for wiring. We recommend using multiple 230VAC
devices to create a mesh network.
To access the batteries and power connector, or to mount the
device, hold the sides of the display and gently pull outwards to
detach the thermostat from the mounting plate.
1. Hold the Center button for 5 seconds.
The display will show “OFF”.
ORDER OF ASSEMBLY
TECHNICAL DATA
HEATIT
PRODUCT
DOCUMENTS
Protocol
Chip
Z-Wave, 868.4MHz
Z-Wave 800 chip
2.7VDC to 3.3VDC
2xAAA
2. Press the ”+” button once to see “CON” in the display.
3. Start the add/remove device process in your primary
controller.
Rated voltage
Battery
Power consumption
Z-TEMP3
Quick Guide
QUICK START
<1W
4. Start the configuration mode on the thermostat by holding
the Center button for approximately 2 seconds.
Ambient temperature 5°C to 40°C
Temperature range 5°C to 40°C
Storage temperature -30°C to 70°C
Hysteresis
Humidity
Range RF
IP Code
1. Insert the batteries or alternatively connect the cable
supplied with the Heatit Transformer 230VAC
(Art. no. 45 126 48).
Article no.
Doc. version
Doc. date
45 126 90
45 126 91
The device is now ready for use with default settings.
2024-C
01.09.2024
0.3°C to 3.0°C (Default 0.5°C)
2. Mount the device directly on the wall or on a junction box.
3. If using a power supply instead of batteris, Connect
the wires according to the description in Chapter
”Connections”. Turn on the voltage.
10% to 85% RH
Min. 40 meter
IP21
NB! When the device is removed from the gateway, the
parameters are not reset. To reset the parameters, see Chapter
”Factory reset”.
Size (LxWxH)
Approvals
84 x 84 x 22mm
Z-Wave Plus, CE,
Reach, RED, RoHS
4. Set the primary controller in add mode
(security/non-security).
If inclusion fails, please perform a ”remove device” process and
try again. If inclusion fails again, please see “Factory reset”.
Red cable
3VDC
5. Hold the Center button until “OFF” is shown in the display
(approx. 5 seconds).
Working frequency 868.4MHz, Max output power 12.49dBm.
The distance between user and products should be no less than
20 cm. There is no restriction to use this product across
the EU countries.
Hereby, Heatit Controls AB declares that this device is in
compliance with the essential requirements another relevant
provisions of Directive 2014/53/EU.
Black cable 0VDC
SmartStart (Automatic)
SmartStart enabled products may be added to a Z-Wave
network by scanning the Z-Wave QR-Code on the product
if your primary controller supports SmartStart inclusion. No
further action is required and the SmartStart product will be
added automatically after being powered on within range of the
primary controller.
6. Press the ”+” button once to reach “CON”, and hold the
middle button “ “ until the display shows a rotating pattern.
7. The thermostat will display “INCL” when the thermostat is
INSTALLATION
Remove the thermostat from the frame and mounting plate.
Insert the 2x AAA batteries in the thermostat or connect
the connector on the back using the optional cable. The
thermostat offers versatile installation options, allowing it to be
mounted on a wall, on a junction box or placed at a preferred
location. For wall mounting, attach the mounting plate using
either screws or double-sided tape. If mounting on a junction
box, use screws. Once the mounting plate is in place, carefully
push the thermostat back onto the mounting plate.
successfully added.
NB! If adding/removing fails, Err (error) will appear.
White RAL 9003
Black matt
45 126 91
45 126 90
MAINTENANCE
FACTORY RESET
ASSOCIATION GROUPS
The product is maintenance-free.
Indoor use only.
Enter the menu by holding the Center button for about 5
seconds, navigate in the menu with the ”+” button til you see
FACT. Press the Center button until you see “-- --” blinking in
the display, then hold for about 5 seconds to perform a reset.
You may also initiate a reset by holding the Right and Center
buttons for 55 seconds.
GROUPS
DESCRIPTION
INTRODUCTION
Heatit Z-Temp3 is a battery-operated thermostat designed for
controlling waterbased heating systems. Used in combination
with the Heatit Z-Water2, you can control your heating system
through the Z-Wave® network or via the buttons on the front
panel. The thermostat has a user-friendly interface.
Lifeline.
Group 1 – Used by controller
Max nodes in group: 1
Binary Switch Set.
Max nodes in group: 10
22mm
84mm
Group 2 – For controlling Relays
NB! Be careful when installing the batteries, ensuring their
polarity matches the indented markings on the plastic.
Group 3 – Used with Group 4 to Thermostat Setpoint set.
enable Master Thermostat Max nodes in group: 10
Group 4 – Used with Group 3 to Thermostat Mode set.
enable Master Thermostat Max nodes in group: 10
When either of these procedures has been performed, the
thermostat will perform a complete factory reset. The device
will display “RES” for 5 seconds while performing a factory
reset. When “RES” is no longer displayed, the thermostat has
been reset.
Heatit Z-Temp3 has 3 modes: Heat, Cool, and Eco.
ADD/REMOVE
55mm
The primary controller/gateway has a mode for adding or
removing devices. Please refer to your primary controller
manual on how to set the primary controller in add/remove
mode. The device may only be added or removed from the
network if the primary controller is in add/remove mode. When
the device is removed from the network, it will NOT revert to
factory settings.
The thermostat fits into System 55 frames, and may be
mounted alongside other equipment such as e.g dimmers or
light switches. Heatit Z-Temp3 can also be mounted directly on
the wall or placed freely, e.g. on a shelf.
If the thermostat is to control a relay, an association from
Group 2 must be created from the thermostat to the relay that
is to be controlled.
Please use this procedure only when the primary controller is
missing or otherwise inoperable.
84mm
Heatit Z-Temp3 can be set as a master thermostat. This means
that you can set the setpoint and mode on one unit, and it will
automatically send the setpoint and mode to other connected
units.
Disclaimer: When using the Heatit Z-Temp3 to control multiple
relays on a Heatit Z-Water (Art. no. 4512475) or a Heatit
Z-Water2 (Art. no. 4512495), only use relays 1 through 7. Do not
use relays 8, 9, or 10 for this purpose.
DISPLAY ICONS
55mm
ICON
DESCRIPTION
Adding the device within a 2 meter range from the gateway can
minimize faults during the Interview process.
This icon will be displayed while the relay is on and
the thermostat is in either Heating or Eco mode.
All communication between Heatit Z-Temp3 and the controlled
device is 100% wireless.
If the thermostat is to control other thermostats as a master
thermostat, an association from Group 3 and Group 4 must be
created from the master thermostat to the thermostats to be
controlled.
Click
There are two ways to add the device to a Z-Wave network.
We develop and design our products according in accordance with our strict quality
requirements (ISO 9001) and environmental requirements (ISO 14001). All electrical
installations must be carried out by an authorized electrical installer. The product
must be installed in accordance with our installers manual and national building
codes. Any wrongful installation, misuse, damage of the product, is not covered
documents.heatit.com. Heatit Controls AB can not be held liable for any type of
errors or omittances in our product information. Product specifications may change
without further notice.
This icon will be displayed while the relay is on and
the thermostat is in Cooling mode.
Standard (Manual)
Heatit Z-Temp3 uses 2x AAA batteries, but you can also connect
the device to an external power source. The Heatit Transformer
230VAC (45 126 48) is recommended for this purpose.
Add/remove mode is indicated on the device by rotating
LCD segments on the display. It indicates this for 90 seconds
until a timeout occurs, or until the device has been added to/
removed from the network. Configuration mode can also be
cancelled by performing the same procedure used for starting
Configuration mode.
CONNECTIONS
This icon shows the current signal strength.
This icon shows the battery status.
The Heatit Z-Temp3 can be connected to a 2.7 to 3.3VDC
power supply via the optional cable, providing an alternative
to using batteries. The cable is supplied with the Heatit
Transformer 230VAC (Art. no. 45 126 48).
Heatit Z-Temp3 can be associated with Heatit ZM Single Relay,
other Z-Wave relays, Heatit ZM Thermostat, Heatit Z-TRM6
Thermostat and other Z-Wave devices to control other types of
heating solutions.
Click
DISCLAIMER
Battery lifespan may vary based on the installation environment
and usage conditions.
Org. doc. 01.07.2024
Heatit Controls AB
l
Läkarvägen 4, 454 31 BRASTAD, SWEDEN


| General | Details |
|---|---|
| Name | HEATIT Z-TEMP3 Thermostat User Guide |
| Make | HEATIT |
| Language | English |
| Filetype | PDF (Download) |
| File size | 0.57 MB |
 (1 votes, average: 5.00 out of 5)
 Loading...

heatit Z-TRM6 DC Z Wave Electronic Thermostat Instruction Manual

HEATIT Z-TRM3 Thermostat User Guide

Heatit Z-TEMP2 Thermostat Installation Guide

heatit Z-TRM3 WiFi Thermostat Instruction Manual

HEATIT Z-Temp3 is a Battery Operated Thermostat Instruction Manual

4512673 Heatit ZM Thermostat 16A User Guide

HEATIT Z-TRM6 Matt Z-Wave Thermostat User Guide

HEATIT 54 304 59 DIN Smart Thermostat Installation Guide

HEATIT 54 305 41 WiFi6 Thermostat Installation Guide

heatit ET-7AW Touchscreen Programmable Thermostat User Manual

Heatit Z-TEMP3 Manual: Questions and Answers
Heatit Z-TEMP3 specifications
| Power supply | 2.7VDC to 3.3VDC |
| Differential | 0.3°C to 3.0°C (Default 0.5°C) |
| Humidity | 10% to 85% RH |
| IP rating | IP21 |
| Power consumption | <1W |
How do I add the Heatit Z-TEMP3 to my Z-Wave network?
Start the add/remove device process in your primary controller, then hold the Center button on the thermostat for approximately 2 seconds to enter configuration mode.
- Hold the Center button for 5 seconds until the display shows OFF.
- Press the + button once to see CON in the display.
- Start the add/remove device process in your primary controller.
- Hold the Center button for approximately 2 seconds to start configuration mode on the thermostat.
- The thermostat will display INCL when successfully added to the network. User Guide, p. 1
Can I use the Heatit Z-TEMP3 to control multiple relays on a Heatit Z-Water device?
Yes, but only use relays 1 through 7. Do not use relays 8, 9, or 10 for this purpose. User Guide, p. 1
What do the icons on the Heatit Z-TEMP3 display mean?
The thermostat displays icons for relay status, signal strength, and battery level.
| Icon | Meaning |
|---|---|
| Relay icon (Heating/Eco) | Relay is on and thermostat is in Heating or Eco mode |
| Relay icon (Cooling) | Relay is on and thermostat is in Cooling mode |
| Signal bars | Current Z-Wave signal strength |
| Battery symbol | Battery status indicator |
Heatit Z-TEMP3 compared with other Heatit thermostats
| Specification | Heatit Z-TEMP3 | Heatit 54 304 DIN | Heatit Z-TEMP2 | Heatit Z-TRM3 |
|---|---|---|---|---|
| Power supply | 2.7VDC to 3.3VDC | 230VAC 50Hz | 3 x AA batteries (1,5V) | 230V 50/60Hz |
| Differential | 0.3°C to 3.0°C (Default 0.5°C) | 0.3°C to 3.0°C (default 0.5°C) | 0,3°C to 3,0°C (default 0,5°C) | 0,3°C to 3,0°C (default 0,5°C) |
| IP rating | IP21 | IP21 | IP 21 | IP 21 |
Other Heatit Z-TEMP3 manuals
More Heatit thermostat manuals

GENERAL LIFE ARUNA 302S Wired Room Thermostat User Manual

sensi 1F76U-22WFB Lite Smart Thermostat User Manual

DEVI 140F1134 Plug In Electronic Thermostat Installation Guide
EMSQ22 Daikin ONE Lite Smart Thermostat User Manual

EcoNet RETST800SYS Smart Thermostat User Guide

ENSTO ECO16BTD Combination Thermostat Instruction Manual

BUDDERFLY BTS-U2 Thermostat User Manual

Zhongjin STN731RF Thermostat Instruction Manual

GENERAL LIFE MITRA 260S RF Digital Room Thermostat User Manual
AuVerte SC801 SpiritCatcher Thermostat Owner’s Manual