
Home > BEOK CONTROLS > beok-controls TOL47 Series Thermostat User Guide
beok-controls TOL47 Series Thermostat User Guide


TOL47 Series Thermostat User Guide
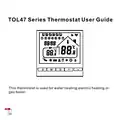
This thermostat is used for water heating,electric heating,or
gas boiler.


| General | Details |
|---|---|
| Name | beok-controls TOL47 Series Thermostat User Guide |
| Make | BEOK CONTROLS |
| Language | English |
| Filetype | PDF (Download) |
| File size | 1.15 MB |
 (1 votes, average: 5.00 out of 5)
 Loading...

BEOK CONTROLS TDR83 WiFi Heating Thermostat User Guide

BEOK CONTROLS TCR7 IPS Colorful LCD Screen Smart Thermostat Owner’s Manual

BEOK CONTROLS TDR89 Thermostat User Guide

BEOK CONTROLS BOT-R7X Wireless Gas Boiler Heating Thermostat Instructions

BEOK CONTROLS TCR8 IPS Colorful LCD Screen Smart Thermostat Owner’s Manual

BEOK CONTROLS TGW60 Touch Screen Boiler Thermostat User Guide

BEOK CONTROLS TGR86 WiFi Thermostat User Guide

BEOK CONTROLS BOT-323W Series Boiler Thermostat Instruction Manual

BEOK CONTROLS TDS72 Digital Screen Thermostat Instruction Manual

BEOK CONTROLS BOT-R6W Gas Boiler Thermostat Instruction Manual

beok-controls TOL47 Series Thermostat User Guide Overview
Summary of Contents
- Page 1: TOL47 Series thermostat user guide. This thermostat is used for water heating, electric heating, or gas boiler.
- Page 2: Welcome Thank you for your trust and support. We have adopted advanced technology and perfect craftsmanship. Your new thermostat will provide you with a suitable temperature environment. For detailed instructions on installing and using this thermostat, please read this manual carefully. Please get in touch with a professional to install the thermostat for you. Please install and use this product within the scope of the law.
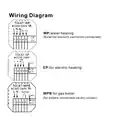
- Page 3: Wiring diagram Water heating External sensors cannot be connected NTC For electric heating For gas boiler For boilers connected via dry contact
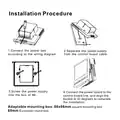
- Page 4: Installation procedure includes connecting the power box according to the wiring diagram. Separate the power supply from the control board cable. Screw the power supply into the box of 86. Connect the power board to the control board line, aligning the buckle at 30 degrees to complete the installation. The adaptable mounting box is 86x86mm square or 60mm European round.
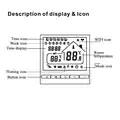
- Page 5: Description of display & icon
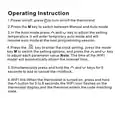
- Page 6: Operating instruction Power on/off: press to turn on/off the thermostat. Press the M key to switch between manual and auto mode. In auto mode, press and key to adjust the setting temperature. It will enter temporary auto mode and will resume auto mode at the next programming session. Press the M key to switch the setting options. Press the key to enter the clock setting. Press the mode and key to adjust each parameter value. The time of the WIFI model will automatically obtain the Internet time. Simultaneously press and hold the keys for 5 seconds to add or cancel the childlock. When the thermostat is turned on, press and hold the button for 5 to 8 seconds to enter the code matching state.
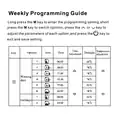
- Page 7: Weekly programming guide Long press the M key to enter the programming setting. Short press the M key to switch options. Press the or key to adjust the parameters of each option. Press the exit and save setting.
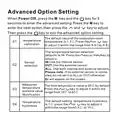
- Page 8: Advanced option setting allows access to various calibration features. To enter advanced settings, press the M key and the designated key for 5 seconds when powered off. The default value for calibration room temperature is -1.5℃, adjustable between 9.9℃ and -9.9℃. Temperature sensor selection defaults to IN, with options for internal, external, or both sensors. If no external sensor is connected, do not set to ALL or OUT to avoid error messages. The default limit temperature value is 60℃, adjustable between 35℃ and 60℃. Temperature hysteresis is set to 1℃ by default, adjustable between 0.5℃ and 10℃. Press the M key to navigate options and the designated keys to adjust values. Press the designated key to exit the advanced option setting. Ensure proper sensor settings to avoid display errors.
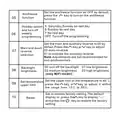
- Page 9: Set the antifreeze function as OFF by default. Press the function key to turn on the antifreeze function. Set the main and auxiliary reverse to 00 by default. Adjustments are not recommended for non-professionals. Turn off the backlight or adjust brightness levels. Set the upper limit of the temperature to 60℃. Adjust the temperature range from 15℃ to 95℃. Press the key to display “---” for factory reset. Press the setting key to restore the factory settings. Holiday option includes various rest day configurations.
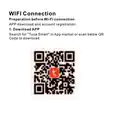
- Page 10: Wi-Fi connection preparation is necessary before proceeding. Download the app by searching for Tuya Smart in the app market or scanning the provided QR code. Account registration is required after downloading the app.
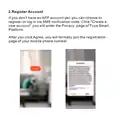
- Page 11: Register account If you don't have an APP account yet, you can choose to register or log in via SMS verification code. Click Create a new account to enter the Privacy page of Tuya Smart Platform. After you click Agree, you will formally join the registration page of your mobile phone number.
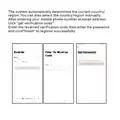
- Page 12: The system automatically determines the current country or region. You can also select the country or region manually. After entering your mobile phone number or email address, click get verification code. Enter the received verification code then enter the password. Click finish to register successfully.
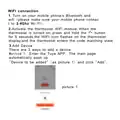
- Page 13: WIFI connection Turn on your mobile phone's Bluetooth and Wi-Fi (please make sure your mobile phone connects to 2.4Ghz Wi-Fi). Activate the thermostat WiFi module: When the thermostat is turned on, press and hold the button for 5 seconds, the WIFI icon flashes on the thermostat display, and the thermostat enters the code matching state. Add Device: There are 3 ways to add a device. Method 1: Enter the Tuya APP. The main page automatically pops up Device to be added and click Add.
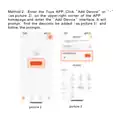
- Page 14: Enter the Tuya app and click Add Device or + on the upper right corner of the app homepage. You will enter the Add Device interface. It will prompt you to find the device to be added and follow the prompts.
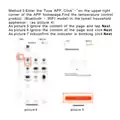
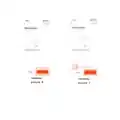
- Page 15: Enter the Tuya app and click + on the upper right corner of the app homepage. Find the temperature control product (Bluetooth + WiFi model) in the small household appliance section. Ignore the content of the page and tap Next. Ignore the content of the page and click Next. Tick to confirm the indicator is blinking and click Next.
- Page 16: Page 16
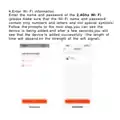
- Page 17: Enter Wi-Fi information. Enter the name and password of the 2.4GHz Wi-Fi. Make sure that the Wi-Fi name and password contain only numbers and letters and not special symbols. Follow the prompts to the next step. You can see the device is being added. After a few seconds, you will see that the device is added successfully. The length of time will depend on the strength of the Wi-Fi signal.
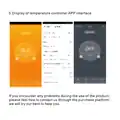
- Page 18: Display of temperature controller app interface If you encounter any problems during the use of the product, please feel free to contact us through the purchase platform.

BEOK TGR85-EP Underfloor Heating Thermostat User Guide

Honeywell Home RLV3150 Electric Thermostat User Guide

Eurotronic Technology sprit Z-Wave Smart Radiator Thermostat Installation Guide

Honeywell RLV450 Programmable Thermostat

CENTER EHE0200322 RF Wireless 7 Day Programmable Thermostat Installation Guide

DEVIreg Electronic Intelligent Timer Thermostat Installation Guide

TCL IPOWER Heat Mat Thermostat Instruction Manual

RTH21 Programmable Thermostat Coldbuster Dual Instruction Manual

HEATIT 54 305 41 WiFi6 Thermostat Installation Guide

eurotronic Comet Zigbee Energy Saving Radiator Thermostat Instruction Manual