BAXI uSense 2 Wired Smart Thermostat Installation Guide
| General | Details |
|---|---|
| Name | BAXI uSense 2 Wired Smart Thermostat Installation Guide |
| Make | BAXI |
| Language | English |
| Filetype | PDF (Download) |
| File size | 0.34 MB |

BAXI uSense 2 Wired Smart Thermostat Gateway Installation Guide

BAXI uSense 2 Wired Smart Thermostat Installation Guide Overview
Summary of Contents
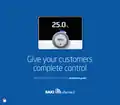
- Page 1: Give your customers complete control. Baxi uSense 2 wired smart thermostat installation guide.
- Page 2: Compatibility In the box Before you start Installation OpenTherm hot water control (combi only) Outdoor sensor Technical specifications Warning: High voltage wiring must only be installed and worked on by a suitably qualified person.
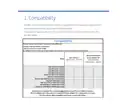
- Page 3: Compatibility The Baxi uSense Wired Smart Thermostat is compatible with all appliances using the 230 V switched live and also has OpenTherm and RUB capability. A Gateway & Power Adapter Kit is only required for certain products in the Baxi range. The Baxi uSense 2 Smart Room Thermostat is compatible with all Baxi, Potterton & Main Combi boilers and Baxi Air Source Heat Pumps (ASHP). An additional uSense 2 Gateway & Power Adapter Kit Accessory may also be required. Baxi uSense 2 is Boiler Plus Compliant when fitted via OpenTherm or RBUS connection. For multiple zones, a Baxi uSense 2, Gateway & Power Adapter Kit is required for each zone. This control is not compatible with System or Heat Only Boilers.
- Page 4: - Room unit package includes various components. - Components listed are user guide, room unit, screw and plug fixings, and mounting bracket.
- Page 5: Before you start Wear appropriate personal protection equipment. Positioning the uSense 2 involves several factors. The room unit must be positioned on an internal wall. It should be 1.5 m away from draughts. The unit should be 1.2-1.5 m from the floor. Avoid placing it behind doors, bookcases, or other objects. Do not position it in direct sunlight. Place it in a room where the user spends most of their time. Keep it away from heat sources like fireplaces and radiators. Ensure the maximum cable length from the gateway to the room unit is 50 m.
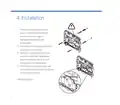
- Page 6: Installation Choose a suitable location for the uSense 2 thermostat. Remove existing thermostat if applicable. Fix the room unit backplate to the wall using the screws provided. Either use existing thermostat wires or run new wires from the gateway. There is no polarity - either wire can be connected to either position. Trim the wires coming out of the wall. Connect them into the connector block on the room unit backplate.
- Page 7: Slacken the screws at the sides of the connectors and insert each wire into the top at either side of the connector, then re-tighten the screws. Make sure the wires are as flat as possible against the back plate so that they do not interfere with the controller when it is mounted in position. Press the room unit onto the backplate until it clicks into place. Connect the other end of the wires to the R-BUS or OpenTherm terminals in the boiler (or gateway if fitted). There is no polarity - either wire can be connected to either position. The connections between the room unit and boiler or gateway are low voltage. 230 V will damage the room unit and gateway.
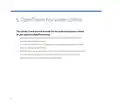
- Page 8: OpenTherm hot water control The uSense 2 room unit will override the hot water temperature controls on your appliance. The room unit will automatically default the hot water temperature to 60 °C when connected by OpenTherm. The room unit will automatically default the heating flow temperature to 80 °C when connected by OpenTherm. These settings can be adjusted to your required comfort level using the uSense 2 room unit only.
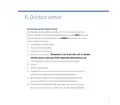
- Page 9: Outdoor sensor Connecting to an outdoor sensor If an outdoor sensor weather compensator is connected in conjunction with the uSense 2, you can only adjust the heating curve on the uSense 2 App. Open the Baxi uSense 2 App. Click on the installer menu. Click on advanced settings. Enter service code 0012. You will see a message ‘Your access level has been updated.’ Change the curve to suit the requirements of the user in accordance with the recommendations of the sensor manufacturer. Do not adjust any other settings in the Advanced Feature menu. Either completely close the App or re-enter the code to cancel the access level.
- Page 10: Technical specifications uSense 2 room unit Dimensions: Width x height x depth (maximum dimensions) Power supply: 24 V ± 5% Maximum power consumption: 1.5 W Maximum cable length for dedicated room unit R-Bus: 50 m Storage temperature: -25 to 70 °C Relative humidity: 5 - 95% (Condensation is not allowed) Operating conditions: 0 - 60 °C
- Page 11: uSense 2 room unit Technical data Room temperature measurement range Maximum temperature deviation at 20 °C Maximum room control overshoot after pre-heating Temperature variation Outside temperature Temperature control area Refer to appliance documentation
- Page 12: Compliant with standards: EMC: 108/2004/EC, EN 55022, 55014 Immunity: EN 2-6-61000 ETSI-EN 17-489 301 R&TTE Directive 5/1999/EC EN 1-60950 (ITE - Safety - Part 1: general requirements) Low voltage directive (95/2006/EC) WEEE directive (96/2002/EC) (disposal requirements) Drop test: IEC 32-2-60068 Protection classification: IP 22 ErP Fiche Information
- Page 13: Page 13
- Page 14: Page 14
- Page 15: Page 15
- Page 16: For tech support, opening hours are Monday to Friday, 8.00am to 6.00pm, and weekends and bank holidays, 8.30am to 2.00pm. Calls may be recorded for training and monitoring purposes. Warranty registration is necessary to activate and maintain the parts warranty for the uSense 2 Smart Thermostat. If not registered, a basic 12-month warranty will apply. Ensure the uSense 2 is installed according to the installation instructions and adheres to Building Regulations. Descriptions and illustrations in this document may change as products are improved. All goods are sold subject to standard Conditions of Sale.