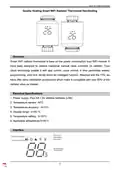
TechPunt E1 Smart WiFi Radiator Thermostat User Guide

Smart WiFi Radiator Thermostat
Quality Heating Smart WiFi Radiator Thermostat Handleiding
Overview
Smart WiFi radiator thermostat is base on low power consumption tuya WiFi module. It
have been designed to replace traditional manual valve controller on radiator. Tuya
cloud technology enable it with app control ,voice control, 4 time period/day weekly
programming, child lock ,family share etc intelligent function. Attached with the TRV, we
have offer valve installation accessories which make it compatible with over 90% of the
radiator valve on market.
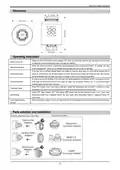
Electrical Specifications
1. Power supply: Four AA 1.5V alkaline batteries (LR6)
2. Temperature sensor : NTC
3. Temperature accuracy : ±0.5°C
4. Display range : 0~50 °C
5. Temperature setting : 5~35°C
6. Applicable temperature:0~50°C
Interface
1

| General | Details |
|---|---|
| Name | TechPunt E1 Smart WiFi Radiator Thermostat User Guide |
| Make | TECHPUNT |
| Language | English |
| Filetype | PDF (Download) |
| File size | 0.2 MB |


TechPunt E1 Smart WiFi Radiator Thermostat User Guide Overview
Summary of Contents
- Page 1: Smart WiFi radiator thermostat is based on low power consumption tuya WiFi module. It has been designed to replace traditional manual valve controllers on radiators. Tuya cloud technology enables it with app control, voice control, and weekly programming. It includes features like child lock and family share. The thermostat is compatible with over 90% of radiator valves on the market. Power supply: Four AA 1.5V alkaline batteries (LR6). Temperature accuracy: ±0.5°C. Display range: 0~50 °C. Temperature setting: 5~35°C. Applicable temperature: 0~50°C.
- Page 2: Smart WiFi radiator thermostat Operating instruction Please turn the knob until the screen displays “OF when you turn off the machine. You only need to turn the knob to adjust the required temperature when you start the machine. When the window is opened, causing the room temperature to drop more than 2°C within 15 minutes, the main screen displays OP. If the heat sink is not fully opened within one week, the valve will be blocked due to silting-up. The controller will automatically open the valve fully every one week. Long press the knob to activate the child lock function in the power-on state, and the screen displays LC. When TRV is in auto mode, manually change the temperature by turning the button. Under OFF state, the mobile app shows that the anti-freezing function is on. When the battery voltage is too low, the alarm symbol will be displayed to remind the user to replace the battery.
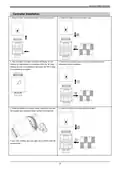
- Page 3: Smart WiFi radiator thermostat Controller installation Press the button and pull the protective cover up to remove it. Install 4 AA batteries and the protection cover. After the battery is installed, the screen will display “in” and blinking. When the “in” stops blinking, the push rod is retracted to the bottom. The TRV is ready to be installed on the radiator. Remove the protective cover and remove the batteries to avoid misoperation during installation. Rotate and tighten the controller copper ring. Install the thermostatic valve installation thread interface of the heat sink. If your valve interface does not match the controller, install the accessory first.
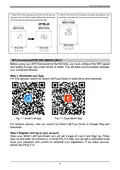
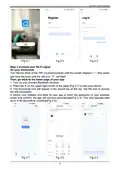
- Page 4: Smart WiFi radiator thermostat When the “in” stops flashing, turn the knob, the TRV will enter self-check mode, the TRV will display “Ad” and the internal push rod will adapt to the opening and closing of the valve. After the TRV self-check is completed, the screen will display the room temperature, indicating that it has been installed and can work normally. Before using your WiFi thermostat for the first time, you must configure the WiFi signal and setting through your smartphone or tablet. For iOS devices, search for Smart Life/Tuya Smart in Apple Store and download. For Android devices, also search for Smart Life/Tuya Smart in Google Play and download. Open your Smart Life/Tuya Smart, you will get a page of Log In and Sign Up. Press Sign Up and enter your phone number or email, then you can get a verification code. Input your password and confirm to complete your registration.
- Page 5: Smart WiFi radiator thermostat Connect your Wi-Fi signal Turn the top knob of the TRV counterclockwise until the screen displays “--”, then press and hold the knob until the wifi icon will flash. Turn on your phone's Bluetooth function. Press the + on the upper right corner of the page to add your device. The thermostat icon will appear in the search bar at the top. Select your network and back to your app to enter the password of your wireless router and confirm. The app will connect automatically. This may typically take up to 5~90 seconds to complete.
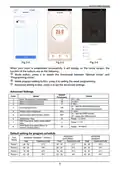
- Page 6: Smart WiFi radiator thermostat When your room is established successfully, it will display on the home screen. The function of the buttons are as follows: Mode button, press it to switch the thermostat between “Manual mode” and “Programming mode”. Week program setting button, press it to set the week programming. Advanced setting button, press it to set the advanced settings. Anti-freezing function can be turned on or off. Open window detect function (OWD) can be activated or deactivated. Default setting for program schedule includes weekend and weekday settings. OWD detect time and temperature drop selection can be adjusted. OWD delay time can be set to return to previous working status.

TRANE XR103 Non-Programmable Heat Pump Thermostat User Guide

EPH Controls RFCP-RFCA RF Cylinder Thermostat Instruction Manual

SALUS TS600 Wireless Temperature Sensor Thermostat User Guide

ENSTO ECO16TOUCH Combination Thermostat Instruction Manual

Honeywell T4 Lockout Change Thermostat User Manual

olympia electronics BS-850-KIT Wireless Programmable WiFi Electronic Chrono Thermostat User Manual

Micro Air ETRV EasyTouch RV Thermostat Instruction Manual

American Standard ACONT103 NP Non Programmable Heat Pump Thermostat Instruction Manual

SALUS RT310i Smart Phone Controlled Programmable Thermostat Installation Guide

sensi 1F87U-42WF Smart Thermostat Installation Guide