Home > olympia electronics > olympia electronics BS-850-KIT Wireless Programmable WiFi Electronic Chrono Thermostat User Manual

olympia electronics BS-850-KIT Wireless Programmable WiFi Electronic Chrono Thermostat User Manual

WIIRELESS PROGRAMMABLE WIIFII ELECTRONIIC CHRONO - THERMOSTAT  
BS-850/KIT, BS-851/KIT  
WIITH HEATIING FUNCTIION AND BOIILER OUTPUT  
● Wireless connection between thermostat and  
commands of Relay.  
● Connection with WiFi.  
Controlled from the smartphone.  
RF signal strength indicator.  
● 3 operation modes: manual, daily and weekly.  
8 key easy operation.  
Easy programm entry.  
Multiply indication screen with backlight.  
Clock, Calendar.  
BS-850/T - BS-851/T  
Keypad lock  
Selection of upper and lower limits for  
Wi  
manual temperature selection.  
Boiler operation (BS-851/Τ) with selectable time.  
Easy connection - adjustment.  
Only for BS-851/R  
BS-850/R - BS-851/R  
Thank you for your trust in our products  
Olympia Electronics - European manufacturer  
CONTROL AND INDICATIOR  
DESCRIPTION  
Thermostat activation  
Thermostat deactivation  
Increase value  
Decrease value  
Presence indicator  
Thermostat active  
Thermostat inactive  
Battery state indicator  
Ascending or descending temperature  
indicator  
= When the selection is less than the  
actual temperature.  
= When the selection + the differential is  
more than the actual temperature.  
= When the temperature is between the  
The key  
is like this  
1
on the BS-850/T.  
2
3
4
5
6
7
8
9
28 27 26 25 24 23 22 21  
20  
MENU  
ENTER  
1
19  
18  
17  
16  
15  
2
3
4
5
ESC  
6
7
8
9
10 11 12 13 14  
selection and the selection the  
differential.  
+
940851000_09_010  
Page 1 from 14  
GeneralDetails
Nameolympia electronics BS-850-KIT Wireless Programmable WiFi Electronic Chrono Thermostat User Manual
Makeolympia electronics
LanguageEnglish
FiletypePDF (Download)
File size2.27 MB
Download PDF
1 Star2 Stars3 Stars4 Stars5 Stars (1 votes, average: 5.00 out of 5)
Loading...
olympia electronics BS-830 Digital Electronic Thermostat Instruction Manual

olympia electronics BS-850-KIT Wireless Programmable WiFi Electronic Chrono Thermostat User Manual
Get the free PDF manual for the olympia electronics BS-850-KIT Wireless Programmable WiFi Electronic Chrono Thermostat User Manual and access setup steps, usage instructions, and troubleshooting tips. 👉 View online or download now to keep your thermostat running smoothly!
olympia electronics BS-850-KIT Wireless Programmable WiFi Electronic Chrono Thermostat User Manual Overview

Summary of Contents

  • Page 1: Wireless programmable WiFi electronic chronothermostat BS-850/KIT, BS-851/KIT with heating function and boiler output. Wireless connection between thermostat and commands of Relay. Connection with WiFi. Controlled from the smartphone. RF signal strength indicator. Three operation modes: manual, daily, and weekly. Keypad lock and selection of upper and lower limits for manual temperature selection. Boiler operation (BS-851/T) with selectable time. Easy connection and adjustment. Thank you for your trust in our products.
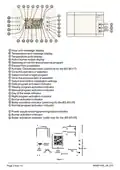
  • Page 2: Hour and message display Temperature and message display Temperature units display Active burner output display Selecting or not the area presence program Activate / deactivate boiler (valid only for the BS-851/T) Select normal or night program Daily program activation indicator Weekly program activation indicator Manual program activation indicator
  • Page 3: Setting up the device Entering the MENU Day or night operation Boiler activation selection Presence selection Screen illumination Battery changing Daily programming example Weekly programming example Smartphone connection
  • Page 4: To set up the parameters of WiFi, you can do this by selecting WPS or Smart Config. By WPS, push the WPS button on the receiver to enter WPS mode, then push the WPS button on the router. In the Smart Config method, enter the SSID and password of the WiFi in the respective fields. After entering the information, push the Manual button on the thermostat and then the SEND icon from the application. When connected, the LD4 must blink every 2 seconds while the LD5 must be off, indicating an internet connection. The thermostat screen refreshes every five minutes, so commands from your smartphone may not appear immediately. Through the Olympia Thermostat App, you can add more than one device with different serial numbers. The thermostat can be controlled by multiple users if they are logged into the same email account.
  • Page 5: temperature is set to 18.0º C. To deactivate the night program, press the key for more than 3. When the plastic battery separator is removed, the unit is automatically activated. In the center of the screen, you can see the current temperature. The clock has the hour 00:00, the date is 1 January 2016, and the thermostat is inactive (OFF state). Boiler activation is available only on the BS-851/T. To enter the menu settings, press the MENU ENTER button for more than 3. To navigate through the menu items, use the keys. In limited absence from the area, there is the capability to execute the absence program. The factory default setting of the night program temperature is 16.0 ºC and can be altered from 6.0 to 30.0 ºC.
  • Page 6: keypad lock can be activated by pressing the menu and enter keys simultaneously for 3 seconds. The 24-hour cycle allows for 10 programs to be set with defined start times and temperatures. The start time of the next program must be greater than the previous program's start time. To enter time and date adjustment mode, press the menu and enter keys. The clock includes leap year and daylight savings time corrections. Adjusting settings for the weekly program can be done by pressing the menu key twice after entering the menu. The day names change automatically based on the year, month, and date. Setting the daily program follows a similar procedure to the weekly program. At least one program must be adjusted for each day to avoid default temperature settings. Pressing the escape key allows you to return to the initial position.
  • Page 7: The option are Celsius or Degree Fahrenheit for temperature display. Depending on the selection, the symbol ºC or ºF is shown on the center right of the screen. Selecting the upper and lower limits of the manual temperature adjustment is possible when the thermostat is in the OFF state. The factory default for the high temperature limit is 30.0 ºC. The factory default for the low temperature limit is 6.0 ºC. The two limits define a temperature area for user input. The selection of limits influences manual temperature adjustment and is independent from the operating mode. The burner output indicator can be deactivated to conserve battery. The time period for which manual temperature adjustment is valid can be determined, with a factory default of 3 hours. Three operation modes can be selected: manual mode, daily operation, and weekly program.
  • Page 8: The differential value can be set between 0.2 °C and 4.0 °C. The factory default value is 0.2 °C. If the room temperature falls below 5 °C, the unit activates the burner output to prevent ice build-up. The device can control only heating units. The maximum operation hours of the burner is 9,999 hours. To clean the device, use a damp cloth and avoid any liquid that may damage the plastic covers. The factory default settings can be restored if needed. The screen displays various messages related to time and program settings. When the battery symbol appears, it indicates that the batteries need to be replaced within the next 3 weeks. The battery life is designed to be approximately one year, influenced by usage and environmental factors.
  • Page 9: Factory default values include settings for thermostat state, daily and weekly programs, selected temperature value, normal or night program, temperature unit, screen backlight, burner activation indicator, presence/absence program, and manual selection time. The thermostat state is inactive (off) and the selected temperature value is set to 23.0°C. The daily programming sub-menu has a 10 program capability. The upper manual temperature limit is 30.0°C and the lower manual temperature limit is 6.0°C. The absence temperature is set to 16.0°C and the night program temperature is set to 18.0°C. The heating function is set to heating and the keypad state is unlocked. To program the thermostat, follow specific steps for setting temperatures and hours for each program. Each program must have a start hour at least 1 minute greater than the end hour of the previous program. Completing the daily program allows you to store the programmed values to the device's memory. Normal operation will continue after programming, and the daily program will start to take effect.
  • Page 10: Make sure you have programmed the device clock with the correct time. The weekly program is based on the daily programming which is repeated for every day of the week independently. For the days of the week that have not been programmed, the values of the last programmed day are valid. If you program only the days Monday to Wednesday, then the programming for Wednesday will be used for the days Thursday to Sunday. The thermostat must be placed in such a position that will allow good signal strength. The number of dashes verifies the correct connection between the two devices and also shows the strength of the signal. The symbol ΜΟ (Monday) means that you are ready to program the Monday program. Completing the programming of the Monday program can be done by pressing the ESC key when the indicator is blinking. Select mounting areas away from heating elements, door and window openings, and fireplaces. The completion of the weekly programming can be done by pressing the ESC key when the indicator is blinking.
  • Page 11: Communication error can occur if the communication between the two devices is disrupted. The thermostat screen will display a communication error message, and the backlight will blink. An interruption of mains voltage causes a disruption in communication. When voltage is restored, the peripheral device-receiver activates outputs according to the previous state until communication is automatically restored. The maximum delay for restoration is 6 minutes. Outputs will change according to new commands once communication is reestablished. Mounting hole spacings are specified.
  • Page 12: Installation procedure The device shall be connected to an all-pole mains switch incorporated in the electrical installation of the building. To install the devices BS-850/T or BS-851/T, insert a flat blade screwdriver in the slot as shown in (Fig. 1). Press and lift the front cover. Remove the retaining screws and remove the plastic cover that contains the keys (Fig. 2). Use the supplied mount accessories to mount the unit according to the diagram on page 11. Install the base, align it using the built-in vial and tighten the screw to secure it. Reinstall the plastic containing the keypad with care and fasten the screws with a maximum torque of 0.4 Nm. To activate the device, remove the battery separation tape (Fig. 3). To install the BS-851/R, remove the front cover with a screwdriver (Fig. 4). Mark and drill the mounting holes according to the schematic on page 11. Connect the phase to the L terminal and the neutral to the N terminal, this is used to power the device.
  • Page 13: Warnings and safety information Failure to comply with national safety regulations may result in personal injury, discomfort, property damage, and other potential hazards. Read before use to reduce the risk of personal injury, discomfort, property damage, including damage to your device and other potential hazards. You shall not touch the device with wet hands. You shall not block the ventilation holes. You shall not remove the protective parts of the device. You shall not install your product near to liquids. You shall not install your product near to flammable or/and explosive atmospheres. Do not attempt to repair or modify your device. Disassembling the device may cause injury to you or damage the device. Disconnect the power supply before any interference with the system. Installation, configuration, start-up, and maintenance must be done by qualified personnel only.
  • Page 14: Technical characteristics Model BS-850/T - BS-851/T Model BS-850/R - BS-851/R Powered by 2 Alkaline AA Consumption 1.9VA Measuring range 0.0 to 99.9 °C Temperature selection range 6.0 to 30.0 °C Communication frequencies Wireless: 869 MHz / WiFi: 2.4GHz Degrees of cover protection IP30 Warranty Olympia Electronics guarantees the quality, condition and operation of the goods.