Home > WHITE RODGERS > White Rodgers BP150 Line Voltage Programmable Thermostat User Guide
White Rodgers BP150 Line Voltage Programmable Thermostat User Guide
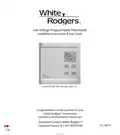


Line Voltage Programmable Thermostat
Installation Instructions & User Guide
For BP150, BP150C, BP125C,1E65-151
Congratulations on the purchase of your
White-Rodgers™ thermostat!
Save these instructions for future use!
Questions? Contact White-RodgersTM
Customer Service at 1-877-654-9394
37-7457A

| General | Details |
|---|---|
| Name | White Rodgers BP150 Line Voltage Programmable Thermostat User Guide |
| Make | WHITE RODGERS |
| Language | English |
| Filetype | PDF (Download) |
| File size | 1.18 MB |


White-Rodgers 1E78 Non Programmable Heat Only Thermostat User Manual

White-Rodgers 1F97-1277 Big Blue Single Stage Thermostat User Manual

White-Rodgers 1F56N-444 Thermostat User Manual

White-Rodgers 1F83-277 Heating & Air Conditioning Auto Changeover Heat Pump Thermostat User Manual

White-Rodgers M30 Thermostat Instruction Manual

WHITE-RODGERS 1F51N-619 Low Voltage Evaporative Cooler Thermostat Instruction Manual

White Rodgers 1F78-151 Non Programmable Thermostat Instructions

WHITE RODGERS 1F80-51 Programmable Electronic Digital Thermostat Instruction Manual

WHITE-RODGERS 1F86-0471 Blue Single 1 1 Stage Thermostat Instruction Manual

WHITE-RODGERS 1F90-71 5-Day 2-Day Electronic Digital Thermostat Instruction Manual

White Rodgers BP150 Line Voltage Programmable Thermostat User Guide Overview
Summary of Contents
- Page 1: Line voltage programmable thermostat Installation instructions & user guide For BP150, BP150C, BP125C, 1E65-151 Congratulations on the purchase of your White-Rodgers thermostat! Save these instructions for future use!
- Page 2: WARNING Before installing and operating this product, the owner and/or installer must read, understand and follow these instructions and keep them handy for future reference. If these instructions are not followed, the warranty will be considered null and void and the manufacturer deems no further responsibility for this product. The following instructions must be adhered to in order to avoid personal injuries or property damages, serious injuries and potentially fatal electric shocks. All electric connections must be made by a qualified electrician, according to the electric and building codes effective in your region. Do NOT connect this product to a supply source other than 120 VAC or 240 VAC, and do not exceed the load limits specified. Protect the heating system with the appropriate circuit breaker or fuse. You must regularly clean dirt accumulations on the thermostat. Do NOT use fluid to clean thermostat air vent. Do not install thermostat in a wet place. However, installing it in insulated walls is allowed. When a part of the product specification must be changed to improve operability or other functions, priority is given to the product specification itself.
- Page 3: Description This programmable electronic thermostat can be used to control electric heating units such as electric baseboards, convectors, or aeroconvectors. It keeps the temperature of a room at the requested set point with a high degree of accuracy. This product is designed for installations with electrical current ranging from 1.25 A to 12.5 A (120/240 VAC). It possesses a user-friendly interface and allows for precise temperature control. This thermostat is not compatible with electrical current higher than 12.5 A, lower than 1.25 A, or central heating systems. Parts supplied include one thermostat, a wall mounting plate, two mounting screws, and two solderless connectors suitable for copper wires.
- Page 4: Using a screwdriver, loosen the screw retaining the mounting base of the thermostat until it is loose. Remove the mounting base at the back of the thermostat by pushing it downwards and then towards you. Align and secure the mounting base to the connection box using the two screws supplied.
- Page 5: Pass the wires from the wall through the opening on the mounting base and connect them using the supplied solderless connectors. When making the connection with aluminum wire, make sure that you are using connectors identified CO/AL. The thermostat wires do not have polarity, so the way they are connected is not important. 2-wire installation 4-wire installation
- Page 6: Place all the wires into the connection box. Align the little slots located on the top of the thermostat with those on the mounting base and secure the thermostat to the mounting base. You can also position the thermostat on the left or the right side of the junction box. Tighten the screw at the bottom of the unit. Turn on the power. Set the thermostat to the desired setting.
- Page 7: Operation The programmable thermostat has three main operating modes: Manual, Automatic, and Preprogrammed. The active mode is displayed at the bottom of the screen. The transition from one mode to another is done by pressing the mode button. It is impossible to change the operation mode when the Security mode is activated. When first powered up, the thermostat is initially in degrees Celsius, in Preprogrammed mode. The Anticipated start mode is activated. The clock is adjusted to Saturday (12:00) and flashes to indicate that an adjustment is necessary. The preprogram is effective immediately.
- Page 8: Adjustment of the hour and the day To adjust the hour and the day, press down the button and release it. The current time mode (24H/12H) is displayed. Press down the button to confirm your choice. The two hour digits flash. Adjust the hours using the button. The two minute digits flash. Adjust the minutes using the buttons. The day of the week flashes. Adjust using the button to confirm your choice. The adjustment is thus completed and the thermostat returns to normal operation. It is possible to exit the hour and day adjustment mode at any time by pressing down the button. In case of a power failure lasting less than 2 hours, the thermostat saves the adjustment of the hour and the day of the week. When the power is restored after an extensive failure, the hour will blink, indicating that it must be readjusted.
- Page 9: Ambient temperature is displayed above the hour in degrees Celsius or Fahrenheit. To adjust the set point, press down the button to increase or the button to decrease it. Set points can only be adjusted by increments of 0.5°C (1°F). The minimum set point is 3°C (37°F), and the maximum set point is 30°C (86°F). To return to the ambient temperature, do not press any buttons for 3 seconds or press both buttons simultaneously. You can turn off the thermostat by lowering the set point below 3°C (37°F). The thermostat can display the ambient temperature and the set point in degrees Celsius or Fahrenheit. To change the display setting, press down the button for 3 seconds and release it. Press down the button to confirm your choice and switch between degrees Celsius and Fahrenheit. Press down the button to confirm your choice after switching the temperature display.
- Page 10: The adjustment is thus completed and the thermostat returns to normal operation. It is possible to exit the degrees Celsius/Fahrenheit adjustment mode at any time by pressing down the button or by not pressing down any buttons during 1 minute. In any case, the adjustment is saved. From the Manual mode, you can manually adjust the thermostat set point by pressing down the or button to increase or decrease the value. The standard factory set point adjustment is 21°C. From the Automatic mode, the thermostat adjusts the set points according to the programmed periods. If no data was entered, the thermostat acts the same way as from the Manual mode. It is possible to program 4 periods a day during the week and 4 periods a day during the weekend. The selected set point will be effective until one period is programmed. From this mode, the screen displays the temperature, the heating power used, the hour, the day of the week, and the current programmed period number.
- Page 11: Programming procedure of the automatic mode can be done in the automatic mode or the manual mode. Press down the button to enter into the programming of period 1 of the 5 days of the week. The time displays --:-- and the set point displays --.-- if there is no programming for the period. If no programming is required for the period, simply press down the button to automatically switch to the next adjustment period. The two hour digits of the period flash and can then be adjusted with the buttons. The two minute digits of the period flash. Use the buttons to adjust by intervals of 15 minutes. The set point temperature of the period is flashing. Adjust the set point using the buttons. The programming of this period is over, and the programming of the next period is displayed. At the end of the programming of the 4 periods of the week days, you enter into the programming period 1 of the two days of the weekend. The programming of the weekend periods is made in the same manner as for the periods of the week days.
- Page 12: At the end of the programming period 4 of the weekend, the programming is completed and the thermostat returns to normal operation. It is possible to exit the Automatic mode’s programming at any time by pressing down the button or by not pressing down any buttons during 1 minute. In any case, all programming is saved. When programming the Automatic mode, it is possible to delete a programming period. Enter into the programming of the Automatic mode and reach the period, as described in the previous section. When the period is displayed, simultaneously press down the buttons to erase the programming. The time of the period displays --:-- and the set point displays --.- to indicate that the programming is erased. Then, exit the programming mode as described in the previous section.
- Page 13: Preprogrammed mode allows a quick and easy preprogram of the thermostat. 18 preprograms (01 to 18) are defined in factory and easily accessible. This mode gives you the possibility to quickly program the thermostat using commonly used preprograms. It is possible at any time to manually adjust the set point from Automatic mode. The screen displays the temperature, the heating power used, the hour, the day of the week, and the number of the preprogram period. This mode is initially activated when the power is turned on for the first time, with program #5. Selection of the preprogram can be done based on sleep hours, wake-up time, and home arrival time. The Detailed preprograms section provides a detailed schedule of all preprograms. To select the preprogram, access the Preprogrammed mode and press the button until the display shows the preprogram number. Press down the button for 3 seconds until the preprogram number blinks at the right-hand side of the hour.
- Page 14: Choose the preprogram number by pressing down the buttons. Confirm by pressing down the button. It is possible to exit the selection of the preprogram at any time. It is possible to view the current preprogram. However, it is impossible to modify a preprogram. Access the Preprogrammed mode by pressing down the button until the display shows the button. The period 1 icon flashes and the days of the week are displayed to indicate that you are visualizing the days of the week’s period 1. Press down the buttons to select the period to view. It is possible to exit the view of the preprogram at any time.
- Page 15: Anticipated start This mode enables the room to reach the selected temperature at the programmed hour. The thermostat estimates the delay required to reach the set point of the next period. The results should be increasingly precise day after day. The icon will blink when the anticipated start of the next period will begin. If the set point is changed manually when this mode is in progress, the anticipated start is canceled. To activate or deactivate the anticipated start, press down the button for 3 seconds. Press down the or button to select the icon. The adjustment is completed and the thermostat returns to normal operation. It is possible to exit the anticipated start adjustment mode at any time. The adjustment is saved if no buttons are pressed for 1 minute.
- Page 16: Frost-free warning is displayed when the temperature set point is between 3°C (37°F) and 5°C (41°F). A minimum temperature will be maintained to ensure frost control. Security mode allows for the imposition of minimum and maximum temperature set points. It prevents exceeding the maximum set point or going below the minimum set point, regardless of the current mode. Activating Security mode requires being in the desired mode and completing the programming or selecting the desired preprogram. To activate Security mode, press down the button for 3 seconds and release it. The various icons and options will appear, and the °C or °F icon will flash. Select the icon indicated by its flashing and confirm your choice by pressing down the button. All icons will disappear except the flashing icon. Press down the button to activate Security mode, indicated by the icon that turns on.
- Page 17: L___ is displayed instead of the hours and the adjustment of the minimum set point flashes. Press down the or button to adjust the minimum set point temperature. The adjustment can range from --.- (Heating off) to 30°C by intervals of 0.5°C (or 86°F by intervals of 1°F). Press down the button to confirm your selection. H___ is displayed instead of the hours and the adjustment of the maximum set point flashes. Press down the or button to adjust the maximum set point temperature. The adjustment will be between the minimum set point previously selected and 30°C by intervals of 0.5°C (or 86°F by intervals of 1°F). It is possible to exit the Security mode adjustment at any time. If the adjustment of minimum and maximum set points is not completed, Security mode will not be activated. To deactivate the Security mode, start by cutting off the thermostat power at circuit breaker and wait at least 30 seconds.
- Page 18: Press down the button to select the icon indicated by its flashing. Press down the button to confirm your choice. All icons disappear except the icon that continues to flash. Press down the button to deactivate the Security mode indicated by the icon that turns off. The deactivation of the Security mode is thus completed and the thermostat returns to normal operation. When the thermostat is used to control a heating system equipped with a fan, the Fan mode must be activated. The Fan mode prevents the system from continuously starting and stopping, which could cause fan failure. The status of the Fan mode is indicated on the display by the icon. To activate or deactivate the Fan mode, press down the button for 3 seconds and release it. Press down the button to confirm your choice for activating or deactivating the Fan mode.
- Page 19: If the Fan mode is deactivated, the thermostat returns to normal operation. If it is activated, the minimum operating time in seconds blinks (90 seconds by default). Press down the or button to adjust the minimum operating time if desired, from 90 to 300 seconds, in intervals of 30 seconds. It is possible to exit the Fan mode adjustment at any time by pressing down the button or by not pressing down any buttons during 1 minute. The thermostat saves some parameters in a non-volatile memory to recover them after being shut off. These parameters include operation modes, programming of the Automatic mode, current set point, Celsius/Fahrenheit display, Fan mode, and minimum operating time in Fan mode. By default, the backlight turns on when pressing down a button and turns off after 15 seconds of inactivity.
- Page 20: Nightlight mode (models BP150, BP150C only) You can activate the Nightlight mode to permanently turn on the backlight. To activate or deactivate this mode, you must simultaneously press both buttons for 3 seconds until the backlight blinks. The Nightlight mode will be activated (or deactivated if it was previously activated). Heating power indicator The level of power used to maintain the temperature at the set point is expressed as a percentage indicated by the number of bars in the thermometer displayed. 4 bars = 76 % to 100 % 3 bars = 51 % to 75 % 2 bars = 26 % to 50 % 1 bar = 1 % to 25 % 0 bar = no heat
- Page 21: Troubleshooting In normal operating conditions, the thermostat housing can reach nearly 40°C / 100°F at maximum load. That is normal and will not affect the effective operation of the thermostat. Check if the thermostat is properly connected. Refer to the installation section. The thermal protection of the heating unit has opened due to overheating. Check if the heating unit is in good condition of operation and that clearance around the unit is according to the manufacturer’s specifications. The load is lower than the minimum load. Install a heating unit that is within the load limits of the thermostat. Check the presence of an air stream or a heat source near the thermostat, and correct the situation. Faulty thermostat. Contact customer service. Possibility of a bad contact. Check thermostat wiring. Refer to the installation section.
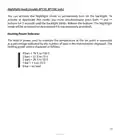
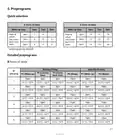
- Page 22: Preprograms Quick selection 8 hours of sleep 9 hours of sleep Wake up time: 6am, 7am, 8am Detailed preprograms P1 (Wake up) P2 (Sleep) P3 (Come back time) P4 (Sleep)
- Page 23: - 21°C / 70°F - 16.5°C / 62°F - Monday-Friday - Saturday-Sunday - P1 (Wake up) - P2 (Leaving time) - P3 (Come back time) - P4 (Sleep) - 9 hours of sleep - 6am
- Page 24: Technical specifications Supply voltage: 120/208/240 VAC, 50/60 Hz Minimum electrical current with a resistive load: 1.25 A Maximum electrical current with a resistive load: 12.5 A Temperature display range: 3°C to 40°C (37°F to 99.5°F) Temperature display resolution: 0.5°C (0.5°F) Temperature set point range: 3°C to 30°C (37°F to 86°F) Temperature set point increments: 0.5°C (1°F) Storage temperature: -40°C to 50°C (-104°F to 122°F)
- Page 25: Page 25
- Page 26: Page 26
- Page 27: Especificaciones técnicas Voltaje de alimentación: 120/208/240 VCA, 50/60 Hz Corriente eléctrica mínima con una carga resistiva: 1.25 A Corriente eléctrica máxima con una carga resistiva: 12.5 A Rango de la pantalla de temperatura: 3°C a 40°C (37 °F a 99.5°F) Resolución de la pantalla de temperatura: 0.5°C (0.5°F) Rango del punto de referencia de la temperatura: 3°C a 30°C (37 °F a 86°F) Incrementos del punto de referencia de la temperatura: 0.5°C (1°F) Temperatura de almacenamiento: -40°C a 50°C (-104°F a 122°F)
- Page 28: - Horas de sueño - Lunes a viernes - Sábado a domingo - Núm. de programa previo - P1 - P2 - P3 (hora de regresar) - P4 (dormir) - Despertar (hora de salir) - Temperaturas registradas: 21°C / 70°F y 16.5°C / 62°F
- Page 29: Programas previos Selección rápida 8 horas de sueño Hora para despertar: 6 a.m., 7 a.m., 8 a.m. Hora a la que regresa del trabajo: 4 p.m., 5 p.m., 6 p.m. Programas previos detallados Lunes a viernes, Sábado a domingo Núm. de programa previo P1, P2, P3 (hora de regresar) (dormir) (despertar) (hora de salir) Temperaturas: 21°C / 70°F, 16.5°C / 62°F
- Page 30: Solución de problemas La carcasa del termostato puede alcanzar casi 40 °C/100 °F con una carga máxima. Esto es normal y no afectará la operación eficaz del termostato. Revise si el termostato está bien conectado. Consulte la sección de instalación. La calefacción no funciona aunque el termostato indica que está encendida. Revise la fuente de alimentación en el panel eléctrico. La protección térmica de la unidad de calefacción se abrió debido a un sobrecalentamiento. La carga es menor que la carga mínima. Instale una unidad de calefacción que quede dentro de los límites de carga del termostato. Compruebe si hay presencia de una corriente de aire o una fuente de calor cerca del termostato y corrija la situación. El termostato tiene fallas. Comuníquese con servicio al cliente. Revise el cableado del termostato. La pantalla tiene bajo contraste cuando la calefacción está encendida. Si no puede resolver el problema después de verificar estos puntos, comuníquese con el departamento de servicio al cliente.
- Page 31: Modo de luz nocturna (solamente modelos BP150, BP150C) Puede activar el modo de luz nocturna para encender de manera permanente la luz de fondo. Para activar o desactivar este modo, debe presionar al mismo tiempo los botones durante 3 segundos. El modo de luz nocturna quedará activado o desactivado. Indicador de poder de calefacción El nivel de poder utilizado para mantener la temperatura se expresa como porcentaje. El poder de calefacción utilizado se muestra con barras en el termómetro. 4 barras = 76 a 100% 3 barras = 51 a 75% 2 barras = 26 a 50% 1 barra = 1 a 25% 0 barra = sin calefacción
- Page 32: Si se desactiva el modo de ventilador, el termostato regresa a operación normal. Si se activa, el tiempo mínimo de operación en segundos va de 90 segundos de manera predeterminada. Presione el botón para ajustar el tiempo de operación mínima, de 90 a 300 segundos en intervalos de 30 segundos. El termostato guarda algunos parámetros en una memoria no volátil para poderlos recuperar después de que se apague. Estos parámetros incluyen los modos de operación, la programación del modo automático, y la selección del programa previo. La luz de fondo se enciende al presionar un botón y se apaga después de 15 segundos de inactividad. Es posible salir en cualquier momento del modo de ventilador presionando el botón o sin presionar ningún botón durante 1 minuto. En cualquier caso, el ajuste queda guardado. El modo de seguridad incluye los puntos de referencia mínimo y máximo. El modo de la hora puede ser configurado en 12 o 24 horas.
- Page 33: Presione el botón para seleccionar el icono indicado por sus destellos. Presione el botón para desactivar el modo de Seguridad, indicado con el icono que apaga. La desactivación del modo de Seguridad queda completa, y el termostato regresa a operación normal. Cuando se usa el termostato para controlar un sistema de calefacción equipado con un ventilador, se debe activar el modo de Ventilador. El modo de Ventilador impide que el sistema arranque y se detenga continuamente, lo cual podría ocasionar una falla en el ventilador. El estado de este modo se indica en la pantalla con el icono correspondiente. Para activar o desactivar el modo de Ventilador, presione el botón durante 3 segundos. Aparecen los diversos iconos y opciones y destella el icono °C o °F. Presione el botón para activar o desactivar el modo de Ventilador, indicado con el icono que enciende o apaga. Presione el botón para confirmar su selección.
- Page 34: Se muestra L___ en lugar de las horas, referencia mínimo. El ajuste puede variar de --.- (Calefacción apagada) a 30 °C. Destella el ajuste del punto de referencia mínimo para ajustar la temperatura en intervalos de 0.5 °C. Se muestra H___ en lugar de las horas, referencia máximo. El ajuste estará entre el punto de referencia mínimo seleccionado anteriormente y 30 °C. La activación del modo de Seguridad queda así completa, y el termostato regresa a operación normal. Es posible salir en cualquier momento del modo de Seguridad. Si no se completa el ajuste de los puntos de referencia mínimo y máximo, no se activará el modo de Seguridad. Para desactivar el modo de Seguridad, comience interrumpiendo la electricidad del termostato. Conecte la electricidad al termostato, y el icono destellará un máximo de 5 minutos.
- Page 35: Advertencia de ausencia de escarcha se muestra el icono cuando el punto de referencia de temperatura se encuentra entre 3 °C (37 °F) y 5 °C (41 °F). Modo de seguridad permite imponer puntos de referencia de temperatura mínima y máxima. Cuando se activa el Modo de seguridad, no es posible realizar cambio alguno en el modo de operación ni en la programación. Procedimientos para activar el modo de Seguridad requieren estar en el modo deseado y haber completado la programación. Para activar el modo de Seguridad, presione el botón durante 3 segundos y suéltelo. Aparecen los diversos iconos y opciones y destella el icono °C o °F. Presione el botón para seleccionar el icono indicado por sus destellos. Todos los iconos desaparecen, excepto el icono que indica el modo de Seguridad. Presione el botón para activar el modo de Seguridad. Confirme su selección presionando el botón correspondiente.
- Page 36: Arranque anticipado Este modo habilita a la habitación para que alcance la temperatura seleccionada a la hora programada. El termostato estima el retraso requerido para alcanzar el punto de referencia del siguiente periodo a la hora programada. Este retraso se obtiene mediante la observación de las variaciones de temperatura en la habitación y los resultados obtenidos durante los arranques anticipados anteriores. El icono va a destellar cuando comience el arranque anticipado del siguiente periodo. Si se cambia manualmente el punto de referencia cuando está en progreso este modo, se cancela el arranque anticipado del siguiente periodo. Para activar o desactivar el arranque anticipado, presione el botón durante 3 segundos y suéltelo. Aparecen los diversos iconos y opciones y destella el icono °C o °F. El ajuste queda completo y el termostato regresa a operación normal. Es posible salir en cualquier momento del modo de ajuste del Arranque anticipado. En cualquier caso, el ajuste queda guardado.
- Page 37: Elija el número de programa previo presionando los botones. Es posible salir en cualquier momento de la selección del programa previo. La selección queda guardada. Es posible ver el programa previo actual. Es imposible modificar el programa previo. Acceda al modo previamente programado presionando el botón. Desde cualquier modo de ajuste, presione al mismo tiempo los botones. El icono del periodo 1 indica que está visualizando los días del periodo 1 de la semana. Es posible salir en cualquier momento de la vista del programa previo. Presione los botones para seleccionar el periodo para ver.
- Page 38: Modo Previamente programado permite reprogramar el termostato de manera fácil y rápida. Desde fábrica se definen 18 programas previos y se accede a ellos fácilmente. Este modo permite programar el termostato con rapidez usando programas previos utilizados usualmente. Es posible ajustar manualmente el punto de referencia en cualquier momento. La pantalla muestra la temperatura, la potencia de calefacción utilizada, la hora, el día de la semana y el número de periodo programado previamente. Este modo se activa inicialmente cuando se enciende la unidad por primera vez con el programa 5. La sección de Selección rápida permite elegir con base en 3 criterios: el número de horas que duerme, la hora en que se levanta y la hora en que llega a casa. La sección de Programas previos detallados contiene una programación detallada de todos los programas previos. Para seleccionar el programa previo, acceda al modo Previamente programado y presione el botón hasta que el número de programa previo destelle al lado derecho de la hora.
- Page 39: Al final del periodo de programación 4 del fin de semana, la programación se completa y el termostato regresa a operación normal. Es posible salir en cualquier momento del modo automático presionando el botón o sin presionar ningún botón durante 1 minuto. En cualquier caso, la programación queda guardada. Cómo borrar la programación. Cuando programe el modo automático, es posible borrar un periodo de programación. Ingrese a la programación del modo automático y busque el periodo. Cuando se muestre el periodo, presione al mismo tiempo los botones para borrar la programación. La hora del periodo muestra --:-- y el punto de referencia muestra --.-- para indicar que se borró la programación. Luego salga del modo de programación.
- Page 40: Procedimiento de programación del modo automático La programación del modo automático se puede hacer en modo automático o en modo manual. A partir de cualquier modo de ajuste, presione el botón y suéltelo. Luego entra a la programación del periodo 1 de los 5 días de la semana. Se muestran los 5 días de la semana y la programación relacionada. Si no se requiere programación para el periodo, simplemente presione el botón. Los dos dígitos de la hora del periodo destellan, y entonces se pueden ajustar con los botones. La temperatura del punto de referencia del periodo destella. Ajuste el punto de referencia con los botones. Al terminar la programación de los 4 periodos de los días entre semana, entra al periodo de programación 1 de los dos días del fin de semana. La programación de los periodos del fin de semana se hace de la misma manera que para los periodos de los días entre semana.
- Page 41: El ajuste queda completo y el termostato regresa a operación normal. Es posible salir en cualquier momento del modo de ajuste de grados Centígrados / Fahrenheit. Desde el modo Manual, puede ajustar manualmente el punto de referencia del termostato. El ajuste estándar de fábrica del punto de referencia es de 21 °C. Desde el modo Automático, el termostato ajusta los puntos de referencia de acuerdo con los periodos programados. Siempre es posible ajustar manualmente el punto de referencia. El punto de referencia seleccionado tendrá vigencia hasta que se programe un periodo. Es posible programar 4 periodos al día durante la semana y 4 periodos al día durante el fin de semana. Desde este modo, la pantalla muestra la temperatura, la potencia de calefacción utilizada, la hora, el día de la semana y el número de periodo programado actualmente.
- Page 42: Temperatura ambiente Las cifras mostradas arriba de la hora indican la temperatura ambiente. Puede mostrarse en grados Centígrados o Fahrenheit. Para ajustar el punto de referencia, presione el botón para aumentar o el botón para disminuirlo. Los puntos de referencia solamente se pueden ajustar en incrementos de 0.5 °C (1 °F). El punto de referencia mínimo es 3 °C (37 °F), y el punto de referencia máximo es 30 °C (86 °F). Para regresar a la temperatura ambiente, no presione ningún botón por 3 segundos o presione al mismo tiempo los botones. El termostato puede mostrar la temperatura ambiente y el punto de referencia en grados Centígrados o Fahrenheit. En cualquier modo, presione el botón durante 3 segundos y suéltelo. Presione el botón para confirmar su selección. Presione el botón para cambiar de grados Centígrados a Fahrenheit.
- Page 43: Ajuste de la hora y del día Para ajustar la hora y el día, presione el botón y suéltelo en cualquier modo. Se muestra el modo con la hora local (24 h/12 h) y se puede seleccionar el formato deseado. Los dos dígitos de la hora destellan y se pueden ajustar con los botones correspondientes. Los dos dígitos de los minutos destellan y se ajustan de la misma manera. El día de la semana destella y se ajusta con los botones. El ajuste queda completo y el termostato regresa a operación normal. Es posible salir del modo de ajuste presionando el botón o sin presionar ningún botón durante 1 minuto. En caso de una falla eléctrica que dure menos de 2 horas, el termostato guarda el ajuste de la hora y del día de la semana. Cuando se restaure la electricidad después de una falla prolongada, la hora va a destellar, indicando que debe ajustarse nuevamente.
- Page 44: Operación Temperatura ambiente Modo de seguridad Anticipated start Periodo de programación Modo (Manual; Automático; Previamente programado) El termostato programable tiene tres modos principales de operación: Manual, Automático y Previamente programado. La transición de un modo a otro se hace presionando el botón. Es imposible cambiar el modo de operación cuando se activa el modo de Seguridad. Cuando se enciende por primera vez, el termostato muestra grados Centígrados en el modo Previamente programado.
- Page 45: Coloque todos los alambres en la caja de conexiones. Alinee las pequeñas ranuras situadas en la parte superior del termostato con las de la base de montaje y asegure el termostato a la base de montaje. Tome en cuenta que también puede colocar el termostato al lado izquierdo o derecho de la caja de conexiones. Luego apriete el tornillo en la parte inferior de la unidad. Encienda la alimentación. Configure el termostato en el ajuste deseado.
- Page 46: Pase los cables de la pared por la abertura de la base de montaje y conéctelos usando los conectores sin soldadura suministrados. Cuando realice la conexión con alambre de aluminio, asegúrese de usar los conectores identificados como CO/AL. Tome en cuenta que los cables del termostato no tienen polaridad. Por lo tanto, no es importante la manera como se conecten. Instalación de 2 alambres. Instalación de 4 alambres.
- Page 47: Con un destornillador, afloje el tornillo que retiene la base de montaje del termostato hasta que esté suelto. Retire la base de montaje en la parte posterior del termostato empujando hacia abajo y luego hacia usted. Alinee y asegure la base de montaje a la caja de conexiones usando los dos tornillos suministrados.
- Page 48: Instalación Selección de la ubicación del termostato El termostato debe montarse a una caja de conexiones sobre una pared de frente a la unidad de calefacción, aproximadamente a 1.5 m (5 pies) por arriba del nivel del piso. No instale el termostato en un sitio donde se podrían alterar las mediciones de temperatura. Montaje y conexión del termostato Desconecte el suministro eléctrico en los cables principales del panel eléctrico con el fin de evitar cualquier riesgo de descarga eléctrica. Asegúrese de que las ventilaciones de aire del termostato estén limpias y libres de cualquier obstrucción.
- Page 49: Descripción Este termostato electrónico programable se puede usar para controlar unidades de calefacción eléctrica, como zócalos eléctricos, convectores o aeroconvectores. Mantiene la temperatura de una habitación al punto de referencia solicitado con un alto grado de precisión. Este producto está diseñado para instalaciones con corriente eléctrica que varía de 1.25 A a 12.5 A (120/240 VCA). Cuenta con una interfaz fácil de usar. Este termostato no es compatible con instalaciones de corriente eléctrica mayor de 12.5 A o menor de 1.25 A. Piezas suministradas incluyen un termostato, placa de montaje en pared, tornillos de montaje y conectores sin soldadura.
- Page 50: Termostato programable por voltaje de línea Instrucciones de instalación y guía del usuario Para BP150, BP150C, BP125C, 1E65-151 Felicitaciones por comprar su termostato White-Rodgers Conserve estas instrucciones para consultarlas en cualquier momento

EPH CONTROLS 20221026 RFRA – RF Room Thermostat Instruction Manual

SALUS Fan Coil thermostat FC600 User Guide

EBECO EB-Therm 205 Thermostat User Guide

heatit Z-Temp2 Wireless Thermostat Instruction Manual

Honeywell FocusPRO P200 Series Programmable Thermostat Installation Guide

hansgrohe 15763003 Shower Select Thermostat Instruction Manual

BEOK TGW60 Glass Screen Thermostat Instruction Manual

PURMO M16MI419 Advanced Thermostat Instruction Manual

DAIKIN DKN510 Wireless VRV Communicating Thermostat Installation Guide

STELPRO ST302P Programmable Electronic Thermostat Owner’s Manual