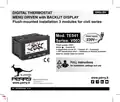
PERRY TE541 Digital Thermostat User Manual


ENGLISH
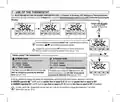
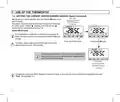
DIGITAL THERMOSTAT
MENU DRIVEN with BACKLIT DISPLAY
Flush-mounted installation 3 modules for civil series
Power supply
Mod. TE541
230V~
230V~
Series: V003
Power supply: 230V~
Winter / Summer
2 temperature levels (t1 = Confort, t2 = Economy)
+ OFF temperature level = antifreeze or thermal protection
Input for remote external contact
FULL instructions
for installation, settings and use
PERRY ELECTRIC Srl
Via Milanese, 11
22070 VENIANO (Como) ITALY
PE - DETIPE026EN 01/24

| General | Details |
|---|---|
| Name | PERRY TE541 Digital Thermostat User Manual |
| Make | PERRY |
| Language | English |
| Filetype | PDF (Download) |
| File size | 1.4 MB |


PERRY TE541 Digital Thermostat User Manual Overview
Summary of Contents
- Page 1: Digital thermostat Menu driven with backlit display Flush-mounted installation for civil series Power supply: 230V~ Two temperature levels: comfort and economy Off temperature level for antifreeze or thermal protection Input for remote external contact Full instructions for installation, settings, and use
- Page 2: device presentation technical data factory settings key functions display features installation start the thermostat use of the thermostat structure of menus available configuration menu (installer)
- Page 3: Presentation Thank you for choosing our product. The thermostat is suitable for all heating and/or cooling systems and features a large backlit display for real-time control. It has an easy-to-use menu navigation, making it user-friendly despite its comprehensive functions. The thermostat can operate in modulating proportional mode or differential ON/OFF mode with adjustable hysteresis. Temperature regulation can be calibrated with a correction value from -6 to +6 °C. Energy-saving features include a set temperature lock and adjustable antifreeze/thermal protection. Read this manual carefully before using the product for important safety and installation guidelines. Installation must be performed by a qualified electrician in accordance with current laws. The thermostat is not intended for use by persons with reduced capabilities unless supervised. In case of a power blackout, the thermostat retains all entered data and resumes operation when power is restored.
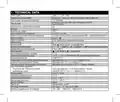
- Page 4: Technical data Power supply: 230V~ +/- 10%, 50Hz Display and key back-lighting: Type of action, disconnection and device Electronic voltage free relay with COM / NO / NC changeover contact, max 5(3)A/250 V ~ Keeping memory setting during power failure: Yes Degree of protection: IP 30 Operating mode: heating (default) / Summer cooling / Winter Ambient temperature display range: 0 °C ÷ +45 °C Thermal protection set temperature OFF (Winter): 0 °C ÷ +4 °C Type of installation: Built-in ErP energy classification: Class I; 1% Reg. EU 811/2013
- Page 5: Factory settings refer to operation defined as Standard. The following chapters describe all customisable functions to satisfy any ambient comfort need. Restore factory settings (default) allows the thermostat to return to original settings. The restore operation is recommended to be carried out by a qualified installer or experienced user. In case of malfunctioning, perform a User reset by pressing the Mode and OK keys simultaneously for 4 seconds. The thermostat guarantees retention in memory of all data entered in case of a power blackout. When power supply is reinstated, the display switches back on and the device returns to its normal functions. The factory settings table includes various temperature settings for winter and summer. Default settings include comfort and economy modes for both winter and summer. Room temperature correction and temperature locks are also part of the factory settings.
- Page 6: Key function legend outlines the display and key back-lighting features. Touching any key activates back-lighting for selection and navigation. Press the desired key within 6 seconds to vary settings. Setting the backlight to always on keeps selection and navigation visible. Specific button functions are described in detailed paragraphs. The multifunction key mode changes depending on the function or active menu. A short pulse pressure switches between set temperatures and access to programming menus. A short press within menus returns to the previous item or exits programming menus. The key increases the desired set temperature and navigates through menus. The pulse arrow key allows for single or fast increase/decrease in settings. Another key decreases the desired set temperature and navigates through menus. The OK key confirms settings and accesses selected menus.
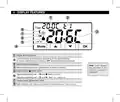
- Page 7: Display features include the currently active set temperature based on the desired setting: comfort, economy, or off. The detected room temperature is also displayed. Further displays are described in specific operation paragraphs. Remote thermostat control can be connected to an external contact. Heating mode is indicated when winter mode is active. Signaling indicates when the user is operating in heating mode. Cooling mode is indicated when summer mode is active. The night reduction icon shows the selection of the economy temperature setting.
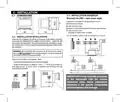
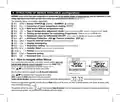
- Page 8: 5 - Installation 5.1 - Dimensions 5.3 - Installation examples Disconnect the 230V~ mains power supply. Examples of installation in heating systems with a thermostat that controls: A) Wall mounted boiler. B) Burner or circulation pump or motorized solenoid valve. C) Zone solenoid valve. 5.2 - Installation regulations Important: the installation and electrical connection of the devices and appliances must be implemented by qualified personnel and in conformity with current laws and regulations. Warning! When mounting the front panel on the thermostat module, take care not to remove the heat-conducting part. Thermostat installation: independent - fixed recessed in rectangular box. Install the thermostat at a height of 1.50 m to 1.70 m from the floor, far from heat sources, air vents, doors or windows. For the assembly procedure of the thermostat with the chosen residential plate, follow instructions contained in the specific compatibility sheet.
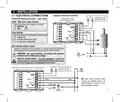
- Page 9: 5 - Installation Electrical connections Disconnect the 230V~ mains voltage. 230V~ 50Hz power supply terminals. Connect line voltage power supply to the terminals: Neutral and Line. AUX terminals may be connected to an external contact for thermostat remote reactivation. Only connect switches and contacts with insulation suitable to work at 230Vac mains voltage. It is not permitted to connect the remote contact on more than one thermostat; each thermostat must operate independently. With strong inductive loads, it is recommended to connect an RC filter in parallel to the load.
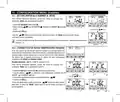
- Page 10: Start the thermostat The first time mains voltage is engaged, the thermostat performs a lamp-test by switching on all display segments. The thermostat displays the normal operation screen after the lamp-test phase. Normal operation includes winter mode (heating) and shows the temperature set at 20°C. From normal thermostat operation in stand-by, pressing a key activates the backlight and displays selection and navigation. Each press results in a change of 0.1 degrees. In the absence of temperature locks, it is possible to change the temperature settings. If the keyboard lock is engaged, the word bLOC will appear flashing for a few seconds when any key is pressed. The T set value will be saved automatically after making changes. To select the desired temperature level and change the T set, refer to the next paragraph.
- Page 11: Use of the thermostat Selecting and setting the desired temperature level: t1 (Comfort), t2 (Economy), OFF (Antifreeze or Thermal protection) From normal operation of the device, pulse the Mode button to display the desired temperature level. Confirm the desired level by pressing the OK button. Changing the value of T set level OFF will only be possible by accessing the dedicated menu. Each press results in a change of 0.1 degrees. Factory preset T Set temperatures can be changed as required. In Winter operation, T set t1 must be greater than or equal to t2; t2 must be greater than or equal to OFF. In Summer operation, T set t1 must be less than or equal to t2; t2 must be less than or equal to OFF. If a Max. and/or Min. temperature lock has been set, it will also be possible to change the temperature T set within these locks.
- Page 12: Use of the thermostat Setting the current winter/summer season (Quick Command) With the device in normal operation, press and hold the OK button for at least 6 seconds. The product will present the proposed season change. If the current season is Winter (heating), it will show the icon flashing and the corresponding level and T set. Confirm with the OK button. If no confirmation is made within 5 seconds, the device returns to normal operation without making any changes. The season change request is prevented in the case of active external contact. At the change of season, the t1 level of the incoming season will be taken over. Changing the season from Winter (heating) to Summer (cooling) can also be done from the appropriate menu item “Prog.”
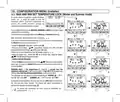
- Page 13: Structure of menus available (configuration) Access to the Prog menu is recommended for the qualified installer or experienced user since the modification of some settings might affect correct system operation. The following menus are available sequentially: Season WINTER (heating) / SUMMER Correction of room temperature reading (OFFSET) MAX and/or MIN set temperature locks Type of temperature adjustment mode: Proportional modulating or Differential ON/OFF Setting period duration for modulating Proportional Hysteresis value for Differential ON/OFF Antifreeze Protection Input for external contact (deactivating the thermostat remotely) Display backlighting and brightness setting Installer Reset (returns the device to factory settings) How to navigate within Menus Press and hold the Mode button for at least 6 seconds to access the PROG menu. Confirm with the OK button to change the chosen menu parameter or setting. The automatic exit from the menus returns to normal operation after 60 seconds of inactivity.
- Page 14: Access to the configuration menu requires a previously entered password. To enter the menu, press and hold for at least 6 seconds. Input each digit using buttons and confirm with OK. If an error occurs, briefly press the Mode button to return to the previous screen. If no password is entered, scroll through the menus using the keys. An example password will be displayed for a few seconds after pressing the OK button if the password is incorrect. The screen is only visible if a password was previously entered.
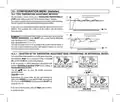
- Page 15: 10 - Configuration menu (installer) Setting winter or summer Current season flashing From normal thermostat operation, access the menus by pressing and holding the Mode key. Under item Set SEA, confirm with OK. Select with the mode keys the winter (heating) or summer (cooling). It will be possible to change the season between winter/summer without entering the menu. Correction of room temperature reading The device has 2 separate parameters to adjust the room temperature measured in the winter and summer modes. Possible correction: -6.0 °C ÷ 6.0 °C (default 0.0 °C). Under item Set Corr, confirm with OK, the displayed value flashes. Change the required temperature value with the buttons.
- Page 16: Configuration menu (Installer) Max and min set temperature lock (Winter and Summer mode) It might be useful to limit the maximum and/or minimum temperature set points. This avoids incorrect settings by unauthorized personnel. It is possible to limit (lock) the maximum, minimum, or both temperature values settable on the device. The restriction may be applied either to the Winter or Summer distinctly. By default, no temperature lock is entered. Select the desired lock, confirm with OK, and enter the desired temperature value. If the set temperature is greater than the maximum entered lock, it will level out with it. During thermostat operation, the user may not set a temperature higher or lower than the max and min locks entered. To cancel any previously set locks, bring the max/min set points back to 1°.
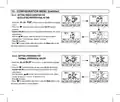
- Page 17: 10 - Configuration menu (Installer) 10.4 - Type temperature adjustment methods The thermostat is factory set to work in modulating proportional (PrOP) mode, setting cycles from 7 to 20 minutes (default 7 minutes). This system maintains the desired temperature more stable, whilst increasing the user's comfort sensation and saving on energy consumption. A long cycle is recommended for systems with high thermal inertia and a short cycle for systems with low thermal inertia. As opposed to the modulating proportional, the temperature can be adjusted in thermal differential mode ON/OFF with a preset thermal differential value of 0.3°C (default). The hysteresis value must be set according to the system's thermal inertia; a low value is recommended for systems with radiators made of cast iron and a high value for systems with fan coils. 10.4.1 - Selection of the temperature adjustment mode (proportional or differential ON/OFF) From normal thermostat operation, access the menus by pressing and holding the Mode key. It will be possible to select temperature adjustment mode between modulating proportional (PrOP) factory setting or thermal differential (On:OFF). Depending on the chosen mode, the next menu displays the setting of the period if you have opted for PrOP or to set hysteresis if you have opted for On:OFF. Press OK to confirm the desired setting.
- Page 18: Configuration menu (Installer) Setting period duration for modulating proportional in time Select the SEt rEG PrOP menu screen. Press the button to display the next menu SEt Per (period duration). Confirm with OK if you want to change the period duration. Enter the duration of the desired period (settable from 7 to 20 minutes, default 7 minutes). Press OK to confirm. Setting hysteresis for thermal differential on-off Select the SEt rEG On:OF menu screen. Press the button to display the next menu SEt Ist (Hysteresis). Confirm with OK if you want to change the hysteresis. Enter the desired hysteresis value, which can be set from 0.2 °C to 1.2 °C (default 0.3 °C).
- Page 19: Configuration menu (Installer) Access the menus by holding down the Mode button. Select the SET OFF to be changed for WINTER mode (antifreeze) or SUMMER mode (thermal protection). To deactivate Tset OFF (antifreeze), go below +4.0 °C. Set the desired antifreeze or thermal protection TSET OFF temperature. Each press of the buttons results in a change of 0.1 degrees. Antifreeze OFF protection range: +4 °C at t2. Thermal protection OFF range: +37.7 °C at t2. If the OFF level of antifreeze or thermal protection is deactivated, it will automatically re-enable. Press the Mode button to select another menu item or exit the menus.
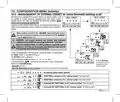
- Page 20: 10 - Configuration menu (Installer) Management of external contact for remote thermostat switching on/off The thermostat is equipped with an input (AUX) for an external contact, allowing connection of accessory equipment that can deactivate the thermostat remotely. A typical use is the window contact that can be connected to this input to switch off the temperature control when a window is opened. Before enabling any item of the Set GAtE menu, ensure you have connected an external contact potential-free to the terminals 1 and 2 (AUX). WARNING: only connect switches and contacts with insulation suitable to work at 230Vac mains voltage to terminals 1 and 2 AUX. Multiple installations: It is not permitted to connect the remote contact on more than one thermostat; each thermostat must have its AUX input operated independently of the others. From normal operation of the thermostat, access the menus by holding down the “Mode” button. The Set GAtE screen is displayed. Confirm by pressing OK, the dashes flash. Using the buttons, select the desired external contact management. Press OK to confirm and press the Mode button to exit the menus and return to normal thermostat operation.
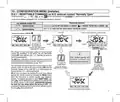
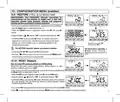
- Page 21: 10 - Configuration menu (installer) Resettable command on N.O. external contact “Normally Open” Management of the resettable N.O. external contact with a command on the thermostat. Contact closure activates level and Tset OFF anti-freeze if in winter or thermal protection in summer. Contact opening results in level OFF and returns to the level before contact closure. The change of state from open contact to closed contact forces the thermostat into the permanent manual OFF state. The OFF level can result in actual temperature control at a certain Tset value or temperature control switched off. Contact opening and closure controls are operative within a maximum of 60 seconds. The subsequent change of state from closed contact to open contact ends the manual forcing OFF. The user can cancel the forcing OFF at any time without opening the remote contact by pressing the MODE button. This type of command is called “resettable,” indicating that the remote contact is still closed.
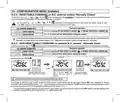
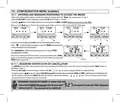
- Page 22: Configuration menu (Installer) Resettable command on N.C. external contact “Normally Closed” Confirmed screen for the management of the resettable N.C. external contact with a command on the thermostat. Do not enable the item prior to connecting a switch or other device that allows change of state from OFF mode to current operating mode. Contact opening activates level and Tset OFF ANTI-FREEZE if in WINTER or THERMAL PROTECTION in SUMMER. Return to the level and Tset active before closing the contact. Non-resettable command on external N.O. contact “Normally Open” Confirmed screen of external contact management N.A. Contact closure and opening activates level and Tset OFF ANTI-FREEZE if in WINTER or THERMAL PROTECTION in SUMMER. A flashing “bLOC” will appear when any button is pressed. The change of state from open remote contact to closed contact causes forcing into the permanent manual OFF state.
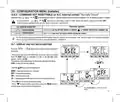
- Page 23: 10 - Configuration menu (installer) Command not resettable on N.C. external contact “Normally Closed” For the management of the N.C. external contact, the following operation is obtained. Do not enable the item prior to connecting a switch or other device that allows change of state. Thermostat operation activates level and Tset OFF ANTI-FREEZE if in WINTER or THERMAL PROTECTION in SUMMER. Contact opening and closure return to the level and Tset active before closing the contact. For the operating principle procedure and displays when the external contact changes state, see the images in the previous paragraph. 10.7 - Display and key back-lighting The menu allows you to manage the backlighting of the display. From normal operation of the thermostat, access the menus by holding down the Mode button. The currently active setting flashes on the display. Select with the keys the desired item for backlighting settings. Press OK key to confirm the desired setting.
- Page 24: Configuration menu (installer) Brightness adjustment (back-light) This setting is only accessible if the Set Led parameter is not set to off. Access the menus by holding down the Mode button. The Set LUMI screen is displayed. Confirm with the OK button, the set brightness value flashes. Choose the intensity of the backlight, which can be set from 1 to 10 levels (default 7). Press the OK button to confirm the desired setting. Press to select another menu item or press the Mode button to exit the menus.
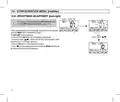
- Page 25: 10 - Configuration menu (Installer) 10.9 - Restore The restore operation is recommended for installer or expert use. This operation deletes many previous settings and programs. Access the menus by holding down the Mode button. Confirm with OK when the factory screen is displayed. Choose “YES” to perform the restore or “NO” to cancel. Confirming YES restores the factory settings. The restore operation deletes any password entered. The thermostat operates in winter mode with a temperature set at 20°C. Press the button to move to the next menu or press the Mode button to exit. 10.10 - Reset Reset does not cancel any previously entered or modified settings. Perform a reset if the thermostat features malfunction or display incorrectly. Access the menus by holding down the Mode button. Choose “YES” to perform the reset or “NO” to exit the function. Confirming YES returns the thermostat to normal operation without changing settings. Press to select another menu item or press the Mode button to exit.
- Page 26: 10 - Configuration menu (Installer) Entering and managing passwords to access the menus From normal thermostat operation, access the menus by holding down the “Mode” key. When the Set Code screen is displayed, confirm with OK. Using the keys, enter 4 digits between 0000 and 9999, individually confirm them with OK. Press the Mode key to return to the previous screen in the event of an error or to exit the Set Code menu. The Installatore password allows access to all menu configuration functions. Pressing and holding the “Mode” button will request the previously entered password before accessing the PROG menus. Password modification or cancellation To change the password already entered, access the menus by holding down the “Mode” button. In the event of forgotten password, enter the reset code to access the PROG configuration menus.
- Page 27: 10 - Configuration menu (Installer) Keyboard lock will only be visible if a password has been set. This function serves to prevent unauthorized persons from modifying thermostat settings. Access the menus by holding down the Mode button. Enter the password previously set. On the Set LOC menu screen, confirm with OK, NO flashes. Choose “YES” to enable the lock or “NO” to disable it. When the keyboard lock is engaged, pressing any key will show “bLOC” flashing on the display. To temporarily disable the keyboard lock, access the PROG menus and enter the password. Any user setting of the thermostat will be possible within 120 seconds of the last key press. To permanently disable the keyboard lock, confirm with OK the word NO in the Set LOC menu screen. 11 - Fault signalling In the event of a malfunction of the room temperature probe, it is identified on the display by the fixed text “E1”. A qualified installer will be required to replace or repair the device. The thermostat deactivates the temperature control and the relay.
- Page 28: Possible problems and solutions No power supply Check that the switch or protection differential isn't on OFF. The thermostat display is OFF Check the power cables if tightened to the appropriate terminals on the wall base. The thermostat works but the system does not start Contact the installer. The temperature fluctuates too much between hot and cold The thermostat is not set correctly for the type of system. Disposal of old electrical and electronic equipment This product cannot be disposed of as household waste. It must be delivered to a specific collection point where electrical and electronic equipment is recycled. By ensuring that the product is disposed of correctly, you will help prevent potential negative consequences for the environment and health. Recycling the materials will help conserve natural resources.

Danfoss TP7000 Range Electronic 7 Day Programmable Room Thermostat Installation Guide

SunTouch SunStat CommandPlus Programmable Thermostat Instruction Manual

Thermafloor HT1 Thermostat White App Electric Mat Thermostat User Guide

Warmme ET-72G(W) Thermostat User Manual

Honeywell Home T3 Pro Non-Programmable Thermostat User Manual

BEOK CONTROLS WiFI-EP WiFi Thermostat User Guide

EPH CONTROLS TM-S Room Thermostat Instruction Manual

Honeywell TH5000 Series FocusPRO Non-Programmable Digital Thermostat Installation Guide

EUROTRONIC SPIRIT ZigBee Energy Saving Thermostat User Guide

PBU 2 Degrees 2 Save Thermostat User Manual