Home > Honeywell Home > Honeywell Home X1N Non Programmable Thermostat Installation Guide
×
- 1. Installation And Wiring (Configuration → System Operation → Troubleshooting)
- 2. Tools You May Need (Installation And Wiring → Removing The Old Thermostat)
- 3. Make Sure There Are No 120/240v Wires. (Take A Picture Of How Your Wiring Looks Right Now. → Make Note Of Any Jumpers.)
- 4. Record Whether You Have Wires In The Following Terminals. (Check Mark The Wires That Are Connected To Terminals. → Important: The X1n Is For Single-stage Systems Only. → Disconnect The Wires And Remove The Old Wall Plate. → Use A Screwdriver To Release Wires From Terminals. → Tip: To Prevent Wires From Falling Back Into The Wall, Wrap The Wires Around A Pencil.)
- 5. Installing Your X1n Thermostat (Uwp Wall Plate → Insert The Wall Anchors)
- 6. Set R-switch Position And Insert R-wire Or Wires (Insert Wires Into The Inner Holes Of The Terminals On The Uwp → Various Wiring Options Are Shown On The Following Pages → If You Have 1 R-wire (r,rh, Or Rc) → If You Have 2 R-wires (r Or Rh, And Rc))
- 7. Wiring (Conventional Systems → Alternate Wiring (for Conventional Systems) → Wiring Notes)
- 8. Heat Pumps (Alternate Wiring (for Heat Pump Systems Only) → Wiring Notes:)
- 9. Connect Wires To The Uwp (Confirm Wiring Matches Snapshot → Mount The Uwp And Close The Door → Install Batteries)
- 10. Attach The Thermostat (Turn The Power On → Battery Replacement)
- 11. Configuration (System Setup)
- 12. Installer Setup Options (isu) (Heating System Type → Heating Equipment Type → Cool Stages/compressor Stages → System Changeover → Minimum Heat Setpoint → Air Filter Replacement Reminder)
- 13. System Operation Settings (Fan Operation Settings → Built-in Compressor Protection)
- 14. Alerts And Reminders (Alert Number → Alert Meaning → Low Batteries → Critically Low Batteries → Thermostat Memory Failure → Internal Sensor Error)
- 15. Troubleshooting (Display Is Blank → Heating Or Cooling Does Not Run → Heat Runs With Cooling → Heat Runs With No Call For Heat Or Cooling → Cannot Change Setpoint To Desired Setting → Waiting Forequipment Shown In Display Under Room)
- 16.
- 17. Caution: Electrical Hazard (Caution: Equipment Damage Hazard → Caution: Mercury Notice → Caution: Electronic Waste Notice → Customer Assistance)
- 18. Installation Et Câblage (Configuration → Fonctionnement Du Système → Dépannage)
- 19. Outils Dont Vous Aurez Besoin (Lisez Et Conservez Ces Instructions → Installation Et Câblage → Retrait De L'ancien Thermostat → Coupez L'alimentation → Vérifiez Que Votre Système Est Éteint → Retirez La Plaque Frontale De L'ancien Thermostat)
- 20. Assurez-vous Qu'il N'y A Pas De Fils (Prenez Une Photo De L'aspect Actuel De Votre Câblage → Notez Tous Les Cavaliers)
- 21. Notez Si Vous Avez Des Fils Dans Les Bornes Suivantes. N'incluez Pas Les Cavaliers Dans Votre Décompte. Ce Thermostat N'a Pas Besoin De Cava…
- 22. Installation De Votre Thermostat X1n (Thermostat → Plaque Murale → Uwp → Ancres Mur → Regroupez Et Insérez Les Fils À Travers L'uwp. → Assurez-vous Qu'au Moins 1/4 De Pouce De Chaque Fil Est Exposé Pour Une Insertion Facile Dans Les Bornes De Fil.)
- 23. Réglez La Position De L'interrupteur R Et Insérez Le Ou Les Fils R. (Retrait De L'ancien Thermostat → Différentes Options De Câblage Sont Présentées Dans Les Pages Suivantes)
- 24. Câblage (Systèmes Conventionnels → Câblage Alternatif (pour Les Systèmes Conventionnels) → Remarques Sur Le Câblage)
- 25. Thermopompe (Câblage Alternatif (pour Les Systèmes De Thermopompe Uniquement) → Remarques Sur Le Câblage)
- 26. Connecter Les Fils À L'uwp (Montez L'uwp Et Fermez La Porte → Installez Les Piles)
- 27. Fixez Le Thermostat (Mettez L'appareil Sous Tension → Remplacement Des Piles)
- 28. Configuration (Configuration Du Système → Menu Isu → Accéder Au Menu Isu → Paramètres Isu → Terminer La Configuration)
- 29. Options De Configuration De L'installateur (isu) (Échelle D'indication De Température → Type De Système De Chauffage → Type D'équipement De Chauffage → Changement De Système → Point De Consigne De Chaleur Minimum → Rappel De Remplacement Du Filtre À Air)
- 30. Réglages Du Fonctionnement Du Système (Modes Du Système → Réglages Du Fonctionnement Du Ventilateur → Modes De Ventilation → Protection Du Compresseur Intégrée)
- 31. Alertes Et Rappels (Numéro D'alerte → Signification De L'alerte → Piles Faibles → Piles Extrêmement Faibles → Panne De Mémoire Du Thermostat → Erreur De Capteur Interne. Problème Avec Le Capteur De Température Intégré.)
- 32. Dépannage (L'affichage Est Vide → Le Chauffage Ou La Climatisation Ne Fonctionne Pas → Si Le Problème Persiste → Le Chauffage Fonctionne Avec Le Refroidissement → Le Chauffage Fonctionne Sans Apport De Chaleur Ou De Refroidissement → Impossible De Modifier Le Point De Consigne Pour Obtenir Le Réglage Souhaité)
- 33.
- 34. Attention : Risque Électrique (Attention : Risque De Dommages À L'équipement → Attention : Avis Concernant Le Mercure → Attention : Avis Sur Les Déchets Électroniques → Assistance À La Clientèle)
- 35. Instalación Y Cableado (Configuración → Funcionamiento Del Sistema → Resolución De Problemas)
- 36. Herramientas Que Podría Necesitar (Lea Y Guarde Estas Instrucciones → Instalación Y Cableado → Remoción Del Termostato Antiguo)
- 37. Asegúrese De Que No Haya Cables De 120/240 V. (Tome Una Fotografía De Cómo Se Ve Su Cableado En Este Momento. → Anote Los Puentes)
- 38. Anote El Color De Los Cables (Importante → Desconecte Los Cables Y Retire La Placa De Pared → Consejo)
- 39. Instalación Del Termostato X1n (Termostato → Placa De Taquetes Pared → Uwp)
- 40. Fije La Posición Del Interruptor (Remoción Del Termostato Antiguo → Opciones De Cableado → Coloque El Interruptor R → Inserte El Cable R → Coloque El Interruptor R En La Posición Hacia Abajo)
- 41. Cableado (Sistemas Convencionales → Cableado Alternativo (para Sistemas Convencionales) → Notas Sobre El Cableado)
- 42. Bomba De Calor (Cableado Alternativo (sólo Para Sistemas De Bomba De Calor) → Notas Sobre El Cableado)
- 43. Conecte Los Cables Al Uwp (Monte El Uwp Y Cierre La Puerta → Instalación De Las Baterías)
- 44. Coloque El Termostato (Conecte La Alimentación → Reemplazo De Las Baterías)
- 45. Configuración (Configuración Del Sistema → Menú Isu → Acceso A La Configuración Del Instalador (isu) → Ajuste De La Isu → Finalización De La Configuración)
- 46. Opciones De Configuración Del Instalador (isu) (Tipo De Sistema De Calefacción → Tipo De Equipo De Calefacción → Válvula De Inversión O/b → Etapas De Refrigeración / Etapas Del Compresor → Cambio De Sistema → Punto Mínimo De Ajuste De Calefacción)
- 47. Ajustes De Funcionamiento Del Sistema (Modos Del Sistema → Ajustes De Funcionamiento Del Ventilador → Modos De Ventilador → Protección Integrada Del Compresor)
- 48. Alertas Y Recordatorios (Número De Alerta → Significado De Alerta → Baterías Bajas → Baterías Críticamente Bajas → Falla En La Memoria Del Termostato → Error De Sensor Interno. Problema Con El Sensor De Temperatura Incorporado.)
- 49. Solución De Problemas (La Pantalla Está En Blanco → La Calefacción O La Refrigeración No Funcionan → No Se Puede Cambiar El Punto De Ajuste A La Configuración Deseada → Waiting Forequipment)
- 50.
- 51. Precaución: Peligro Por Descarga Eléctrica (Precaución: Peligro De Daños Al Equipo → Precaución: Aviso De Mercurio → Precaución: Aviso Sobre Residuos Electrónicos → Asistencia Al Cliente)
×
Honeywell Home X1N Non Programmable Thermostat Installation Guide
3
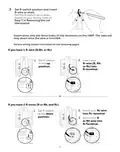
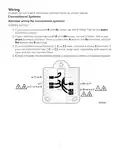
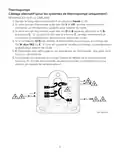
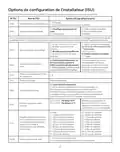
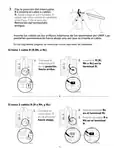
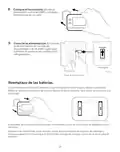
Set R-switch position and insert
R-wire or wires.
Set the R-switch up or down
based on your wiring notes in
Step 7 in Removing the old
thermostat.
M37225
Insert wires into the inner holes of the terminals on the UWP. The tabs will
stay down once the wire is inserted.
Various wiring options are shown on the following pages
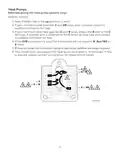
If you have 1 R-wire (R,Rh, or Rc)
1. Set R-switch
to the up
position.
2. Insert your
R-wire (R, Rh
or Rc) into
R-terminal.
M37228A
M37226
or
If you have 2 R-wires (R or Rh, and Rc)
2. Insert your Rc wire
into Rc-terminal
1. Set R-switch
to the down
position.
3. Insert your R
or Rh wire into
R-Terminal.
M37229A
6
| General | Details |
|---|---|
| Name | Honeywell Home X1N Non Programmable Thermostat Installation Guide |
| Make | Honeywell Home |
| Language | English |
| Filetype | PDF (Download) |
| File size | 1.69 MB |

Honeywell Home TH8320R1003-Uv VisionPRO 8000 with RedLINK Multistage Thermostat Installation Guide

Honeywell Home TH2110DH 1 Cool Programmable Digital Thermostat Installation Guide

Honeywell Home DT4R Wireless Room Thermostat User Guide

Honeywell Home N100 Series Non Programmable Thermostat User Guide

Honeywell Home DT4M Wired Room Thermostat User Manual

Honeywell Home T834 Series Thermostat Owner’s Manual

Honeywell Home M38794 T10 and T10 plus Pro Smart Thermostat with RedLINK Installation Guide

Honeywell Home DT4 Channel Wired Room Thermostat Instruction Manual

Honeywell Home T10 Smart Home Thermostat Instructions

Honeywell Home FocusPRO Smart S200 Series Smart Thermostat User Guide


LATICRETE 0804-0402-TW Programmable LCD Thermostat Instruction Manual

Price Industries Disio Display Thermostat User Guide

Honeywell TL116A Thermostat Installation Guide

WIFI Temp2 Battery Operated Thermostat Installation Guide

Danfoss KP 61 Temperature Switches Thermostat Installation Guide

MODINE 5-580.4 Programmable Room Thermostat Installation Guide

Honeywell Non-Programmable Digital Thermostat User Guide

Ebeco EB-Therm 55 Thermostat User Manual

beok BOT-323W Room Thermostat Instruction Manual

CLIMATE MC-LR-THERMOS Wireless Thermostat User Manual
Table of Contents
- 1. Installation And Wiring - Configuration →
- 2. Tools You May Need - Installation And Wiring →
- 3. Make Sure There Are No 120/240v Wires. - Take A Picture Of H... →
- 4. Record Whether You Have Wires In The Following Terminals. - ... →
- 5. Installing Your X1n Thermostat - Uwp Wall Plate →
- 6. Set R-switch Position And Insert R-wire Or Wires - Insert Wi... →
- 7. Wiring - Conventional Systems →
- 8. Heat Pumps - Alternate Wiring (for Heat Pump Systems Only) →
- 9. Connect Wires To The Uwp - Confirm Wiring Matches Snapshot →
- 10. Attach The Thermostat - Turn The Power On →
- 11. Configuration - System Setup →
- 12. Installer Setup Options (isu) - Heating System Type →
- 13. System Operation Settings - Fan Operation Settings →
- 14. Alerts And Reminders - Alert Number →
- 15. Troubleshooting - Display Is Blank →
- 16. Page 16 →
- 17. Caution: Electrical Hazard - Caution: Equipment Damage Hazar... →
- 18. Installation Et Câblage - Configuration →
- 19. Outils Dont Vous Aurez Besoin - Lisez Et Conservez Ces Instr... →
- 20. Assurez-vous Qu'il N'y A Pas De Fils - Prenez Une Photo De L... →
- 21. Notez Si Vous Avez Des Fils Dans Les Bornes Suivantes. N'inc... →
- 22. Installation De Votre Thermostat X1n - Thermostat →
- 23. Réglez La Position De L'interrupteur R Et Insérez Le Ou Les ... →
- 24. Câblage - Systèmes Conventionnels →
- 25. Thermopompe - Câblage Alternatif (pour Les Systèmes De Therm... →
- 26. Connecter Les Fils À L'uwp - Montez L'uwp Et Fermez La Porte →
- 27. Fixez Le Thermostat - Mettez L'appareil Sous Tension →
- 28. Configuration - Configuration Du Système →
- 29. Options De Configuration De L'installateur (isu) - Échelle D... →
- 30. Réglages Du Fonctionnement Du Système - Modes Du Système →
- 31. Alertes Et Rappels - Numéro D'alerte →
- 32. Dépannage - L'affichage Est Vide →
- 33. Page 33 →
- 34. Attention : Risque Électrique - Attention : Risque De Dommag... →
- 35. Instalación Y Cableado - Configuración →
- 36. Herramientas Que Podría Necesitar - Lea Y Guarde Estas Instr... →
- 37. Asegúrese De Que No Haya Cables De 120/240 V. - Tome Una Fot... →
- 38. Anote El Color De Los Cables - Importante →
- 39. Instalación Del Termostato X1n - Termostato →
- 40. Fije La Posición Del Interruptor - Remoción Del Termostato A... →
- 41. Cableado - Sistemas Convencionales →
- 42. Bomba De Calor - Cableado Alternativo (sólo Para Sistemas De... →
- 43. Conecte Los Cables Al Uwp - Monte El Uwp Y Cierre La Puerta →
- 44. Coloque El Termostato - Conecte La Alimentación →
- 45. Configuración - Configuración Del Sistema →
- 46. Opciones De Configuración Del Instalador (isu) - Tipo De Sis... →
- 47. Ajustes De Funcionamiento Del Sistema - Modos Del Sistema →
- 48. Alertas Y Recordatorios - Número De Alerta →
- 49. Solución De Problemas - La Pantalla Está En Blanco →
- 50. Page 50 →
- 51. Precaución: Peligro Por Descarga Eléctrica - Precaución: Pel... →


