
Home > Honeywell Home > Honeywell Home X1N Non Programmable Thermostat Installation Guide
Honeywell Home X1N Non Programmable Thermostat Installation Guide








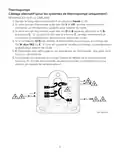












or Y1 or M
Y
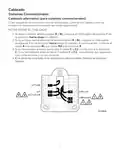
Wiring
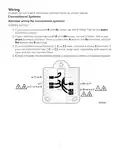
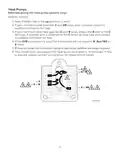
If labels do not match terminals, connect wires as shown below.
Conventional Systems
Alternate wiring (for conventional systems)
WIRING NOTES:
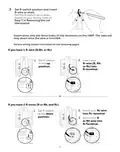
1. If you must connect both R and Rc wires, set the R Slider Tab to the down
position (2 wires).
2. If your old thermostat had both R and RH wires, set the R Slider Tab to the
down position (2 wires). Then connect the R wire to the Rc terminal, and the
RH wire to the R terminal.
3. If your old thermostat had only 1 C or C1 wire, connect it to the C terminal. If
your old thermostat had 2 C or C1 wires, wrap each separately with electrical
tape and do not connect them.
4. C does not power the thermostat display or operations; batteries are always required.
S
S
L/A
O/B
AUX
E
A
W2
Y2
G
C
U
U
or F
W
K
or W1 or H
or C1 or X or B
3
4
2
or RH or 4 or V
R
Rc
2
M39606
7

| General | Details |
|---|---|
| Name | Honeywell Home X1N Non Programmable Thermostat Installation Guide |
| Make | Honeywell Home |
| Language | English |
| Filetype | PDF (Download) |
| File size | 1.69 MB |
 (1 votes, average: 5.00 out of 5)
 Loading...

Honeywell Home TH8320R1003-Uv VisionPRO 8000 with RedLINK Multistage Thermostat Installation Guide

Honeywell Home TH2110DH 1 Cool Programmable Digital Thermostat Installation Guide

Honeywell Home DT4R Wireless Room Thermostat User Guide

Honeywell Home N100 Series Non Programmable Thermostat User Guide

Honeywell Home DT4M Wired Room Thermostat User Manual

Honeywell Home T834 Series Thermostat Owner’s Manual

Honeywell Home M38794 T10 and T10 plus Pro Smart Thermostat with RedLINK Installation Guide

Honeywell Home DT4 Channel Wired Room Thermostat Instruction Manual

Honeywell Home T10 Smart Home Thermostat Instructions

Honeywell Home FocusPRO Smart S200 Series Smart Thermostat User Guide


KOnighaus Infrarot Smart Thermostat User Guide

GENERAL LIFE FH251S Underfloor Heating Thermostat User Manual

Honeywell T9 Smart Thermostat Installation Guide

PRO1 T725 Thermostat User Guide

ZigBee WiFi Series Water Heating Thermostat User Guide

GENERAL LIFE MITRA 110S Digital Room Thermostat User Manual

Uponor ETN4 Ecoflex Supra Standard Thermostat Instruction Manual

Drayton 2290M Mains Digital Room Thermostat User Manual

GLOBAL Touch Screen Thermostat HY08AC User Manual

Danfoss TP5001B Programmable Room Thermostat User Guide