Goodman GTST Connected Thermostat User Guide


GOODMAN GTST
CONNECTED THERMOSTAT
HOMEOWNER GUIDE
®

| General | Details |
|---|---|
| Name | Goodman GTST Connected Thermostat User Guide |
| Make | Goodman |
| Language | English |
| Filetype | PDF (Download) |
| File size | 0.98 MB |
 (1 votes, average: 5.00 out of 5)

Goodman GTST Connected Thermostat User Guide Overview
Summary of Contents
- Page 1: Goodman GTST connected thermostat homeowner guide.
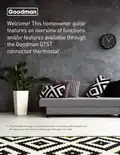
- Page 2: Welcome! This homeowner guide features an overview of functions and/or features available through the Goodman GTST connected thermostat. The Goodman home app is the preferred means of accessing these features, but the instructions that follow are helpful even if the app is not used.
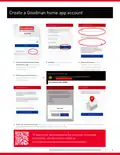
- Page 3: Create a Goodman home app account After installing the Goodman GSTS home app from the App Store or Play Store, select “Create Account”. Review the documents and enter your name, email address, and a password that meets the length and complexity requirements. Select “I Agree”. Check your email account for an email with your account verification code. Enter the verification code in the app and select “Confirm Code”. When successful, you will next be asked about enabling biometrics, and then navigated to the “my home” screen. To learn more about operating the Goodman connected thermostat, visit our how-to videos.
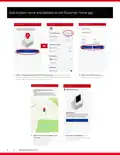
- Page 4: Add location name and address to the Goodman home app. After creating a Goodman GTST home account, you will be prompted to add a location. If you already have a location and want to add another, select “add location” on the “settings” screen. Enter the location name and address, then select “Next”. Verify the location address on the map. Move the pin to the correct location if needed, then select “Save This Location”. You will be navigated to the “my home” page where you can add a thermostat.
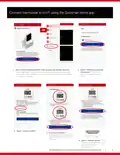
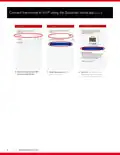
- Page 5: Connect thermostat to Wi-Fi using the Goodman home app. After creating a Goodman GTST home account and adding a location, select “Add Device” to add a thermostat. Select “Goodman Connected Thermostat” from the list, select a location, and press “Next”. Select “Connect to WiFi”. Press the fan button for 5 seconds to put the thermostat in “WIRELESS SETUP”, then select “Continue”. Select “Discover Device” and allow the Goodman GTST app to join the thermostat’s WiFi network. Goodman brand GTST connected thermostat homeowner guide.
- Page 6: Connect thermostat to Wi-Fi using the Goodman home app. Select the appropriate Wi-Fi network from the list. Enter the password. Confirm that the Wi-Fi icon appears on the thermostat screen, then select “Finish”. Select “Connect”.
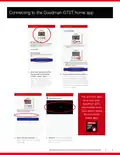
- Page 7: Connecting to the Goodman GTST home app After your Goodman GTST thermostat is connected to WiFi, select “Next”. Press and hold the fan button on the thermostat for 5 seconds to put the thermostat in “Wireless Setup” mode. Then press the up/warmer button on the thermostat to display the 6-digit pairing code and select “Next”. You are now able to access your Goodman GTST thermostat from your phone using the Goodman home app. Enter the pairing code. Confirm that the newly added thermostat appears on the “My Home” screen.
- Page 8: Thermostat interface overview includes a limited segment display. The mode button cycles through available modes. As each mode is selected, its name appears in the upper left corner of the display. The text disappears 1 second after the mode is selected, but the relevant setpoints for the selected mode are always displayed. The interface includes buttons for adjusting temperature up or warmer and down or cooler. There is an LED indicator present on the display. The on-screen display shows the current mode and fan settings. Different modes can be selected using the mode button. The fan settings are also indicated on the display. The document includes references to the Goodman Manufacturing website.
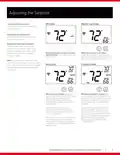
- Page 9: Adjusting the setpoint involves increasing or decreasing the temperature using the warmer (up) and cooler (down) arrow buttons. Button presses raise and lower the temperature by 1 degree in Fahrenheit and 0.5 degrees in Celsius. When the system is off, pressing the warmer and cooler buttons has no effect. In heat or cool modes, the warmer button raises the setpoint, while the cooler button lowers it. For cool only mini and multi-split systems, certain modes and heat setpoints are hidden. In auto mode, the warmer button increases both heat and cool setpoints, while the cooler button decreases them. When the schedule is enabled, adjustments to setpoints remain until the next schedule event. To adjust setpoints individually, switch to heat or cool mode, make the adjustment, and return to auto mode. Changing the setpoint during a scheduled period will override the schedule until the next scheduled event occurs. When setpoints reach the top or bottom of the scale, the other setpoint will continue to adjust until the minimum difference is reached.
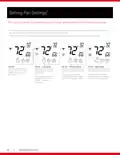
- Page 10: Fan settings can be changed more easily on the air quality screen of the Goodman home app. The presence of the FAN segment indicates constant fan operation. You may turn the fan on even if the thermostat is in the OFF mode. Pressing the FAN button toggles this feature on or off. If the fan is not on the display, then the fan is in auto mode and will only run when necessary to heat or cool. Pressing the fan button again will cycle through fan speeds. The bars below the FAN segment indicate fan speed - one bar for low speed, two bars for medium speed, and three bars for high speed. Fan on - low speed. Fan on - medium speed. Fan on - high speed.
- Page 11: Setting up a daily schedule can be accomplished more easily using the Goodman home app. A schedule automatically uses different heat and/or cool setpoints for different days of the week and different periods of each day. The schedule repeats each week and can have up to 4 schedule events per day, each with its own heat and cool setpoints. Press and hold the fan and warmer (up) buttons for 2 seconds to enter schedule mode for programming a schedule. While in schedule mode, press the mode button to advance through each setting for each day of the week and each time period of each day. Press the warmer (up) button and cooler (down) button to toggle the schedule on and off. To exit schedule mode and return to the home screen at any time, press and hold the mode button for 2 seconds. The system will return to the home screen automatically after 2 minutes of inactivity.
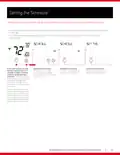
- Page 12: Setting the schedule involves choosing the day of the week and pressing the mode button to advance through the steps. You can enable or disable the morning event by pressing the warmer (up) or cooler (down) buttons to adjust the morning schedule event start time in 15-minute increments. The day of the week being scheduled appears below the time selection, along with the name of the schedule event. With the morning schedule event enabled, you can proceed to select the event start time. To select the next day of the week, use the warmer button, or the cooler button to select the previous day. Setting the morning event cool setpoint can be done using the warmer and cooler buttons. The day of the week being scheduled appears below the Cool text.
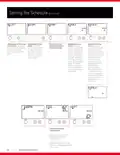
- Page 13: Setting the schedule involves adjusting the cool and heat setpoints for different schedule events. Press the warmer or cooler buttons to adjust the cool setpoint for the morning schedule event. Press the mode button to advance to the next step. The day of the week being scheduled appears below the time selection, along with the name of the schedule event. Repeat steps for the day event and enable the day event. Set the day event start time and both the cool and heat setpoints. Repeat steps for the evening event.
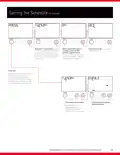
- Page 14: Setting the schedule involves enabling evening and night events. You can set the evening event start time, cool setpoint, and heat setpoint. Repeat the steps for the night event. Press the mode button again to complete the day’s schedule. You can then select another day to schedule or copy this day’s schedule to another day.
- Page 15: Setting the schedule involves copying Monday's schedule to another day. Press the mode button to copy Monday's schedule to Tuesday or select another day using the warmer and cooler buttons. After copying, you can continue to copy to as many days as wanted. Press the mode button to return to the screen for selecting another day of the week or use the warmer button to copy the current day's schedule. Choose the day of the week for programming individual days. The warmer button selects the next day, while the cooler button selects the previous day.
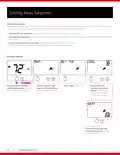
- Page 16: Setting away setpoints allow you to save energy by limiting heating and cooling when you are away from home. The Away setpoints are used when geofencing is enabled in the Goodman Home App. Press the warmer (up) button and cooler (down) buttons to enter the settings for Away mode. Press the mode button to advance through the away mode settings. To exit to the home screen at any time, press and hold the mode button for 2 seconds. The system will return to the home screen automatically after 2 minutes of inactivity. Press and hold the fan and cooler (down) buttons to enter the settings for Away mode. Press the warmer (up) and cooler (down) buttons to toggle away on or off. Press the mode button again to adjust the heating setpoint. Press the warmer (up) and cooler (down) buttons to adjust the cooling setpoint.
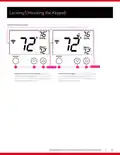
- Page 17: Locking/Unlocking the keypad is important to prevent unauthorized use of the thermostat. To disable or lock the keypad, press the warmer (up) and cooler (down) buttons together and hold for two seconds. To unlock the keypad, press the warmer (up) and cooler (down) buttons together and hold for two seconds. When the lock icon disappears from the display, release the buttons to unlock. When the lock icon appears on the display, release the buttons to lock. Setting the daily schedule is a feature of the thermostat. The front panel buttons may be disabled by locking them. The mode and fan settings are accessible through the keypad. The lock icon indicates the status of the keypad. The homeowner guide provides instructions for using the thermostat.
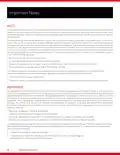
- Page 18: Important notes This device complies with Part 15 of the FCC Rules. Operation is subject to two conditions: it may not cause harmful interference, and it must accept any interference received. This equipment has been tested and found to comply with the limits for a Class B digital device. These limits are designed to provide reasonable protection against harmful interference in a residential installation. This equipment generates, uses, and can radiate radio frequency energy, which may cause harmful interference if not installed and used according to the instructions. If this equipment does cause harmful interference to radio or television reception, the user is encouraged to try to correct the interference. Measures to correct interference include reorienting or relocating the receiving antenna, increasing separation between the equipment and receiver, and consulting a technician for help. This device contains license-exempt transmitter(s)/receiver(s) that comply with Innovation, Science and Economic Development Canada’s license-exempt RSS(s). Operation is subject to two conditions: the device may not cause interference, and it must accept any interference that may cause undesired operation.
- Page 19: Once you choose the Goodman brand, you’ll probably be a fan for life. Millions across North America are big fans already. See why others are saying, “Thank Goodness for Goodman.” Daikin Industries, Ltd. is a Fortune 1,000 company with more than 84,870 employees worldwide. Daikin Comfort Technologies North America, Inc. provides Daikin, Amana, Goodman, and Quietflex brand products. DNA and its affiliates manufacture heating and cooling systems for residential, commercial, and industrial use. Before purchasing this appliance, read important information about its estimated annual energy consumption. Additional information is available from your retailer. Daikin engineering and manufacturing is located at the Daikin Texas Technology Park near Houston, TX. Goodman is a Daikin brand.

WILLIAMS P322016 Thermostat Instruction Manual

Honeywell Home FocusPRO S200 Smart Thermostat User Manual

Honeywell Communicating Fan Coil Thermostat Instruction Manual

BEOK TGP53 China Piano Buttons Underfloor Heating Thermostat User Guide

Honeywell RLV4305 Programmable Thermostat Owner’s Manual

SALUS HTRP230(50) Wired Programmable Digital Thermostat User Manual

celect T30 Simple Plug In Thermostat Installation Guide
Drayton 22902 Programmable 2 Channel Room Thermostat Installation Guide

Roth 1135006445 Wireless Room Thermostat Touchline 230 V Instruction Manual

Arcoaire TSTATIIEWF-01 Gray Smart Thermostat Owner’s Manual