
Home > EPH CONTROLS > EPH CONTROLS TRFPi2 COMBIPACK2 Programmable RF Thermostat Instruction Manual
EPH CONTROLS TRFPi2 COMBIPACK2 Programmable RF Thermostat Instruction Manual


Boiler Plus
Page 1 of 3
Operating Instructions
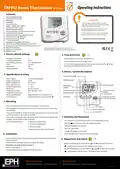
TRFPi2 Room Thermostat Wireless
Contents
1. Factory default settings
2. Specifications & wiring
3. Mounting
CAUTION!
4. Installation
5. Frost protection
6. Button / symbol description
7. Resetting the thermostat
8. Keypad lock and unlock
The thermostat must not be left unsupervised
when open. (Prevent non specialists and especially
children from gaining access to it.)
Only qualified electricians or authorised service
staff are permitted to open the thermostat.
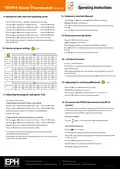
9. Setting the date, time and operating mode
10. Factory program settings
11. Adjusting the program settings for 5/2d
12. Temporary override (Manual)
13. Permanent override (Hold)
14. +1hr Boost funtion
If the thermostat is used in a way not specified by
the manufacturer, its safety may be impaired.
Important: Keep this document
15. Adjusting the switching differential
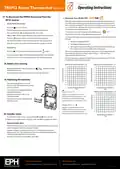
16. To connect the TRFPi2 thermostat to the RF1A
17. To disconnect the TRFPi2 thermostat from the RF1A
18. Battery low warning
19. Replacing the batteries
20. Installer menu
Prior to setting the thermostat, it is neccessary to
complete all required settings described in this section.
1. Factory default settings
5°C
5. Frost protection
Temperature indicator:
Switching differential:
In built frost protection:
Clock:
°C
Frost protection is built into this thermostat.
It is pre fixed at 5°C and is not adjustable.
0.4°C
5°C - Not adjustable
24 hours
It will only be activated when the thermostat is in the stand by
and the room temperature falls below 5°C.
mode
Keypad lock:
Off
Operating mode:
5/2 day
6. Button / Symbol description
2. Specifications & wiring
Heating ON symbol
Wireless symbol
Power supply:
2 x AA Alkaline Battery
Power consumption:
Battery replacement:
Temp. control range:
Ambient temperature:
Dimensions:
2 mW
Once a year
5 ... 35°C
Day of the week
Keypad lock
symbol
0 ... 50°C
84 x 84 x 30mm
Current program
Standby symbol
Wireless connect
button
Reset button
Temperature sensor:
Temperature indication:
Switching differential:
Frost protection:
NTC 10K Ohm @ 25°C
˚C
Adjustable from 0.2/0.4/0.6/0.8/1.0˚C
Only operational in stand by mode
OK button
Set point increase
Set point decrease
3. Mounting
The mounting height should be 1.5 meters above the floor level.
+1hr button
The thermostat should be wall mounted in the room where the heating is to
be controlled.
Standby button
Set button
The place of installation should be chosen so that the sensor can measure the
room temperature as accurately as possible.
7. Resetting the thermostat
Choose the mounting location to prevent direct exposure to sunlight or other
heating / cooling sources when mounted.
It is necessary to reset the thermostat prior to initial programming.
The unit can be fitted to:
1. Recessed conduit boxes.
2. Surface mounting boxes.
3. Directly on walls.
RESET
Press the
button on the side of the thermostat.
‘rst no’ will appear on the screen.
Press the button.
4. Table mounting with stand provided.
‘rst yes’ will appear on the screen.
Press the ‘OK’button to return to normal operation.
4. Installation
Slacken the fastening screw on the bottom of the thermostat with a philips
head screwdriver.
OFF
8. Keypad lock and unlock
The thermostat is hinged and can be opened 180 degrees.
Mount the unit as described in section 3.
Insert 2 x AA batteries.
To lock the keypad, press and hold the
will appear on the screen. The keypad is now locked.
To unlock the keypad, press and hold the and buttons for 5 seconds.
will disappear from the screen. The keypad is now unlocked.
and
buttons for 5 seconds.
Close the thermostat and tighten the fastening screw.
EPH Controls Ireland
EPH Controls UK
20230123_TRFPi2_OpIns_PK


| General | Details |
|---|---|
| Name | EPH CONTROLS TRFPi2 COMBIPACK2 Programmable RF Thermostat Instruction Manual |
| Make | EPH CONTROLS |
| Language | English |
| Filetype | PDF (Download) |
| File size | 0.34 MB |
 (1 votes, average: 5.00 out of 5)
 Loading...

EPH CONTROLS eTRV-HW Smart Cylinder Thermostat User Guide

EPH CONTROLS eTRV-HW Smart Hot Water Thermostat Instruction Manual

EPH CONTROLS eTRV Smart Radiator Thermostat Instruction Manual

EPH CONTROLS 20221026 RFRA – RF Room Thermostat Instruction Manual

EPH CONTROLS CDTP2 Hardwired Room Thermostat Instruction Manual

EPH Controls CDT2-24 24V Room Thermostat Installation Guide

EPH CONTROLS RFCA RF Cylinder Thermostat Instruction Manual

EPH CONTROLS PR092K7 RF Cylinder Thermostat Instruction Manual

EPH CONTROLS COMBIPACK2 Smart Thermostat with Automation and Optimum Start Instructions

EPH CONTROLS RFR RF Room Thermostat Instruction Manual

EPH Controls TRFPi2 COMBIPACK2 Instruction Manual: Specifications
| Power supply | 2 x AA Alkaline Battery |
| Sensor | NTC 10K Ohm @ 25°C |
| Operating temperature | 0 ... 50°C |
| Dimensions | 84 x 84 x 30mm |
| Power consumption | 2 mW |
EPH Controls TRFPi2 COMBIPACK2 compared with other EPH Controls thermostats
| Specification | EPH Controls TRFPi2 COMBIPACK2 | EPH Controls CDT2-24 | EPH Controls CDTP2 Hardwired | EPH Controls CRTP2 |
|---|---|---|---|---|
| Power supply | 2 x AA Alkaline Battery | 24Vac 50Hz | 230Vac 50Hz | 2 x AA Alkaline Battery |
| Sensor | NTC 10K Ohm @ 25°C | NTC 10K Ohm @ 25°C | NTC 10K Ohm @ 25°C | NTC 10K Ohm @ 25°C |
| Operating temperature | 0 ... 50°C | 0 ... 50°C | 0 ... 50°C | 0 ... 50°C |
| Dimensions | 84 x 84 x 30mm | 84 x 84 x 30mm | 84 x 84 x 30mm | 84 x 84 x 30mm |
| Power consumption | 2 mW | 8 VA | 8 VA | 8 VA |
Other EPH Controls COMBIPACK2 manuals
- EPH CONTROLS COMBIPACK2 Smart Thermostat with Automation and Optimum Start Instructions
- EPH Controls TRFPi2 Programmable RF Thermostat Instruction Manual
More EPH Controls thermostat manuals

Honeywell TH5220D Non-Programmable Digital Thermostat Installation Guide

BEOK CONTROLS TFT-LCD Heating Thermostat Instruction Manual
ENGO CONTROLS E901RF Wireless Programmable Thermostat User Guide

Micro-Air 351 Air Conditioner Digital Thermostat User Guide

emos P5604 Thermostat Instruction Manual

Moes 002 Series Wifi Thermostat User Guide

GENERAL LIFE Solara 330S Wired Room Thermostat User Manual

LATICRETE Strata Heat WiFi Thermostat Instruction Manual

Honeywell TL116A Thermostat Installation Guide

Netatmo NTH01-AMZ Energy Saving Smart and Connected Thermostat Instruction Manual