
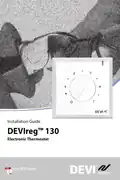
DEVIreg 130 Electronic Thermostat Installation Guide






| General | Details |
|---|---|
| Name | DEVIreg 130 Electronic Thermostat Installation Guide |
| Make | DEVI |
| Language | English |
| Filetype | PDF (Download) |
| File size | 0.62 MB |
 (1 votes, average: 5.00 out of 5)
 Loading...

DEVI 140F1143 Electronic Intelligent Timer Thermostat Installation Guide

DEVIreg Electronic Intelligent Timer Thermostat Installation Guide

DEVI 330 Electronic Thermostat Installation Guide

DEVI 532 Electronic Thermostat Installation Guide

DEVI 140F1161 Intelligent Electronic Timer Controlled Thermostat Installation Guide

DEVI 140F1064 Touch Electronic Intelligent Timer Thermostat Installation Guide

DEVIreg 316 Electronic Thermostat Installation Guide

DEVI 530M Electronic Thermostat Installation Guide

DEVI 610 Electronic Thermostat Installation Guide

DEVI 316 Electronic Thermostat Installation Guide

DEVI DEVIreg 130 Manual: Questions and Answers
DEVI DEVIreg 130 specifications
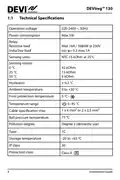
| Power supply | 220-240V~, 50Hz |
| Differential | 0,2 °C |
| Sensor | NTC 15 kOhm at 25°C |
| Operating temperature | 0 to +30 °C |
| Storage temperature | -20 to +65 °C |
| Weight | 90 g |
| Power consumption | Max 5W |
| Frost protection | 5 °C - |
Can I use the DEVI DEVIreg 130 with a wooden floor without a floor sensor?
No. When controlling floor heating under wood or similar material, you must use a floor sensor and never exceed 35 °C maximum floor temperature. Installation Guide, p. 5
Where is the release tab on the DEVI DEVIreg 130?
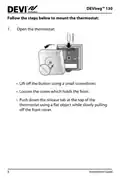
At the top of the thermostat. Installation Guide, p. 8
What is the maximum temperature setting on the DEVI DEVIreg 130?
45 °C.
How do I adjust the minimum and maximum floor temperatures on the DEVI DEVIreg 130?
Lift off the adjustment button with a thin screwdriver, move the pins to desired positions, then reinstall the button.
- Lift off the adjustment button using a thin screwdriver.
- Move the pins to the desired positions.
- Put the adjustment button back in place. Installation Guide, p. 10
How do I reinstall the DEVI DEVIreg 130 after adjusting settings?
Install the front cover and button in reverse order of disassembly, then turn on the power supply.
- Install the front cover and button in reverse order of disassembly.
- Turn on the power supply. Installation Guide, p. 10
Why won't my DEVI DEVIreg 130 thermostat turn on after installation?
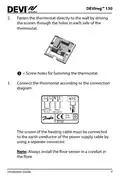
Verify the connections match the connection diagram. Load, L, N, and NTC terminals must be wired correctly to terminals 1, 2, 3, and 4.
- Check that mains power is 220-240V~
- Confirm the thermostat is fastened securely to the wall
- Verify the earth conductor from the heating cable screen is connected via a separate connector Installation Guide, p. 9
Does the DEVI DEVIreg 130 floor sensor need special installation?
Install it in a conduit within the floor. Installation Guide, p. 9
DEVI DEVIreg 130 compared with other DEVI thermostats
| Specification | DEVI DEVIreg 130 | DEVI DEVIreg 530 | DEVI 316 | DEVI 530M Electronic Thermostat |
|---|---|---|---|---|
| Power supply | 220-240V~, 50Hz | 220-240V~, 50Hz | 220 - 240V~, 50Hz | 220-240 V~, 50/60 Hz |
| Differential | 0,2 °C | 0.4°C | 0 ° to 6 °C | 0.4°C |
| Sensor | NTC 15 kOhm at 25°C | NTC 15kOhm at 25°C | NTC 15 kOhm at 25 °C | NTC 15 kOhm at 25°C (Default) |
| Operating temperature | 0 to +30 °C | -10 to +30°C | -10 °C to +45 °C | -10 to +30°C |
| Storage temperature | -20 to +65 °C | -20 to +65°C | -20 °C to +65 °C | -20°C to +65°C |
| Weight | 90 g | 90 g | 180 g | 90 g |
| Power consumption | Max 5W | Max 0.25W | Max 0.25W | Max. 0.25 W |
More DEVI thermostat manuals

Eurotronic Technology sprit Z-Wave Smart Radiator Thermostat Installation Guide

EZAIoT R7C RGB Colorful LCD Screen Thermostat User Manual

ENGO CONTROLS EASY230W Non-Programmable Wired Thermostat User Guide

network thermostat X-Series Ethernet Thermostat Instruction Manual

WHITE-RODGERS 1F86-0471 Blue Single 1 1 Stage Thermostat Instruction Manual

ADAX VG11 Digital Thermostat User Guide

STEGO ET 011 Electronic Thermostat User Manual

ENSTO ECO10BTW-J Heat Control Thermostat Instruction Manual

4512673 Heatit ZM Thermostat 16A User Guide

American Standard ACONT103 NP Non Programmable Heat Pump Thermostat Instruction Manual