
Home > seitron > seitron TAD022 Digital Room Thermostat for Heating Cooling System Instruction Manual
seitron TAD022 Digital Room Thermostat for Heating Cooling System Instruction Manual
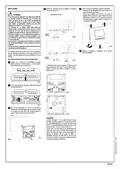
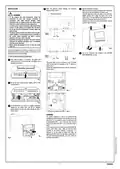


Make the electrical wirings following the connection
diagrams of Fig. 5 and 6.
Close the thermostat as follows:
INSTALLATION
4
5
- Match the two teeth located in the upper side of the plastic
base with the two slots located on the plastic cover.
- Close the upper side of the cover while, at the same time,
slightly pressing with a finger the plastic tooth on the
bottom side of the base making it lean towards the inner
side of the thermostat (see the arrow in Fig. 9).
Complete the rotation of the cover until the plastic tooth on
the base snaps into position.
: Reinforced insulation.
WARNING!
- To set properly the room temperature, install the
thermostat far from heat sources, airstreams or
particularly cold walls (thermal bridges). These
indications must be applied to place the remote sensor
when this is used to acquire the room temperature.
- A remote sensor must be connected using wires having
at least 1.5 mm² section and no longer than 15 metres.
Do not use the same channelling for sensor signal and
mains voltage.
1
1
LOAD
- The device must be wired to the electric mains through a
switch capable of disconnecting all poles according to
REMOTE
SENSOR
L
N
Fig. 5
the current safety standards and with
separation of at least 3 mm in all poles.
a
contact
230V~ 50Hz
- Installation and electrical wirings of this device must be
performed by qualified technicians and in compliance
with the current standards.
- Before wiring the appliance be sure to turn the mains
power off.
Fig. 9
2
3
The device is designed to be installed in a standard recess (or wall)
mounted junction box with two modules or else directly on the
wall using the screw anchors provided.
Turn on the thermostat and configure it (see ‘SETTING
USER PARAMETERS’ section).
6
REMOTE
SENSOR
To install the device perform the following steps:
L
N
TO THE
BOILER
230V~ 50Hz
Fig. 6
Push, with the help of a screwdriver, the plastic tooth
located on the slot on the bottom side, then slightly lift up
the plastic cover (Fig. 2).
1
The power supply must be connected to the ‘E’ terminal
while the load must be connected to the ‘F’ terminal as
shown in Fig. 7.
Connect the optional remote sensor to the ‘G’ connector as
shown in Fig. 8.
Fig. 2
Lift up the cover, while pressing it slightly, until it is fully
extracted (Fig. 3).
2
E
F
Fig. 7
Fig. 3
G
Fix the base directly on a wall or on 2-modules wiring boxes
3
through the two screws seats with 60 mm wheelbase
paying attention to push the cables through the hole as
shown in Fig. 4.
Fig. 8
WARNING
The outputs, terminals 3, 4 and 5, are tension-free and
insulated with double insulation from the other parts of the
thermostat. So, it is possible to power the thermostat with
an high tension (230V~) and, at the same time, control a
load at a low tension SEL (24V~), as can be seen in Fig. 5
and 6.
In this case it is necessary to keep a separation between the
remote sensor cables, power cables and the load wires,
according to the current standards. In particular, it is
necessary to fix the group of cables with cable ties
separating the SELV wires from the others to avoid that if a
wire gets disconnected accidentally, this won’t reduce the
insulation towards SELV.
Fig. 4
4
- ENGLISH -

| General | Details |
|---|---|
| Name | seitron TAD022 Digital Room Thermostat for Heating Cooling System Instruction Manual |
| Make | seitron |
| Language | English |
| Filetype | PDF (Download) |
| File size | 0.48 MB |
 (1 votes, average: 5.00 out of 5)
 Loading...

seitron Wi-Time Wall Wi-Fi Programmable Thermostat Instruction Manual

seitron TM 00-M Electro Mechanical Room Thermostat Instructions

seitron 039790 WiFi WiTime Wall Programmable Thermostat User Guide

seitron DR R02M Thermostat Wireless Kit Instruction Manual

seitron KTY003 Hygge Kit Class 5 WiFi Battery Powered Programmable Thermostat User Guide

seitron TR D02B Wireless Digital Thermostat User Manual


NT NetX X5N-NX Thermostat Instruction Manual

Honeywell CT50A Standard low volt Thermostat Instruction Manual

klima SF300 Thermostat User Manual

Honeywell DT4 Room Thermostat User Manual

TIMEGUARD TRT05 Plug In Thermostat Instruction Manual

BOSCH Thermostat atmosphere Smart Home 230 V Instruction Manual

Gigaset Thermostat Instruction Manual

Danfoss TPOne-B Electronic Programmable Room Thermostat User Guide

White Rodgers 1F78-144 Non Programmable Thermostat Instruction Manual

HEATIT Z-TRM3 Thermostat User Guide