
Home > seitron > seitron KTY003 Hygge Kit Class 5 WiFi Battery Powered Programmable Thermostat User Guide
seitron KTY003 Hygge Kit Class 5 WiFi Battery Powered Programmable Thermostat User Guide
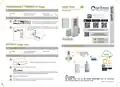


PROGRAMMABLE THERMOSTAT hygge
hygge home
Programmable thermostat radio controlled Kit
Weekly programmable
TECHNICAL FEATURES
Power supply:
Battery 2x1.5V size AAA.
Software class:
A
Size:
35x115x19 mm (LxHxD)
Thermoregulation class:
V (3%)
INSTALLATION
1
Take off the battery compartment cover and correctly insert
the featured batteries (according to the correct polarity).
hygge programmable thermostat can be installed on a wall or it can be
put on a flat horizontal surface (e.g. a table) with or without the provided
magnetic stand.
2
App Android and iOS for Smartphone
and download the complete manual
CONTACT US
TALK WITH US
+39 0424 567842
GATEWAY hygge way
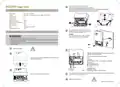
LOGIC SYSTEM DIAGRAM
TECHNICAL FEATURES
Power supply:
Size:
5V through power grid plug
85x125x25 mm (LxHxD)
Software class:
A
hygge way
CLOUD
INSTALLATION
90-264Vac
ROUTER
1
hygge
Connect the provided power adapter, on the back of the device.
Seitron Smart
Temperatura sotto controllo
The IoT Gateway is only used stable on a flat surface.
2
WARNING
hygge radio
Before placing the device on its final position, make sure that the WiFi signal is present and that the device
85-264Vac
receives the radio signals transmitted by hygge programmable thermostat correctly.
Download the Seitron Smart app.
3
4
WARNING
THE DEVICES INSIDE THIS KIT ARE FACTORY PRE-MATCHED: ONCE THE MECHANICAL
Start the App, sign in as a new user and make the Login by entering your email and password.
Then complete the configuration of the IOT GATEWAY.
INSTALLATION IS COMPLETE, THEY ARE READY TO USE.
WIST03170ESE 038890 240222


| General | Details |
|---|---|
| Name | seitron KTY003 Hygge Kit Class 5 WiFi Battery Powered Programmable Thermostat User Guide |
| Make | seitron |
| Language | English |
| Filetype | PDF (Download) |
| File size | 1.27 MB |
 (1 votes, average: 5.00 out of 5)
 Loading...

seitron Wi-Time Wall Wi-Fi Programmable Thermostat Instruction Manual

seitron TAD022 Digital Room Thermostat for Heating Cooling System Instruction Manual

seitron TM 00-M Electro Mechanical Room Thermostat Instructions

seitron 039790 WiFi WiTime Wall Programmable Thermostat User Guide

seitron DR R02M Thermostat Wireless Kit Instruction Manual

seitron TR D02B Wireless Digital Thermostat User Manual

Seitron KTY003 Hygge Class 5 Manual: Questions and Answers
What does the Seitron KTY003 thermostat class V 3% rating mean?
Thermoregulation class V indicates the thermostat maintains temperature control within 3% accuracy. User Guide, p. 1
What is the difference between the Seitron KTY003 Hygge Class 5 thermostat and the receiver?
The thermostat is battery-powered and wireless; the receiver connects to mains power and controls heating via relay contacts.
| Component | Power Source |
|---|---|
| Thermostat | Two AAA batteries |
| Receiver | 85-264V AC mains power |
More Seitron thermostat manuals

ENGO CONTROLS E10-MBUSW Wi-Fi Modbus Thermostat User Guide

Tempio Controls HY02B05 WIFI Digital Heating Thermostat User Manual

GENERAL LIFE HT330S RF Wireless Room Thermostat User Manual

Honeywell RTH9600WF Touchscreen Programmable Thermostat User Guide

EAE Technology EAE-KNX MONA Series Thermostat Instruction Manual

Braeburn 2030 Economy Model Thermostat User Manual

SIEMENS Powers Controls TH 192-3 Series Day Night Vent Room Thermostat Instruction Manual

AIRZONE AZS62THINKRB, AZS62THINKRN Wireless Think Thermostat Instruction Manual

DEVI 532 Electronic Thermostat Installation Guide

YOLINK YS4003-UC Smart Thermostat User Guide