
Home > NEOMITIS > NEOMITIS RTE7SD Mains Powered Digital 7 Day Programmable Room Thermostat Instruction Manual
NEOMITIS RTE7SD Mains Powered Digital 7 Day Programmable Room Thermostat Instruction Manual
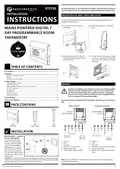
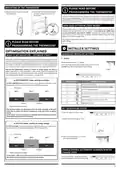
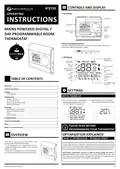
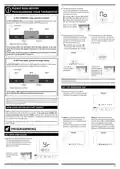
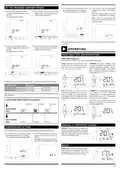
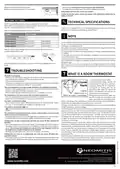


For best performance, do not mount the thermostat on metal wall boxes and leave at
ůĞĂƐƚꢀϯϬꢀĐŵꢀĚŝƐƚĂŶĐĞꢀĨƌŽŵꢀĂŶLJꢀŵĞƚĂůꢀŽďũĞĐƚƐꢀŝŶĐůƵĚŝŶŐꢀǁĂůůꢀďŽdžĞƐꢀĂŶĚꢀďŽŝůĞƌꢀŚŽƵƐŝŶŐ͘
RTE7SD
INSTALLATION
MOUNTING OF WALL MOUTING PLATE
dŚĞꢀĚŝŐŝƚĂůꢀƌŽŽŵꢀƚŚĞƌŵŽƐƚĂƚꢀŝƐꢀĮdžĞĚꢀŽŶꢀƚŚĞꢀǁĂůůꢀǁŝƚŚꢀƚŚĞꢀƐƚĂŶĚĂƌĚꢀǁĂůůꢀƉůĂƚĞꢀǁŚŝĐŚꢀŝƐꢀ
ƐƵƉƉůŝĞĚꢀǁŝƚŚꢀƚŚĞꢀƉƌŽĚƵĐƚ͘
INSTRUCTIONS
1- Unscrew the 2 screws under the
2-ꢀꢀZĞŵŽǀĞꢀƚŚĞꢀǁĂůůꢀƉůĂƚĞꢀĨƌŽŵꢀƚŚĞꢀƚŚĞƌ-
ƚŚĞƌŵŽƐƚĂƚ͘
ŵŽƐƚĂƚ͘
MAINS POWERED DIGITAL 7
DAY PROGRAMMABLE ROOM
THERMOSTAT
x2
3- ^ĞĐƵƌĞꢀƚŚĞꢀǁĂůůꢀƉůĂƚĞꢀǁŝƚŚꢀƚŚĞꢀƚǁŽꢀ
ƐĐƌĞǁƐꢀƉƌŽǀŝĚĞĚꢀƵƐŝŶŐꢀƚŚĞꢀŚŽƌŝnjŽŶƚĂůꢀ
ĂŶĚꢀǀĞƌƟĐĂůꢀŚŽůĞƐ͘
4- /ꢀŶꢀĐĂƐĞꢀŽĨꢀƐƵƌĨĂĐĞꢀŵŽƵŶƟŶŐ͕ꢀĂꢀŬŶŽĐŬꢀ
ŽƵƚꢀĂƌĞĂꢀŝƐꢀƉƌŽǀŝĚĞĚꢀŽŶꢀƚŚĞꢀǁĂůůꢀƉůĂƚĞꢀ
ĂŶĚꢀŽŶꢀƚŚĞꢀĐŽƌƌĞƐƉŽŶĚŝŶŐꢀĂƌĞĂꢀŽĨꢀƚŚĞꢀ
ƚŚĞƌŵŽƐƚĂƚ͘
TABLE OF CONTENTS
Pack contains........................................................................................................... 1
/ŶƐƚĂůůĂƟŽŶ.............................................................................................................. 1
ꢀ
ꢀ
ꢀ
DŽƵŶƟŶŐꢀŽĨꢀǁĂůůꢀŵŽƵƟŶŐꢀƉůĂƚĞ................................................................................................. 1
tŝƌŝŶŐ......................................................................................................................................... 1
DŽƵŶƟŶŐꢀŽĨꢀƚŚĞꢀdŚĞƌŵŽƐƚĂƚ ...................................................................................................... 2
/ŶƐƚĂůůĞƌꢀƐĞƫŶŐƐ...................................................................................................... 2
ꢀ
ꢀ
ꢀ
ꢀ
ꢀ
ꢀ
ꢀ
ꢀ
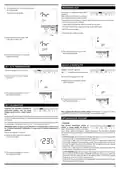
ꢁĚǀĂŶĐĞĚꢀŝŶƐƚĂůůĞƌꢀƐĞƫŶŐ........................................................................................................... 2
^ĞƚꢀϭϮͬϮϰꢀŚŽƵƌƐꢀĐůŽĐŬ.................................................................................................................. 2
ꢀꢂŶĂďůĞͬĚŝƐĂďůĞꢀĂƵƚŽŵĂƟĐꢀƐƵŵŵĞƌͬǁŝŶƚĞƌꢀĐŚĂŶŐĞꢀŽǀĞƌ ............................................................2
^ĞƚꢀΣꢃͬΣ&ꢀƚĞŵƉĞƌĂƚƵƌĞ................................................................................................................. 3
^ĞƚꢀĐĂůŝďƌĂƟŽŶ............................................................................................................................. 3
WƌŽŐƌĂŵꢀůŽĐŬ............................................................................................................................... 3
^ĞůĞĐƚꢀϮꢀƉŽŝŶƚƐͬdW/ ...................................................................................................................... 3
KƉƟŵŝƐĂƟŽŶꢀĨĞĂƚƵƌĞ................................................................................................................... 3
WIRING
ꢁůůꢀĞůĞĐƚƌŝĐĂůꢀŝŶƐƚĂůůĂƟŽŶꢀǁŽƌŬꢀƐŚŽƵůĚꢀďĞꢀĐĂƌƌŝĞĚꢀŽƵƚꢀďLJꢀĂꢀƐƵŝƚĂďůLJꢀƋƵĂůŝĮĞĚꢀ
Electrician or other competent person. If you are not sure how to install
ƚŚŝƐꢀƚŚĞƌŵŽƐƚĂƚꢀĐŽŶƐƵůƚꢀĞŝƚŚĞƌꢀǁŝƚŚꢀĂꢀƋƵĂůŝĮĞĚꢀĞůĞĐƚƌŝĐŝĂŶꢀŽƌꢀŚĞĂƟŶŐꢀꢂŶ-
ŐŝŶĞĞƌ͘ꢀꢃŽꢀŶŽƚꢀƌĞŵŽǀĞꢀŽƌꢀƌĞĮƚꢀƚŚĞꢀƚŚĞƌŵŽƐƚĂƚꢀŽŶƚŽꢀƚŚĞꢀďĂĐŬƉůĂƚĞꢀǁŝƚŚŽƵƚꢀ
ƚŚĞꢀŵĂŝŶƐꢀƐƵƉƉůLJꢀƚŽꢀƚŚĞꢀƐLJƐƚĞŵꢀďĞŝŶŐꢀŝƐŽůĂƚĞĚ͘ꢀ
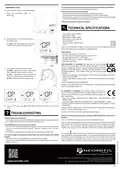
dƌŽƵďůĞƐŚŽŽƟŶŐ ...................................................................................................... 4
dĞĐŚŶŝĐĂůꢀƐƉĞĐŝĮĐĂƟŽŶƐ ........................................................................................... 4
ꢁůůꢀǁŝƌŝŶŐꢀŵƵƐƚꢀďĞꢀŝŶꢀĂĐĐŽƌĚĂŶĐĞꢀǁŝƚŚꢀ/ꢂꢂꢀƌĞŐƵůĂƟŽŶƐ͘ꢀdŚŝƐꢀƉƌŽĚƵĐƚꢀŝƐꢀĨŽƌꢀĮdžĞĚꢀǁŝƌŝŶŐꢀ
only.
PACK CONTAINS
ϮϯϬsꢀꢄŽŶŶĞĐƟŽŶƐꢀ
sŽůƚĂŐĞꢀ&ƌĞĞꢀꢄŽŶŶĞĐƟŽŶƐꢀ
^ƚĂŶĚĂƌĚꢀ
ǁĂůůƉůĂƚĞꢀƐƵƉƉůŝĞĚ
^ƚĂŶĚĂƌĚꢀǁĂůůƉůĂƚĞꢀ
ƐƵƉƉůŝĞĚ
x2
x2
x1
Thermostat
Screw Anchor
Screws
N
L
1
2
3
4
N
L
1
2
3
4
INSTALLATION
WŽǁĞƌꢀƐƵƉƉůLJ
ϮϯϬsΕꢀϱϬ,nj
ꢁĂůůꢀĨŽƚꢀŚĞĂƚ
Power out
ϮϯϬsΕꢀϱϬ,nj
ϮϯϬsΕꢀꢁŽŶŶĞĐƟŽŶꢀ
In
Out
ZĞĐŽŵŵĞŶĚĞĚꢀ ůŽĐĂƟŽŶƐꢀ
for your thermostat.
In / out :
Voltage Free
ꢁŽŶŶĞĐƟŽŶƐꢀꢀ
To ensure that your ther-
ŵŽƐƚĂƚꢀƉƌŽǀŝĚĞƐꢀĂĐĐƵƌĂƚĞꢀ
ƌĞĂĚŝŶŐƐꢀĂŶĚꢀĐŽŶƚƌŽůƐꢀĞīĞĐ-
ƟǀĞůLJ͕ꢀŝƚꢀŵƵƐƚꢀďĞꢀŝŶƐƚĂůůĞĚꢀ
ĂƉƉƌŽdžŝŵĂƚĞůLJꢀϭ͘ϱꢀŵꢀĂďŽǀĞꢀ
ŇŽŽƌꢀůĞǀĞůꢀŽŶꢀĂŶꢀŝŶƐŝĚĞꢀǁĂůů͕ꢀ
ĂǁĂLJꢀĨƌŽŵꢀĚŝƌĞĐƚꢀƐƵŶƐŚŝŶĞꢀ
ĂŶĚꢀĂŶLJꢀŽƚŚĞƌꢀƐŽƵƌĐĞƐꢀŽĨꢀŚĞĂƚꢀ
ŽƌꢀĐŽůĚꢀƐƵĐŚꢀĂƐꢀƌĂĚŝĂƚŽƌƐ͕ꢀĐŽůĚꢀ
ĚƌĂƵŐŚƚƐ͕ꢀĞƚĐ͘
N = Neutral
L = Live
1 = Not used
2 = Common - Power In 230V
3 = Not normally used
ϰꢀꢀсꢀꢁĂůůꢀĨŽƌꢀŚĞĂƚꢀͲꢀWŽǁĞƌꢀŽƵƚꢀϮϯϬs
N = Neutral
L = Live
1 = Not used
ϮꢀꢀсꢀꢁŽŵŵŽŶꢀͲꢀWŽǁĞƌꢀ/Ŷꢀ&ƌĞĞꢀꢁŽŶŶĞĐƟŽŶƐ
3 = Not normally used
ϰꢀꢀсꢀꢀꢁĂůůꢀĨŽƌꢀŚĞĂƚꢀͲꢀWŽǁĞƌꢀKƵƚꢀĨƌĞĞꢀꢁŽŶĞĐ-
ƟŽŶƐ
Important: dŚĞꢀƚŚĞƌŵŽƐƚĂƚꢀŵĞĂƐƵƌĞƐꢀƚŚĞꢀƚĞŵƉĞƌĂƚƵƌĞꢀŽĨꢀƚŚĞꢀƉůĂĐĞꢀǁŚĞƌĞꢀŝƚꢀŝƐꢀŝŶƐƚĂůůĞĚ͘ꢀ
/ƚꢀĚŽĞƐꢀŶŽƚꢀƚĂŬĞꢀŝŶƚŽꢀĂĐĐŽƵŶƚꢀƚŚĞꢀƚĞŵƉĞƌĂƚƵƌĞꢀĚŝīĞƌĞŶĐĞƐꢀƚŚĂƚꢀŵĂLJꢀĞdžŝƐƚꢀďĞƚǁĞĞŶꢀĚŝīĞ-
ƌĞŶƚꢀůŽĐĂƟŽŶƐꢀꢀŝŶꢀƚŚĞꢀŚŽƵƐĞꢀŝĨꢀƚŚĞꢀƚĞŵƉĞƌĂƚƵƌĞꢀŝƐꢀŶŽƚꢀƵŶŝĨŽƌŵ͘
NOTE: dŚĞꢀƵŶŝƚꢀŝƐꢀĚŽƵďůĞꢀŝŶꢀŝŶƐƵůĂƚĞĚꢀƐŽꢀĚŽĞƐꢀŶŽƚꢀƌĞƋƵŝƌĞꢀĂŶĚꢀĞĂƌƚŚꢀďƵƚꢀĂꢀƚĞƌŵŝŶĂůꢀŝƐꢀ
ƐƵƉƉůŝĞĚꢀĨŽƌꢀƚŚĞꢀƐƉĂƌĞꢀǁŝƌĞ͘
1
RTE7SD NEO ENG CP V02 03 03 2021


| General | Details |
|---|---|
| Name | NEOMITIS RTE7SD Mains Powered Digital 7 Day Programmable Room Thermostat Instruction Manual |
| Make | NEOMITIS |
| Language | English |
| Filetype | PDF (Download) |
| File size | 3.02 MB |
 (1 votes, average: 5.00 out of 5)
 Loading...

NEOMITIS RTE7OTA Wired Digital 7 Day Programmable Smart Room Thermostat Instruction Manual

Neomitis RTMA Mechanical Room Thermostat Instruction Manual

NEOMITIS RTE7D, RTE7BD Wired Digital 7 Day Programmable Room Thermostat Instruction Manual

NEOMITIS Rtaneoa Wired Analog Room Thermostat Instruction Manual

NEOMITIS PRG7 RF 7 Day Two Channel Programmer with RF Room Thermostat Instruction Manual

NEOMITIS RTE0RFA Wireless Digital Room Thermostat and Receiver Instruction Manual

NEOMITIS RTE0B Wired Digital Room Thermostat Installation Guide

NEOMITIS RTUa Mechanical Room Thermostat Instruction Manual


REPTO R3300030 Smart Thermostat Instruction Manual

Honeywell RLV450 Programmable Thermostat User Guide

heatit Z-TRM3 WiFi Thermostat Instruction Manual

DEVI 532 Electronic Thermostat Installation Guide

OUELLET OTL221 Single Pole Mechanical Thermostat Instructions

PRO1 T701 Digital Non Programmable Thermostat Instruction Manual

OJ ELECTRONICS UTN5 OJ Microline Non Programmable Thermostat User Manual

GENERAL LIFE HT250S Smart Room Thermostat User Manual

COMFORT SENTRY OH-522 Programming Thermostat Instruction Manual

GENERAL LIFE FH251S Underfloor Heating Thermostat User Manual