Home > TIMEGUARD > TIMEGUARD TRT05 Plug In Thermostat Instruction Manual

TIMEGUARD TRT05 Plug In Thermostat Instruction Manual

Plug In Thermostat  
with 24 Hour  
Time Control  
Model: TRT05  
GeneralDetails
NameTIMEGUARD TRT05 Plug In Thermostat Instruction Manual
MakeTIMEGUARD
LanguageEnglish
FiletypePDF (Download)
File size0.63 MB
Download PDF
1 Star2 Stars3 Stars4 Stars5 Stars (1 votes, average: 5.00 out of 5)
Loading...

TIMEGUARD TRT05 Plug In Thermostat Instruction Manual
Get the free PDF manual for the TIMEGUARD TRT05 Plug In Thermostat Instruction Manual and access setup steps, usage instructions, and troubleshooting tips. 👉 View online or download now to keep your thermostat running smoothly!
TIMEGUARD TRT05 Plug In Thermostat Instruction Manual Overview

Summary of Contents

  • Page 1: Plug in thermostat with 24 hour time control. Model: TRT05.
  • Page 2: General information should be read carefully and retained for further reference and maintenance. Do not plug in any appliance that exceeds the capacity of the timer. Always ensure the plug of any appliance is fully inserted into the timer outlet. If cleaning of the timer is required, remove from mains power and wipe timer with a dry cloth. Do not immerse in water or any other liquid. For indoor use only. Technical specifications include 230V AC 50 Hz and a switch rating of 13A resistive (3kW heating). The timer features a 24-hour time period, manual override, and three programmes. Operating temperature ranges from 0°C to +40°C, with a set temperature of 0°C to +35°C. It has a non-replaceable factory-fitted rechargeable battery lasting 4 weeks and is CE compliant.
  • Page 3: For all 13A appliances up to 3kW. Before programming for the first time, connect the unit to the mains for at least 15 minutes prior to pressing the reset button. The reset button is located on the back of the TRT05, which is only accessible when the unit is unplugged. This can be used to restore the factory default settings and blank any programming.
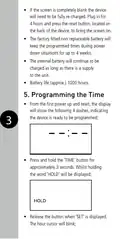
  • Page 4: If the screen is completely blank, the device will need to be fully re-charged. Plug in for 4 hours and press the reset button, located on the back of the device, to bring the screen on. The factory fitted non-replaceable battery will keep the programmed times during power down situations for up to 4 weeks. The internal battery will continue to be charged as long as there is a supply to the unit. Battery life is approximately 1000 hours. From the first power up and reset, the display will show four dashes, indicating the device is ready to be programmed. Press and hold the ‘TIME’ button for approximately 3 seconds. Whilst holding, the word ‘HOLD’ will be displayed. Release the button when ‘SET’ is displayed. The hour cursor will blink.
  • Page 5: Use the ‘TEMP’ button to increase the numeric value, or ‘MODE’ button to decrease the numeric value. The clock is set in 24 hour format. Holding down the ‘TIME’ button for approximately 3 seconds will exit the programming time mode. Set the hour and press the ‘TIME’ button to move to the minutes. Use the ‘TEMP’ or ‘MODE’ button to set the minutes. Press the ‘TIME’ button to save and exit the Time/Date entry and return to the operating mode. The display will now show the correct time, and the output status will show OFF.
  • Page 6: Setting the temperature involves pressing and holding the ‘TEMP’ button for approximately 3 seconds. The word ‘HOLD’ will be displayed while holding the button. Release the button when ‘SET’ is displayed, and the temperature will blink. The default temperature is 20°C, with a set range of 0°C to 35°C. Use the ‘TEMP’ or ‘MODE’ button to adjust the set temperature in 1 degree steps. Press and hold the ‘TEMP’ button to save and exit the temperature adjustment. To program ON/OFF times, press and hold the ‘PROG’ button for approximately 3 seconds.
  • Page 7: Release the button when ‘SET’ is displayed. The display will also show ‘Prog 1 ON’, and the hour cursor will blink. Use the ‘TEMP’ or ‘MODE’ button to set the hours. Press the ‘PROG’ button to save and move to the minutes. Use the ‘TEMP’ or ‘MODE’ button to set the minutes. Press the ‘PROG’ button to save and move the ‘Prog 1 OFF’ time.
  • Page 8: Use the ‘TEMP’ or ‘MODE’ button to set the hours. Press the ‘PROG’ button to save and move to the minutes. Use the ‘TEMP’ or ‘MODE’ button to set the minutes. Press the ‘PROG’ button to save and move to the ‘Prog 2 ON’ time. There are 3 ON/OFF programmes available. If no more ON/OFF times are required, leave the remaining programs set to 4 dashes ‘--:--‘. Hold down the ‘PROG’ button for approximately 3 seconds to save and exit the programming time mode. For programming across midnight, enter your ON time and OFF time accordingly. Using program 1, enter your ON time. Using program 2, enter an ON time of 0:00 (i.e. midnight).
  • Page 9: Operating mode The TRT05 has four operating modes. You can press the ‘MODE’ button to scroll between these modes. Select one of the following modes after you have completed programming. MODE A – Auto mode: The output will be controlled by the set temperature only. MODE ON – Permanently ON: The output will be ON, irrespective of the set temperature. MODE OFF – Permanently OFF: The output will be OFF, irrespective of the set temperature.
  • Page 10: Timed mode controls the output by the set temperature between programmed ON and OFF times. There is only one set temperature that cannot be adjusted for individual timed periods. You can display the current time or the actual room temperature. By default, the device displays the current time once programmed. In normal operating mode, pressing the ‘TEMP’ button briefly changes the display to show the actual room temperature, not the set temperature.
  • Page 11: If the ‘TEMP’ button is pressed briefly again, then the display reverts to showing the current time. In both auto and timed mode, the ON/OFF will reflect the output of the TRT05. In the unlikely event of this product becoming faulty due to defective material or manufacture within 3 years of the date of purchase, please return it to your supplier in the first year with proof of purchase and it will be replaced free of charge. For the second and third years or any difficulty in the first year, telephone the helpline. A proof of purchase is required in all cases. For all eligible replacements, the customer is responsible for all shipping/postage charges outside of the UK. All shipping costs are to be paid in advance before a replacement is sent out.
  • Page 12: If you experience problems, do not immediately return the unit to the store. Telephone the Timeguard Customer Helpline. Qualified Customer Support Co-ordinators will be on-line to assist in resolving your query.