Home > Robertshaw > Robertshaw RS8210 Non-Programmable Multi-Stage 2H-1C Wall Thermostat User Manual
Robertshaw RS8210 Non-Programmable Multi-Stage 2H-1C Wall Thermostat User Manual
| General | Details |
|---|---|
| Name | Robertshaw RS8210 Non-Programmable Multi-Stage 2H-1C Wall Thermostat User Manual |
| Make | Robertshaw |
| Language | English |
| Filetype | PDF (Download) |
| File size | 0.23 MB |

Robertshaw RS9220 Programmable Thermostat Installation Guide

Robertshaw RS10420T WIFI Programmable Thermostat User Guide

Robertshaw RS8110 Non Programmable Thermostat Instruction Manual

Robertshaw RS8210 Thermostat Installation Guide

Robertshaw RS9220 Digital Programmable Wall Thermostat Instruction Manual

Robertshaw 9602 Programmable Thermostat User Manual

Robertshaw RS9320T Programmable Touchscreen Wall Thermostat Instruction Manual

Robertshaw RS9423T Thermostat Installation Guide

Robertshaw RTC500 WIFI Thermostat Instruction Manual

Robertshaw RS1110 Programmable 1 Heat 1 Cool Wall Thermostat Instruction Manual

Robertshaw RS8210 Non-Programmable Multi-Stage 2H-1C Wall Thermostat User Manual Overview
Summary of Contents
- Page 1: Page 1
- Page 2: Caution Do not switch system to cool if the temperature is below 50°F (10°C). This can damage the air conditioning system and cause personal injury. Thermostat operation Thermostat quick reference Programming Installer setup menu Terminal designations
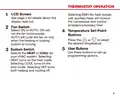
- Page 3: - Thermostat operation controls include various settings such as heat, cool, and fan modes. - The LCD screen displays the current settings and temperature. - Temperature set-point buttons allow users to adjust the desired temperature. - User buttons provide quick access to specific functions. - The system switch enables users to select the operating mode. - The fan switch controls the fan operation independently of the heating or cooling system. - The menu option may provide additional settings or configurations. - The sleep function likely adjusts the temperature for energy savings during nighttime. - The auto setting automatically adjusts the temperature based on the current conditions. - The off setting completely powers down the system.
- Page 4: Thermostat operation details are provided. The LCD screen displays important information. Selecting EMH locks out the compressor and controls auxiliary heat. The fan switch can be set to ON or AUTO. Temperature set-point buttons allow selection of the desired temperature. User buttons are available for programming options. The system switch selects between HEAT and COOL modes. Selecting HEAT activates the heating mode. Selecting COOL activates the cooling mode. Selecting OFF turns off both heating and cooling.
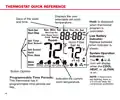
- Page 5: Thermostat displays the user selectable set-point temperature, days of the week, and time. Hold is displayed when the thermostat program is overridden. Low battery indicator shows when batteries need replacement. Set time and run schedule options are available. System operation indicators display when the cool, heat, or fan is on. Flashing icons indicate a 5-minute delay for compressor protection. The thermostat has 4 programmable time periods per day. Indicates the current room temperature.
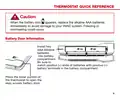
- Page 6: Caution: When the battery icon appears, replace the alkaline AAA batteries immediately to avoid damage to your HVAC system. Freezing or overheating could occur. Install two AAA alkaline batteries into the battery compartment. Be sure to match positive (+) ends of batteries with positive (+) battery terminals in the battery compartment. Press the lower portion of the thermostat to open the easy access battery door.
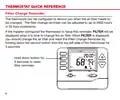
- Page 7: Filter change reminder can be configured to alert when the air filter needs to be changed. The reminder can be adjusted to up to 2000 hours in 50-hour increments. When the reminder is active, FILTER will be displayed on the thermostat. To reset the filter change reminder, hold down the second button from the top left side for 3 seconds. It is important to change the air filter when the reminder is displayed. The thermostat includes various settings such as heat, cool, fan, and sleep modes. The display shows the current room temperature and settings. Users can adjust the temperature settings using the thermostat controls. The thermostat provides options for manual and automatic operation. The interface includes buttons for quick access to different modes.
- Page 8: Set time Press the MENU button. Press SET TIME. Day of the week will be flashing. Use to select the current day of the week. Press NEXT STEP. The current hour will be flashing. Use to select the current hour. Press NEXT STEP. The minutes will be flashing. Use to select the current minutes. Press DONE when completed. Set temperature Use to select set temperature.
- Page 9: Installer setup menu instructions include pressing the menu button and holding tech set for three seconds. Configure installer options using the provided table. Use navigation buttons to move between options and change settings. Only press done when exiting the installer setup options. The minimum compressor run time can be adjusted from off to 3, 4, or 5 minutes. The filter change reminder can be adjusted from off to 2000 hours in 50-hour increments. The room temperature display can be adjusted to read 3 degrees. The compressor short cycle delay setting can be removed by selecting off. The cooling differential setting is adjustable from 0.2°F to 2°F. The heating differential setting is also adjustable from 0.2°F to 2°F.
- Page 10: Installer setup menu includes settings for room temperature calibration, compressor on-time, and short cycle delay. The cooling differential is factory preset at 0.5°, while the heating differential is set at 0.4°. The compressor short cycle delay helps protect the compressor from short-cycling. A filter change reminder will flash in the display after the elapsed run time. The installer can select the minimum run time for the compressor. The OFF setting disables the compressor to protect it from frequent cycling. Adjusting the temperature differential can reduce the frequency of system activation. The thermostat can be calibrated to display a different temperature than the actual room temperature. Settings can be adjusted to optimize system performance and efficiency. Next steps and options for navigating the setup menu are provided.
- Page 11: Installer setup menu Filter setting: Display SE Fl, flashing 1000 (the default value 1000 hours), select from 50-2000 hours. Temperature calibration: Display CAL and flashing 0°F (the default value 0), select from -3-3°F. Minimum compressor on time: Display AN ON and flashing OFF (default setting), select from OFF, 3, 4 or 5 minutes. Compressor delay time setting: Display CO OF and flashing ON (default setting), select from ON or OFF. Cooling differential setting: Display df CO and flashing 0.6, choose from 0.2-2.0 (factory default setting: 0.6°F). Heating differential setting: Display df HE and flashing 0.5, choose from 0.2-2.0 (factory default setting: 0.5°F). °F/°C selection: Setting F (Fahrenheit) or C (Celsius). 24H/12H selection: Setting the 24 hour or 12 hour time format. ELEC/GAS selection: Select the ELEC or GAS.
- Page 12: Terminal design includes various relays such as the auxiliary heat relay, compressor relay, and fan relay. The heat pump reversing valve is energized in cooling and heating modes. The 24VAC power and common wire are also specified. In systems without an emergency heat relay, a jumper can be installed between E and W2.
- Page 13: Page 13