HORSTMANN C-Stat 17-B 7 Day Programmable Room Thermostat Instruction Manual


C-Stat 17-B | C-Stat 17-M
User Instructions
7 Day Programmable Room Thermostat
Programmable room thermostats are widely recognised as one
of the best ways in which to control central heating. Horstmann
C-Stat programmable room thermostats have a large display
and intuitive user interface, making them easy to set up and use.
C-Stat uses a sophisticated time proportional integral (TPI)
algorithm for accurate temperature control and energy
efficiency.
1

| General | Details |
|---|---|
| Name | HORSTMANN C-Stat 17-B 7 Day Programmable Room Thermostat Instruction Manual |
| Make | Horstmann |
| Language | English |
| Filetype | PDF (Download) |
| File size | 0.63 MB |


HORSTMANN C-Stat 17-B 7 Day Programmable Room Thermostat Instruction Manual Overview
Summary of Contents
- Page 1: User instructions for the C-Stat 17-B and C-Stat 17-M. 7 day programmable room thermostat. Programmable room thermostats are effective for controlling central heating. Horstmann C-Stat thermostats feature a large display and intuitive user interface. They are designed for easy setup and use. C-Stat employs a time proportional integral (TPI) algorithm for accurate temperature control. The thermostats aim for energy efficiency.
- Page 2: What is a programmable room thermostat? A programmable room thermostat is both a programmer and a room thermostat. A programmer allows you to set 'ON and OFF' time periods to suit your own lifestyle. A room thermostat works by sensing the air temperature, switching on the heating when the air temperature falls below the thermostat setting. A programmable room thermostat lets you choose what times you want the heating to be on, and what temperature it should reach while it is on. Turning a programmable room thermostat to a higher setting will not make the room heat up any faster. Neither does the setting affect how quickly the room cools down. Turning a programmable room thermostat to a lower setting will result in the room being controlled at a lower temperature, and saves energy. The best way to set and use your programmable room thermostat is to find the lowest temperature settings that you are comfortable with. Any adjustments above these settings will waste energy and cost you more money.
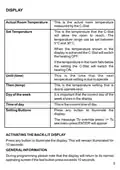
- Page 3: Actual room temperature is measured by the C-Stat. Set temperature can be adjusted between 5°C and 30°C. When the set temperature is achieved, the C-Stat will switch the heating off. If the room temperature falls below the set point, the C-Stat will switch the heating on. The time displayed indicates when the next temperature setting will operate. The temperature setting that is due to operate next is shown in the display. It is important that the correct day of the week is displayed. The current time of day is also shown. Press any button to illuminate the display for 10 seconds. During programming, the display will return to normal if the last button press exceeds 10 seconds.
- Page 4: Temporary override allows for a change in temperature at any time. It is possible to extend the duration of the temperature override. Press ‘-’ or ‘+’ to adjust the temperature. The new temperature setting will be displayed. The temperature will revert to the normal programmed setting at the next timed change. Temporary override with time extension has a maximum duration of 4 hours. Press ‘+’ to adjust the time for the override. The hours of the UNTIL time will flash when adjusting. Press ENTER to confirm the new settings. The temperature will revert to its normal setting after the override period.
- Page 5: Permanent override allows for a new temperature setting. To adjust the temperature, press ENTER and use the ‘-’ or ‘+’ buttons. The new setting will be displayed. Press the '+' button to flash the hours of the UNTIL time. Press ENTER repeatedly until 'HOLD' appears on the display. A message will confirm the temperature set until manual release. In the 'HOLD' position, the temperature can be overridden with the '-' or '+' buttons. This will establish a new 'HOLD' temperature. To cancel permanent override, press BACK and then press ENTER.
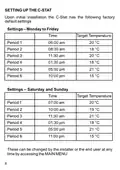
- Page 6: Upon initial installation, the C-Stat has factory default settings. Settings for Monday to Friday include target temperatures for different periods throughout the day. The target temperatures for Monday to Friday are set at 18 °C, 20 °C, 18 °C, 21 °C, 15 °C, and 20 °C. Settings for Saturday and Sunday also include target temperatures for various periods. The target temperatures for Saturday and Sunday are set at 19 °C, 21 °C, 18 °C, 21 °C, 15 °C, and 20 °C. These settings can be changed by the installer or the end user at any time. Access to the MAIN MENU allows for adjustments to these settings.
- Page 7: Main menu To access the main menu, press '-' or '+' and then press ENTER twice to toggle between the menu options. Menu options Programme allows the user to adjust different time and temperature settings from the factory default settings. Up to six different temperature levels can be set in any 24-hour period. Standby puts the C-Stat into frost protection or standby condition, allowing the heating to be permanently switched off but will activate if the temperature falls below the standby temperature set. Holiday puts the C-Stat into a temporary standby mode with a start and end date, resuming normal operation at the end of the set period. Time / date set up requires setting on initial installation. If not set, refer to the Setting the Time and Date section before continuing. Enables the programming of various options outlined in the Set Up Menu, which should be set on installation.
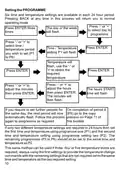
- Page 8: Setting the programme involves six time and temperature settings available in each 24-hour period. Pressing BACK at any time will return you to normal operating mode. To select the day to programme, press '-' or '+'. Press ENTER three times to make the day of the week flash. Use '-' or '+' to select the time/temperature period you wish to set (P1 to P6). After setting the time/temperature, press ENTER. Adjust the hours and minutes as needed, pressing ENTER after each adjustment. If further periods need to be set, the next period will automatically flash after completing period 6. For only two different temperature settings in 24 hours, set the first using programme one (P1) and the second using programme two (P2). The same method applies for three, four, or five temperature levels, using the first settings for temperature changes and setting the remaining to match the last required setting.
- Page 9: To copy the same programmes to other days of the week, please follow the process below. When you have set P6, the message 'To Copy press ENTER' will appear. The next sequential day will now flash. Press '-' or '+' to select the days you wish to copy the set programmes. Press ENTER after each day to confirm. When complete, press BACK to return to normal operating mode. To programme remaining days, please go to the start of the process 'Setting the PROGRAMME'. Setting the STANDBY involves pressing '-' or '+' until STANDBY appears. Press ENTER twice; the words STANDBY and Standby Enabled will appear on the display. To exit STANDBY mode, press ENTER twice.
- Page 10: Setting the holiday programme involves several steps. Pressing BACK at any time will return you to normal operating mode. Use the '-' or '+' buttons until HOLIDAY appears on the display. Press ENTER twice to proceed. Adjust the start date of the holiday programme using the '-' or '+' buttons. Press ENTER to change between Day, Month, and Year. The start date will flash once set. Adjust the end date of the holiday programme in the same manner. Press ENTER to change between Day, Month, and Year for the end date. The holiday programme is now set.
- Page 11: If the holiday period start date matches today's date, the standby temperature will be shown on the display together with the suitcase icon. If the holiday period start date does not match today's date, the display will remain in normal operating mode but with the suitcase icon appearing on the right of the display. To cancel a set holiday programme in advance of its activation, re-programme using the above procedure and set the start date and back date to today's date. To cancel a set holiday programme during activation, press the enter button twice; the unit will return to normal operating mode and the suitcase icon will disappear. The dates specified become effective from midnight of the day entered.
- Page 12: Setting the time and date involves pressing BACK to return to normal operating mode. Press '-' or '+' until Time/Date appears on the display. Press ENTER twice to proceed with the adjustment. Adjust hours and press ENTER; the hours will flash. Adjust minutes and press ENTER; the minutes will flash. Adjust the day to match today's date by pressing '-' or '+'. Press ENTER to change between Day, Month, and Year. The day of the date will flash for adjustment. Once set, the unit will return to normal operating mode. An incorrect date entry will result in the wrong day appearing on the normal operating screen.
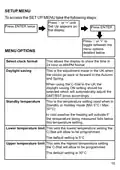
- Page 13: To access the setup menu, press '-' or '+' until Set Up appears on the display. Press ENTER twice to enter the menu options. Select clock format to show the time in 24 hour or AM/PM format. Daylight saving adjustment is necessary in the UK when clocks go back or forward. When using the C-Stat in the UK, select the daylight saving ON setting for automatic GMT/BST adjustments. Standby temperature is the setting used in Standby or Holiday mode (Min 5°C / Max 30°C). In cold weather, heating activates if the measured temperature falls below the standby temperature setting. Lower temperature limit sets the lowest programmable temperature, with a default of 5°C. Upper temperature limit sets the highest programmable temperature, with a default of 30°C.
- Page 14: Menu options include TPI cycles per hour, which helps the TPI energy saving software operate correctly based on the heating system type. Optimum start calculates the time needed for the C-Stat to switch on before reaching the next target temperature. Tamper setting allows a 4-digit release code to prevent unauthorized adjustments in multi-occupancy buildings. To set the clock format, press BACK to return to normal operating mode. Press '-' or '+' until Set Up appears on the display, then press ENTER twice. Choose between 'Select clock 24 hr' or 'Select clock AM/PM' options. Press '-' or '+' until Select clock format appears, then press ENTER. Toggle between the two options and select your choice by pressing ENTER. The unit will return to the Set up position; press BACK to return to normal operating mode.
- Page 15: Select the daylight saving option. Pressing BACK at any time in this process will return you to normal operating mode. The default factory setting is for the daylight saving to be ON. Press '-' or '+' until Set Up appears on the display. Press ENTER twice. Either 'Daylight Saving Off' or 'Daylight Saving On' will appear on the display. Press '-' or '+' until daylight saving appears on the display. Press ENTER to toggle between the two options. The unit will now return to the Set up position. Select your choice by pressing ENTER.
- Page 16: Setting the standby temperature, lower temperature limit or upper temperature limit. Pressing BACK at any time in this process will return you to normal operating mode. Press '-' or '+' until Set Up appears on the display. Press ENTER twice. The temperature setting will now flash. Press '-' or '+' until the required option appears on the display. Press ENTER. Press '-' or '+' to adjust temperature then press ENTER. The unit will now return to the Set Up position. Simply press BACK to return to normal operating mode.
- Page 17: Setting the TPI cycles involves several steps. Pressing BACK at any time will return you to normal operating mode. Use '-' or '+' until Set Up appears on the display. Press ENTER twice to proceed. Adjust the TPI cycles per hour setting by pressing '-' or '+'. The current setting will flash on the display. Press ENTER to confirm the setting. The unit will return to the Set Up position after adjustments. For oil boilers, options include 3, 6, 9, or 12 cycles per hour. Electric heating settings are typically configured by the installer.
- Page 18: Setting the optimum start allows the C-Stat to anticipate the next set temperature and switch on up to two hours in advance. The switch on time could take place anywhere between 2 hours and zero before the set time and temperature. With the optimum start set to OFF, the user will need to anticipate the warm-up time needed in the programme settings. Typically, the set temperature will be set approximately 1 hour in advance of when it is required. Pressing the BACK at any time will return you to normal operating mode. Press '-' or '+' until Set Up appears on the display. Press ENTER twice to confirm. Select YES or NO and press ENTER to confirm. Press '-' or '+' until Optimum Start appears on the display. This feature would normally be set by your installer.
- Page 19: Setting the tamper setting allows the unit to be locked to the programmes set and can only be reactivated by entering the pin code. None of the buttons will operate until the security code is entered. Pressing BACK at any time in this process will return you to normal operating mode. Press '-' or '+' until Set Up appears on the display. Press ENTER twice. The first digit of FOUR will now flash. Please make a note of this code and keep it in a safe place. This will be required to make any changes in the future. A message will appear briefly confirming 'Tamper code set when this message clears.'
- Page 20: Cancelling the tamper setting involves pressing BACK to return to normal operating mode. A message will appear prompting to enter the release code. Press ENTER twice to proceed. You will need to confirm the first digit of the release code and then press ENTER. A message will indicate that the tamper code has been cleared. If the release code is unknown, contact the homeowner or landlord. If you are the homeowner or landlord and have forgotten the code, contact technical support for an override code after answering security questions.
- Page 21: Resetting the C-Stat If the display becomes frozen or scrambled, press both the BACK and ENTER button simultaneously. All settings made prior to resetting will remain except the Time and Date, which will need to be re-entered. The C-Stat 17-B runs on 2 standard AA (Alkaline) non rechargeable batteries and is designed to give a battery life of approximately two years. The C-Stat 17-M is mains powered and therefore does not require a battery. There are three stages of warning as the batteries become low in power.
- Page 22: The battery low symbol will appear in the display. The words 'Low Battery' will appear in the display for 1 second each time a button is operated. The unit will switch itself OFF and the message 'Replace Batteries' will appear permanently in the display. The batteries should be changed at Stage 2 at the latest. To replace the batteries of the C-Stat 17-B, please carefully pull down the hinged battery cover on the front of the unit. Ensure they are fitted correctly as indicated by the terminal markings in the battery compartment. Please dispose of the old batteries responsibly. This programmer is NOT user serviceable. In the unlikely event of a fault developing, please refer to the resetting the C-Stat on page 23. If this fails to resolve the problem, please contact a local heating engineer or a qualified electrician.

WhisperKOOL Phantom 24V Thermostat Conversion Kit Installation Guide

Vaillant VRC 700 Weather Compensating Thermostat Instruction Manual

BUDDERFLY BTS-U1 Thermostat User Manual

Honeywell TH8732WFH5004 Round Smart Thermostat User Guide

SIEMENS RS485 Flush Mounted Room Thermostat User Manual

HotWire R220 WiFi Thermostat Instruction Manual

BEOK CONTROLS TDS72 Digital Screen Thermostat Instruction Manual

Honeywell T841A,B Easy-To-SeeTM Heat Pump Thermostat Instruction Manual

Smartica HY607B 3A Zig Bee Thermostat User Manual

WarmlyYours 670078B Wifi LED Touch Thermostat User Manual