Home > WarmlyYours > WarmlyYours 670078B Wifi LED Touch Thermostat User Manual
WarmlyYours 670078B Wifi LED Touch Thermostat User Manual


| General | Details |
|---|---|
| Name | WarmlyYours 670078B Wifi LED Touch Thermostat User Manual |
| Make | WarmlyYours |
| Language | English |
| Filetype | PDF (Download) |
| File size | 0.65 MB |


WarmlyYours TH115-AF-GA-08 SmartStat TH115 Series Thermostat Instruction Manual

WarmlyYours UTN5-4999 Thermostat User Guide

WarmlyYours 670078B Wifi LED Touch Thermostat User Manual Overview
Summary of Contents
- Page 1: nJoy WIFI LED touch thermostat user manual.
- Page 2: Introduction Description of buttons and functions How to turn off the display How to lock the screen Standby and frost protection How to connect with Bluetooth The app Start-up wizard How to perform a factory reset on the thermostat Errors and indications
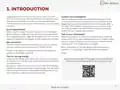
- Page 3: Introduction Congratulations on the purchase of your new nJoy WiFi LED touch thermostat. The thermostat automatically adjusts heating start times to ensure that the required temperature is reached at the beginning of a scheduled event. After a few days, the intelligent adaptive function will learn when the heating needs to be switched on to provide maximum comfort. Simply tap the capacitive touch buttons on the thermostat gently with your fingertip for quick temperature adjustments. Make it even easier to adjust your thermostat by enabling voice control with Google Assistant or Amazon Alexa. The WiFi-enabled thermostat allows you to set up, monitor, and control the thermostat from your mobile phone. Lowering the temperature while your home is unoccupied will reduce your energy costs without reducing comfort. Download the nJoy app from Google Play or the Apple App Store for setup. Set up your thermostat to turn on your underfloor heating system during preset periods to save energy.
- Page 4: Description of buttons and functions Touch areas Information area Adjust and navigate down Adjust and navigate up Select and accept GFCI test button Multifunctional button: Press once to go into standby mode or turn on the thermostat. When on, hold for 15 seconds to perform a factory reset. Indicators Heating: The LED lights up orange during heating.
- Page 5: How to enter the settings menu To activate the settings menu, touch any touch area to wake up the thermostat. The dots in the left column indicate the setting number. Touch the select/accept button for three seconds to enter the setup menu. If you are not sure what the text on the screen means, you can touch the menu abbreviations and explanatory text will scroll across the screen. To exit the settings menu, after 30 seconds, the screen saver will activate. More settings are available via the app. Use the up or down arrow buttons to navigate to the exit icon and press the select/accept button.
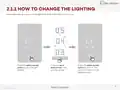
- Page 6: How to change the lighting In the light setting, you can set the light level when the screen saver is active. Press the select/accept button to go to the light setting. Press the up or down arrow to adjust the setting. Press the select/accept button to confirm. The screen will return to the setting options.
- Page 7: How to change the time In the Time setting, you can adjust the time. The clock is in 12-hour format. The two small dots on the left indicate whether it is AM or PM. Press the select/accept button to change the setting. Press the up or down arrow to change the hour. Press the select/accept button to confirm. AM or PM will scroll from the right, followed by the hour. The process is the same for setting the minutes. The screen will return to the setting options.
- Page 8: How to change the temperature unit In the Unit setting, the temperature unit can be set to F (Fahrenheit) or C (Celsius). Press the select/accept button to change the setting. Press the up or down arrow to set the temperature unit to Fahrenheit or Celsius. Press the select/accept button to confirm the setting.
- Page 9: Start-up wizard When the thermostat has been installed and turned on for the first time, or after a factory reset, the thermostat will run a start-up wizard. The wizard guides you through a basic setup process to ensure that you have the right settings and a thermostat test is performed. The start-up wizard gives you the option to adjust four settings, followed by the GFCI test. You can choose to complete this start-up process on the thermostat or via the app. The start-up wizard takes you through the following steps: Unit, Sensor, Time, Protection. After the last setting, you will be instructed to perform a GFCI Test. Once the test has been passed, the thermostat is ready to use. To see a description of the setting, you can tap the text or wait 10 seconds.
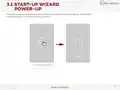
- Page 10: Start-up wizard During power-up, a pulsating select/accept button will appear, followed by the text “press here.” Pressing this area will initiate the start-up wizard.
- Page 11: Start-up wizard Step 1 – Unit The first step is the Unit setting. In the Unit setting, the temperature unit can be set to Fahrenheit or Celsius. Fahrenheit is set as default. Press the up or down arrow to set the temperature unit. Press the select/accept button to change the setting. Press the select/accept button to confirm the setting.
- Page 12: Start-up wizard Step 2 – Sensor The second setting option is the sensor application. You can choose between room sensor, floor sensor, or room sensor with floor limit. Once the sensor application has been chosen, you can only change it via the app or by performing a factory reset. With the floor setting, the floor sensor controls the heating system. In room/floor protection, the room sensor controls the heating while the floor sensor limits heating according to set limits. With the room setting, the room sensor controls the heating system. Press the select/accept button to change the setting. Press the up or down arrow to scroll through the sensor options. Press the select/accept button to confirm the setting.
- Page 13: Start-up wizard Step 3 – Time The third setting option is the time setting. In this setting, you can adjust the time. The clock is in 12-hour format. The two small dots on the left indicate whether it is AM or PM. Press the select/accept button to change the setting. Press the up or down arrow to change the hour. The process is the same for setting the minutes. The screen will return to the setting options.
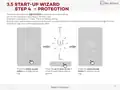
- Page 14: Star-up wizard step 4 – protection outlines the floor protection setting. Set the floor protection according to the floor type: W (wood), L (laminate), or T (tiles). Tile is the default setting. Once the floor type has been selected, it can only be changed via the app or by performing a factory reset. Press the select/accept button to change the setting. Press the up or down arrow to scroll through the protection options. Press the select/accept button to confirm the setting.
- Page 15: Floor and temperature limits There are two types of temperature limit. Floor protection limits will override the heating/regulation if the floor temperature exceeds the thresholds set. If the temperature falls below the minimum threshold, the heating is switched on. If it rises above the maximum threshold, the heating is switched off. This limit feature is only active in the “Floor” and “Room with floor limits” modes. Temperature limits (setpoint range) limit the setpoint that the user can set on the thermostat. The user can only modify these limits via the app. The thermostat will never regulate above or below the floor protection limits.
- Page 16: Start-up wizard Step 5 – GFCI test The last step in the start-up wizard is the GFCI test. Push the top button to test the GFCI relay. A red light on the right-hand side will flash. The text GFCI tripped press to reset will scroll across the screen. When the arrow flashes, press the side button for a moment. A dot will rotate until the thermostat restarts. The thermostat will then be ready for use.
- Page 17: How to change the temperature To see the upper and lower limits, go to the section on floor limits. In screen saver mode, touch the temperature area to wake up the thermostat. The home screen will appear. Use the up and down arrows to adjust the temperature. The number will blink three times and the screen will return to the current temperature measured. The temperature is now set.
- Page 18: Heating status When the heating is on, the white degree indicator will turn orange. This is visible in the screen saver, on the home screen, and when adjusting the temperature. The orange dot is also visible on the standby screen when frost protection is enabled and active. To find out more about frost protection, go to the section on standby and frost protection.
- Page 19: How to turn a schedule on and off If the thermostat is regulating heating according to a schedule, the schedule icon will be visible on the home screen. If you change the temperature while the schedule is activated, this adjustment will only apply until the next scheduled temperature change. The schedule can be activated or deactivated on the thermostat. In the screen saver mode, touch the temperature area to wake up the thermostat. Press and hold the temperature area for three seconds. The schedule abbreviation will appear and the text SCHEDULE ON will scroll across the screen. The thermostat will now follow the schedule and the schedule icon will be visible. To deactivate the schedule, follow the same procedure. The schedule icon will turn off and the screen will say SCHEDULE OFF.
- Page 20: Preset schedule is based on the selected sensor. The schedule can be changed via the app. For Monday to Friday, the room sensor settings are 21°C/70°F and 16°C/62°F. For Saturday and Sunday, the settings are 28°C/82°F and 23°C/74°F. The schedule includes specific time slots for different temperature settings. The time slots for Monday to Friday are 06:00 am to 09:00 am, 09:00 am to 05:00 pm, 05:00 pm to 11:00 pm, and 11:00 pm to 06:00 am. The time slots for Saturday and Sunday are 08:00 am to 11:00 pm and 11:00 pm to 08:00 am. Floor sensor or room sensor with floor limit can be used for temperature settings. The document is published by OJ Electronics A/S.
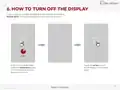
- Page 21: How to turn off the display In the screen saver mode, the display can be turned off completely. This can only be done in the screen saver mode. In the screen saver mode, press the temperature area for three seconds and the screen will turn off. Touch the screen to turn on the display in the screen saver.
- Page 22: How to lock the screen The screen lock prevents children or others from tampering with the thermostat and changing any of its settings. In the screen saver mode, touch the temperature area to wake up the thermostat. Press both arrows simultaneously for three seconds to lock the screen. The screen will show a lock icon and return to screen saver mode. Repeat this process to unlock the screen.
- Page 23: Standby mode allows for frost protection while disabling other thermostat functions. Frost protection activates heating when the temperature reaches a minimum limit. Press the side button briefly to activate standby mode. The standby icon will display for three seconds before fading out. An orange dot indicates that standby and frost protection are active. If frost protection is active and the user interacts with the touch areas, a snowflake icon will appear. The screen will display FROST PROTECTED followed by the standby icon. The standby icon will eventually fade out, returning to standby mode.
- Page 24: How to connect with Bluetooth To connect with Bluetooth, follow the instructions in the nJoy app. To establish a connection, Bluetooth pairing mode must be activated on the thermostat. Wake up the thermostat by touching the screen. Press the side button for a moment to activate standby mode. The thermostat will show the standby icon for three seconds, then the icon will fade out. The thermostat is now on standby. Press the side button to deactivate standby mode and activate Bluetooth pairing mode. Bluetooth pairing mode is now activated (blinking Bluetooth icon) and you can continue in the app.
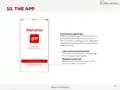
- Page 25: The nJoy app is a tool that enables you to control and optimize your floor heating system effortlessly. You can easily view and set temperatures, customize your heating schedule, put your system in vacation mode, and track your energy usage. Save money on your heating bill and enjoy a comfortable home with this intuitive, user-friendly app. Take full control of your nJoy thermostat with our app. Manage and customize your thermostat settings easily to achieve the perfect level of comfort while keeping track of all the data you need. Download the nJoy app from Google Play or the Apple App Store and follow the app guide for setup to get started. iOS (version 14 or higher) Android (version 8 or higher)
- Page 26: The app setup process involves creating a user, adding the thermostat via Bluetooth, and connecting to a WiFi network. Existing users can log in to control their thermostats. Bluetooth control allows operation of thermostats without an account or WiFi connection.
- Page 27: The app allows you to select the building you want to see in the overview. You can view the current temperature, selected temperature, and schedule status for each thermostat in the selected building. Thermostats can be set up to turn on the underfloor heating system during preset periods. You can customize predefined schedules or create your own schedule for the thermostat. Vacation mode allows you to set or plan temperatures to maintain while on vacation. A red exclamation mark indicates either a software update is available or an error on the thermostat. You can follow the guide in the app to install software updates. An overview of energy consumption for each thermostat is available. Settings allow you to change app, thermostat, or user profile configurations. You can access notifications and software updates through the settings.
- Page 28: Smart home connectivity with Alexa allows voice control of thermostats. Requirements for setup include an Amazon account and a thermostat account. Steps to connect your thermostat to Alexa involve opening the thermostat app and accessing settings. Link your thermostat account and Alexa account by selecting the Alexa option in the app. Enable the nJoy skill in the Alexa app to link accounts. Login to the nJoy application when prompted by Alexa. You can also link accounts directly through the Alexa app by adding a device. Search for the nJoy skill in the Alexa app to complete the setup. Once linked, you can use voice commands to control your thermostat. Refer to part 2/2 for voice commands.
- Page 29: Smart home connectivity with Alexa Disconnecting from your Amazon Alexa home system involves opening the Amazon Alexa app, selecting devices, and choosing the thermostat to disconnect. After confirming the disconnection, your thermostat will no longer be connected to your Amazon Alexa device. Voice commands allow for control of thermostats connected to the Amazon Alexa home system. Examples of voice commands include setting an exact temperature, reading out a temperature, and increasing or decreasing the temperature in specific rooms or on all thermostats.
- Page 30: Smart home connectivity with Google allows you to voice control your thermostats together or individually. Requirements before setup include having a Google account connected to the Google Home app. Open the Google Home app on your smartphone or tablet to begin the setup process. Tap “ADD” - “SET UP DEVICE” - “WORKS WITH GOOGLE” in the app. Search for “nJoy” and select it from the results. Follow the in-app steps to complete the setup, including signing into the app and accepting the grants page. Your thermostat should appear as available to be linked to Google Home after setup. Choose the thermostat and click “NEXT” to proceed. Select a name/location for your thermostat and click “NEXT” again. Your thermostat is now set up, and you can use different commands with the name/location you chose in the Google Home app.
- Page 31: Smart home connectivity with Google Disconnecting the thermostat from your Google Home system involves opening the Google Home app, selecting the thermostat, and unlinking it. Voice commands allow for voice control of thermostats connected to Google Home. Examples of voice commands include setting an exact temperature, reading out a temperature, and increasing or decreasing the temperature. Commands can be issued for individual rooms or for all thermostats collectively.
- Page 32: GFCI thermostat has a built-in GFCI that ensures personal safety in the event of ground faults. It is important that the GFCI is tested monthly. Installation and use must be in line with national and local regulations. Press the top button to test the GFCI relay. The red light on the side will flash and the text GFCI TRIPPED PRESS TO RESET will scroll across the screen. Press the side button for a moment to reset. A check mark will appear to show that the GFCI has been reset and is working correctly. Normal operation then continues.
- Page 33: GFCI error indicates an electrical fault when the relay is triggered. The red light will flash and GFCI TRIPPED PRESS TO RESET will scroll across the screen. A check mark will appear to confirm the GFCI has been reset and is functioning correctly. If the test fails, the display will revert to the GFCI tripped message. The red light will continue to flash if the cause of the tripped relay is unresolved. Refer to the error pages or app for further details. Press the side button for a moment to reset.
- Page 34: How to perform a factory reset on the thermostat. This option allows you to restore the thermostat to factory settings. This action cannot be undone and all of your personal settings will be lost. Tap the select/accept button to confirm. A reset has been performed. In the screen saver mode, touch the temperature area to wake up the thermostat. Press the side button for 15 seconds. The text RESET -NO- will scroll from right to left. Use the up and down arrows to switch to RESET -YES-.
- Page 35: Errors and indications E0 - Internal failure. E4 - Bootloader error – update failed. Contact your contractor for a product replacement. The thermostat is defective. Contact your contractor. The thermostat must be replaced. E1 - Internal sensor defective or short-circuited. Contact your contractor. The thermostat must be replaced. E5 - Internal overheating. Contact your contractor to arrange an inspection of the installation. E2 - External wired floor sensor disconnected, defective, or short-circuited. Contact your contractor for reconnection or a replacement. E6 - Communication error – wireless chip not working. Contact your contractor for a product replacement. E7 - GFCI triggered. The installation must be inspected. E3 - Internal compensation sensor defective. Contact your contractor for a replacement.
- Page 36: Errors and indications include various statuses such as turned off, not connected to WiFi, and Bluetooth not paired. The device can indicate when it is turned on or connected to WiFi and Bluetooth. Specific error messages include WiFi router not available, cloud system not available, and wireless chip broken. The device also shows firmware update progress and authentication failures to the cloud. Different blinking patterns indicate various operational statuses.
- Page 37: Troubleshooting I can't connect to my wireless network My WiFi network does not appear in the list of available networks. If the network name contains a comma, quotation marks, or a semicolon, the specific network cannot be found and will therefore not appear in the dropdown list. Insufficient WiFi signal. Try connecting another device to your wireless network. If the wireless network signal cannot be detected by your phone, you may be too far away from your WiFi router or there may be a problem with it. Your WiFi router has insufficient security. WiFi routers use two main types of protective encryption: WEP and WPA. WEP offers very little security, while WPA is a security protocol that makes it much more difficult to break into networks. If your router was manufactured after 2003, you should be able to change the setting from WEP to WPA. Your WiFi Touch Thermostat can still control your floor heating system without a wireless network connection. I cannot connect to my WiFi router even though there is a good signal. Some WiFi routers limit the number of wireless devices that can connect to the Internet. To test whether this is the problem, shut down one of the other WiFi-enabled devices in your home.
- Page 38: Troubleshooting I can't connect to my wireless network. Your WiFi router may require a restart/reboot. Simply restarting the router will usually resolve such problems. Your WiFi router firmware may need to be updated. Contact your ISP or the router manufacturer for instructions on how to update the firmware. Other devices are interfering with the wireless signal. Try turning off other wireless devices that may cause interference. Test the WiFi Touch Thermostat’s network connection. Your WiFi Touch Thermostat needs a user reset. See the section about performing a factory reset.
- Page 39: Troubleshooting Bluetooth connection issues with the thermostat includes several steps. To pair a new phone with the thermostat, ensure the thermostat is in pairing mode and that Bluetooth is enabled on the mobile device. If the connection is lost or times out, restart the mobile device and remove the Bluetooth pairing before attempting to reconnect. If the phone is paired but cannot access the thermostat, close the nJoy app and restart the thermostat. For multiple phones paired to the thermostat, ensure no other Bluetooth connections are active, as only one connection can be established at a time. To close the Bluetooth connection, the nJoy app must be closed. Removing the thermostat from the Bluetooth menu and pairing it again may resolve communication issues.
- Page 40: Page 40

Honeywell T874H Multistage Thermostat Instruction Manual

Honeywell RTHL2510 Series Programmable Thermostat Owner’s Manual

SunTouch 113901 SunStat ConnectPlus Thermostat User Manual

NT NetX X5N-SM Thermostat Installation Guide

Robertshaw 9602 Programmable Thermostat User Manual

GENERAL SENNA 300S Smart Room Thermostat User Manual

ELEKTROBOCK PT02 Electronic Pipe Thermostat Instruction Manual

COOKING PERFORMANCE GROUP 351030208 Retrofit Thermostat Instructions

MI-HEAT MTS200 WiFi Thermostat Instruction Manual

Generic HY610 WiFi Digital Heating Thermostat User Manual