Home > EPH CONTROLS > EPH CONTROLS RDTP Recessed Programmable Thermostat Installation Guide
EPH CONTROLS RDTP Recessed Programmable Thermostat Installation Guide


RDTP
Recessed Room Thermostat
Installation and Operation Guide

| General | Details |
|---|---|
| Name | EPH CONTROLS RDTP Recessed Programmable Thermostat Installation Guide |
| Make | EPH CONTROLS |
| Language | English |
| Filetype | PDF (Download) |
| File size | 0.5 MB |


EPH CONTROLS eTRV-HW Smart Cylinder Thermostat User Guide

EPH CONTROLS eTRV-HW Smart Hot Water Thermostat Instruction Manual

EPH CONTROLS eTRV Smart Radiator Thermostat Instruction Manual

EPH CONTROLS 20221026 RFRA – RF Room Thermostat Instruction Manual

EPH CONTROLS CDTP2 Hardwired Room Thermostat Instruction Manual

EPH Controls CDT2-24 24V Room Thermostat Installation Guide

EPH CONTROLS COMBIPACK2 Smart Thermostat with Automation and Optimum Start Instructions

EPH CONTROLS RFCA RF Cylinder Thermostat Instruction Manual

EPH CONTROLS PR092K7 RF Cylinder Thermostat Instruction Manual

EPH CONTROLS CRT2 Room Thermostat Instruction Manual

EPH CONTROLS RDTP Recessed Programmable Thermostat Installation Guide Overview
Summary of Contents
- Page 1: Recessed room thermostat Installation and operation guide
- Page 2: Installation instructions Factory default settings Specifications LCD display Buttons Wiring Mounting and installation Operating instructions Adjusting the target temperature Locking the keypad
- Page 3: Temporary override and permanent override functions are available. The boost function is included for enhanced performance. Operating modes include normal mode, optimum start control, and time proportional integral mode. Settings for high and low limits can be adjusted. Hysteresis settings for HOn and HOFF are configurable. Calibration of the device is possible. Frost protection features are included. Instructions for resetting the thermostat are provided. Exiting the menu is explained.
- Page 4: Mains operated programmable room thermostat Installation instructions
- Page 5: Factory default settings include high and low temperature limitations. The keypad lock is set to off. The operating mode is normal. The temperature indicator is displayed in degrees Celsius. Frost protection is activated at 5˚C. The hysteresis (HYS) is set to on at 0.4˚C and off at 0.0˚C.
- Page 6: Specifications Switch output: SPDT Volt Free 230VAC Power supply / Input: Operating <1W Standby: 5 … 35˚C Ambient temperature: 0 … 45˚C Ambient admissible humidity: 5-95%RH Contact rating: 10(3)A 230VAC Dimensions: 95 x 95 x 40mm Internal temperature sensor: NTC 100K External temperature sensor: NTC 10K Hysteresis (Switching differential): Adjustable from 0 to 1°C
- Page 7: LCD display functions include: - Displays current day of the week. - Displays when setting target temperature. - Displays current room temperature. - Displays when setting high and low temperature limit. - Displays when keypad is locked. - Displays when the thermostat is calling for heat. - Displays current time and date. - Displays when setting holiday mode. - Displays when thermostat is in boost mode. - Displays current operating mode.
- Page 8: Menu button OK button Time +1h Down button Up button
- Page 9: Wiring Terminal connections Live in Neutral in Normally closed connection Normally open connection Common connection External temperature sensor/probe available as an accessory If mains output is required, terminals L and 3 must be electrically linked. If an external NTC 10K sensor is connected, the thermostat will automatically detect and read the temperature from the probe’s location.
- Page 10: Mounting & installation Installation and connection should only be carried out by a qualified person. Only qualified electricians or authorised service staff are permitted to open the thermostat. If the thermostat is used in a way not specified by the manufacturer, its safety may be impaired. Prior to setting the thermostat, it is necessary to complete all required settings described in this section. Before commencing installation, the thermostat must be first disconnected from the mains. This thermostat can be mounted to a recessed conduit box.
- Page 11: Remove the thermostat from its packaging. Choose a mounting location so that the thermostat can measure the room temperature as accurately as possible. Mount the thermostat 1.5 metres above the floor level. Prevent direct exposure to sunlight or other heating/cooling sources. Use the fastening clip on the base of the thermostat to release the front housing from the rear wiring box. Wire the thermostat according to the wiring diagram. Screw the rear wiring box to the recessed back box. Attach the front housing to the rear wiring box until it clips securely into place.
- Page 12: Page 12
- Page 13: Mains operated programmable room thermostat Operating instructions
- Page 14: Adjusting the target temperature allows you to set it from 5-35˚C. Press to increase or decrease the target temperature. The target temperature is saved after 5 seconds of inactivity. Locking the keypad disables the buttons for security. To lock the thermostat, press and hold specific buttons for 10 seconds. An indicator will appear on the screen when locked. To unlock, press and hold the same buttons for 10 seconds. The lock indicator will disappear when unlocked.
- Page 15: Backlight settings include three options: 'AUtO', 'On', and 'OFF'. In 'AUtO', the backlight activates for 10 seconds when any button is pressed. The 'On' setting keeps the backlight permanently on. The 'OFF' setting turns the backlight permanently off. To adjust the backlight setting, press and hold for 10 seconds. 'AUtO' will appear on the screen during adjustment. Use designated buttons to change the mode between AUTO, ON, and OFF. Press the confirmation button to finalize the selection and return to normal operation.
- Page 16: Mode selection allows for three options: OFF, MAN, and AUTO. OFF means the thermostat is permanently off. MAN means the thermostat is permanently on. AUTO means the thermostat operates according to pre-programmed times and temperatures. Press to change between the modes. The current mode will be underlined on the screen. In Manual mode, the thermostat displays the current room temperature and 'MAN'. In OFF mode, it displays the current room temperature and 'OFF'. In AUTO mode, it shows the current room temperature, the program number, and 'AUTO'.
- Page 17: Setting the date, time and programming mode involves pressing specific buttons to adjust the year, month, day, hour, and minute. You can adjust the time format from 5/2d to 7d or 24h mode. There is an option to turn Daylight Saving Time on or off. After making adjustments, the thermostat will return to normal operation after 20 seconds or by pressing a specific button. Holiday mode switches the thermostat off while enabling frost protection during the holiday period. You can set the start time for holiday mode by pressing designated buttons. The end time for holiday mode can also be set using specific button presses. The thermostat will remain off during the holiday period. You can cancel the holiday function by pressing a specific button for 5 seconds.
- Page 18: How your programmable thermostat works When the thermostat is in the AUTO mode, it will operate according to the times and temperatures that have been programmed. The user can select from 6 different programs per day, each with a time and a temperature. There is no OFF time, only a higher and a lower target temperature. If the user wants the thermostat to be OFF at a certain time, set the temperature for this time to be low. The thermostat will turn ON if the room temperature is lower than the target temperature for the current period. Example: If P1 is set to be 21˚C at 6am, and if P2 is set to be 10˚C at 8am, the thermostat will look for the temperature to be 21˚C between 6am and 8am.
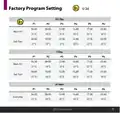
- Page 19: Factory program setting 5/2 day 7 day 24 hour Mon-Fri Sat-Sun Temperature settings at various times EPH Controls Ltd.
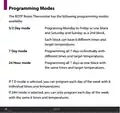
- Page 20: Programming modes of the RDTP Room Thermostat include 5/2 Day mode, 7 Day mode, and 24 Hour mode. 5/2 Day mode allows programming Monday to Friday as one block and Saturday and Sunday as a second block, with 6 different times and target temperatures for each block. 7 Day mode enables programming all 7 days individually with different times and target temperatures. 24 Hour mode allows programming all 7 days as one block with the same times and target temperatures. In 7 Day mode, each day can be programmed with 6 individual times and temperatures. In 24 Hour mode, each day can only be programmed with the same 6 times and temperatures.
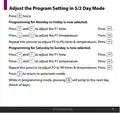
- Page 21: Adjust the program setting in 5/2 day mode. Programming for Monday to Friday is now selected. Press to adjust the P1 time. Press to adjust the P1 temperature. Repeat this process to adjust P2 to P6 times and temperatures. Programming for Saturday to Sunday is now selected. Press to adjust the P1 time. Press to adjust the P1 temperature. Repeat this process to adjust P2 to P6 times and temperatures. Press to return to automatic mode.
- Page 22: Temporary override allows adjustment of the target temperature in AUTO mode. Press buttons to modify the target temperature. The thermostat will maintain the new target until the next switching time. Permanent override can be activated by selecting manual mode. Adjust the target temperature in manual mode as needed. The thermostat will operate to the new target temperature until canceled. To cancel permanent override, press the appropriate button until AUTO or OFF mode is selected.
- Page 23: Boost function allows the thermostat to reach a specific temperature for 1, 2, or 3 hours. This feature is not available in holiday mode. Pressing 1, 2, or 3 times will show the end time of the boost program on the screen. The target temperature can be adjusted by pressing the appropriate buttons. After adjusting, pressing again or waiting for 5 seconds will activate the boost. The display will show 'BOOST TO' along with the end time. Pressing again will deactivate the boost, returning the thermostat to its previous mode.
- Page 24: Menu function allows the user to adjust additional functions. To access the menu, press and hold specific buttons together for 5 seconds. P01 Operating mode includes Normal, Optimum Start, and TPI settings. The default setting is Normal. Press and hold specific buttons together for 5 seconds to access the operating mode. ‘P01’ will appear on the screen for selection. Use the designated buttons to select between Normal mode, Optimum start mode, and Time proportional integral mode. Press the designated button to confirm the mode.
- Page 25: Normal mode activates when the temperature falls below the target temperature. The thermostat will demand heat until the temperature rises above the target. When the temperature exceeds the target, the demand for heat is canceled. A graph illustrates the normal mode operation with temperature readings over time. The target temperature is set at 21˚C. The temperature can vary from 17˚C to 22˚C. The time is measured in minutes, ranging from 0 to 100.
- Page 26: Optimum Start Control (OS) allows the thermostat to reach the target temperature by the start of the next switching time. The Ti (time interval) can be set to 10, 15, 20, 25, or 30 minutes for temperature adjustment. The thermostat aims to increase the room temperature by 1°C within the set time interval. To achieve the target temperature, the thermostat reads the room temperature (RT), setpoint temperature (ST), and target temperature difference (TTD). TTD is the difference between the setpoint temperature and the room temperature. Optimum Start Time (OST) is the time needed to overcome TTD, with a maximum value of 3 hours (180 minutes). OST is subtracted from the start time to determine when to begin heating. As the temperature increases, the thermostat recalculates the OST.
- Page 27: Optimum start control graph with Ti = 20. Optimum start control graph with Ti = 15. Optimum start control graph with Ti = 10. Example when Ti = 20: The thermostat will start the heating at 05:30am to reach 21°C for 06:30am. Example when Ti = 10: The thermostat will start the heating at 06:00am to reach 21°C for 06:30am. Target temperature difference ˚C. Program 1 on the thermostat is 21°C for 06:30am and the room temperature is 18°C. Target temperature difference ˚C. EPH Controls Ltd.
- Page 28: Operating mode Time proportional integral mode (TPI) When the thermostat is in TPI mode and the temperature is rising in the zone and falls into the proportional bandwidth section, TPI will start to affect the thermostat's operation. The thermostat will turn on and off as it gains heat so that it doesn’t overshoot the target by too much. It will also turn on if the temperature is falling so it doesn’t undershoot the target, which will leave the user with a more comfortable level of heat. There are 2 settings that will affect the thermostat's operation: the number of heating cycles per hour and the proportional bandwidth. CyC – number of heating cycles per hour This value will decide how often the thermostat will cycle the heating on and off when trying to achieve the target temperature.
- Page 29: Proportional bandwidth refers to the temperature below the target at which the thermostat will start to operate in TPI control. You can set this temperature from 1.5°C to 3.0°C in 0.1°C increments. Graph (27.1) illustrates TPI control with target and actual temperatures. Heating on and off times are represented in the graph. Target temperature is set at 22˚C. The graph shows temperature changes over time in minutes. The range of temperatures includes 19˚C to 22˚C. The document includes information from EPH Controls Ltd. The proportional bandwidth is set at 2°C. TPI control is a key feature of the thermostat operation.
- Page 30: Operating mode: Time Proportional Integral Mode (TPI) Once TPI mode is selected, ‘CYC’ and ‘06’ will appear on the screen. Use the controls to select from 2, 3, 6, or 12. Press to confirm. ‘P Band’ and ‘2.0’ will appear on the screen. Use the controls to select from 1.5 to 3.0. Press to confirm. Press to return to normal operation.
- Page 31: Setting high and low limits allows the installer to change the minimum and maximum temperatures for the thermostat. To access this setting, press and hold specific buttons together for 5 seconds. ‘P01’ will appear on the screen. Press to select ‘P02’. Press to select ‘ON’. ‘HI LIM’ will appear on the screen, and the temperature will begin to flash. Use buttons to select the high limit for the thermostat. Press to confirm. ‘LO LIM’ will appear on the screen, and the temperature will begin to flash. The settings will be saved when confirmed.
- Page 32: Hysteresis HOn & HOff This menu allows the installer to change the switching differential of the thermostat when the temperature is rising and falling. If ‘HYS ON’ is set at 0.4˚C and the setpoint is 20˚C, then the thermostat will switch on when the temperature drops below 19.6˚C. If ‘HYS OFF’ is set at 0.2˚C and the setpoint is 20˚C, then the thermostat will switch off when the temperature reaches 20.2˚C. To access this setting, press and hold the appropriate buttons together for 5 seconds. ‘P01’ will appear on the screen. Press until ‘P03’ appears on the screen. Press to access ‘HOn’ and the differential temperature will begin to flash. Use the buttons to select the ‘HOn’ temperature, press to confirm. ‘HOFF’ will appear on the screen and the differential temperature will begin to flash. Use the buttons to select the ‘HOFF’ temperature, press to confirm.
- Page 33: Calibrate menu allows the installer to calibrate the temperature of the thermostat. To access this setting, press and hold specific buttons together for 5 seconds. ‘P01’ will appear on the screen. Press until ‘P04’ appears on the screen. ‘CAL’ and the actual temperature will appear on the screen. Press and specific buttons to calibrate the temperature. Press to confirm the temperature. The current temperature will be saved. The user will be returned to the previous screen.
- Page 34: Frost protection can be enabled or disabled on the thermostat. When enabled, the thermostat activates heating at 5˚C. To access the frost protection setting, press and hold specific buttons for 5 seconds. The display will show ‘P01’ initially. Navigate to ‘P05’ to access the frost protection option. ‘Fr’ will appear on the screen with ‘ON’ flashing. Use designated buttons to toggle frost protection on or off. Press to confirm the selection. The setting will be saved and the user will return to the previous screen.
- Page 35: Resetting the thermostat to factory settings involves pressing and holding specific buttons together for 5 seconds. The screen will display 'P01' initially. You need to navigate to 'P06' on the screen. Selecting 'FACt' will show 'nO' flashing. Pressing the button will change the display to 'YES' flashing. Confirming the selection will restart the thermostat and revert it to factory settings. To exit the installer menu at any time, press a designated button. Alternatively, you can navigate to 'P07' and press to exit.
- Page 36: Page 36

Danfoss Next Plus Electronic Intelligent Timer Thermostat Installation Guide

Danfoss RET Series Electronic Thermostat Instruction Manual

ENGO CONTROLS EASY230W Non-Programmable Wired Thermostat User Guide

FURRION FACW10ESSA-BL Standard Single Zone Wall Thermostat User Guide

ROLBIT C124W Under Floor Thermostat Instructions

GENERAL LIFE MITRA 260S Wired Room Thermostat User Manual
e l m leblanc TRL 7.26 RF Room Thermostat User Manual

Danfoss DEVIreg 316 Electronic Thermostat Installation Guide

heatmiser neoStat-Pro Smart Thermostat Instruction Manual

SMT-2W5 Smart Temp Wifi Thermostat Instruction Manual