Home > Commercial Electric > Commercial Electric HTSA15CWB Smart Thermostat User Guide
×
- 1. Smart Thermostat
- 2. Safety Information (Fcc Regulation → Wireless Protocol → Warranty → Package Contents → Pre-installation → Installation)
- 3. Safety Information (Required 24vac Power With 0.7a Maximum Current Only → Note → Caution)
- 4. Fcc Regulation (Suppliers Declaration Of Conformity → Cfr 2.1077 Compliance Information → Responsible Party)
- 5. Fcc Regulation (continued) (Compliance With Fcc Rules → Conditions Of Operation → Testing And Compliance → Interference And Solutions)
- 6. Wireless Protocol (Warranty → Year Limited Warranty)
- 7. Package Contents (User Guide → Smart Thermostat → Power Extender Kit (pek) → Quick Start Guide)
- 8. Pre-installation (Planning Installation → Tools Required)
- 9. Installation
- 10. Installation (continued) (Remove Your Old Thermostat From The Wall Plate → Note)
- 11. Installation (continued) (Take A Picture Of The Wires → Connected To The Terminals → Of Your Old Thermostat. → The Smart Thermostat Is → Designed For 24vac With → A 0.7a Maximum Current. → Use The Wire Labels (g) Included As Each Wire Is Removed)
- 12. Installation (continued) (Power Extender Kit (pek) Installation)
- 13. Installation (continued) (Carefully Disconnect And Label The Wires From Your Old Thermostat One At A Time, Using The Labels Provided. → Note: The Existing Wire May Not Be Color Coded To The Letter On The Terminal.)
- 14. Installation (continued) (Follow The Step Below To Install Your Thermostat)
- 15. Installation (continued) (Insert The Wall Anchors (f) → Level The Wall Plate (c) → Use The Drill Bit Size Φ6mm To Make The Holes For The Wall Anchors (f) → Insert Wall Anchors (f))
- 16. Installation (continued) (Insert R-wire Or Wires)
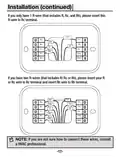
- 17. Installation (continued) (If You Only Have 1 R-wire → If You Have Two R-wires → Note)
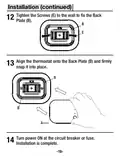
- 18. Installation (continued) (Tighten The Screws To The Wall To Fix The Back Plate → Align The Thermostat Onto The Back Plate → Turn Power On At The Circuit Breaker Or Fuse → Installation Is Complete)
- 19. Power Extender Kit (pek) Installation (If You Do Not See A C Wire In The Wall, Please Install As Below Steps With The Included Pek (d) In The Box.)
- 20. Power Extender Kit (pek) Installation (Control Board → Hvac System → Be Careful)
- 21. Power Extender Kit (pek) Installation (Take A Picture Of The Wires Connected To Your Control Board → Label Only The R, Y, G And W Wire With The Matching Labels Provided → Disconnect The Wires Labeled R, Y, G And W From The Hvac Control Board)
- 22. Power Extender Kit (pek) Installation (Connect The Wires You Disconnected From The Hvac Control Board → Connect The Five Wires Coming Out From Pek With Hvac Control Board)
- 23. Power Extender Kit (pek) Installation (Check Installation Of Pek → Mounting The Pek Inside Hvac System)
- 24. Power Extender Kit (pek) Installation (Remove The Old Thermostat And Install The Smart Thermostat)
- 25. Operation (Download The Hubspace App From The Apple App Store Or The Google Play Store. → Connect Your Thermostat To Power And Follow The Instructions On The App Screen. → My Home)
- 26. Hubspace App Quick Start Guide (Using Your Smart Thermostat → Power & Hvac Types → Control Temperature → Change Modes → Configure Presets → Create Schedules)
- 27. Current Temperature (Schedule Mode → Wifi Status → Auto Status → Fan Button → 'temperature+' Button → 'temperature-' Button)
- 28. Operation (continued) (Adjust Temperature → Adjust The Fan Mode → Mode Change)
- 29. Power & Hvac Types
- 30. Specification (Compatibility → Troubleshooting)
- 31. Troubleshooting (Problem → Solution → Wi-fi Connection Issues → Qr Code Issues → Product Offline Issues → Adding A Product)
- 32. Questions, Problems, Missing Parts? Before Returning To The Store, Call Hubspace Customer Service 8 A.m. - 7 P.m., Est, Monday-friday, 9 A.m…
×
Commercial Electric HTSA15CWB Smart Thermostat User Guide
FCC Regulation
Supplier’s Declaration of Conformity
47 CFR § 2.1077 Compliance Information
Responsible Party
Leedarson America, Inc. 300 Technology Court SE Suite 100; Smyrna,
GA 30082 1-678-293-8382
HTSA15CWB (SKU # xxxx xxx xxx)
Unique Identifier:
Contains FCC ID: 2AB2Q-LA02301
This equipment complies with FCC radiation exposure limits set forth
for an uncontrolled environment.
This equipment should be installed and operated with minimum
distance of 20 cm between the radiator and your body.
-4-
| General | Details |
|---|---|
| Name | Commercial Electric HTSA15CWB Smart Thermostat User Guide |
| Make | Commercial Electric |
| Language | English |
| Filetype | PDF (Download) |
| File size | 1.81 MB |


DIGITEN WTC100 Wireless Programmable Thermostat User Manual

Meross MTS960 Smart Wi-Fi Socket Thermostat Instruction Manual

DAIKIN DTST-ONE-ADA-A One Touch Smart Thermostat Installation Guide

ROMA HEATING RT5 Touch Screen Thermostat Instructions

Danfoss RA 2000 Radiator Thermostat Installation Guide

Carrier EB-STATE3LTICB-01 lLite Smart Thermostat Instructions
SIEMENS RDE100.1 Programmable Room Thermostat Instruction Manual

VIVE TP-S-855C Digital Programmable Thermostat Instruction Manual

GENERAL LIFE MITRA 110S Digital Room Thermostat User Manual

Sygonix 2992337 DIN Rail Mounted Heating And Cooling Thermostat User Manual
Table of Contents
- 1. Smart Thermostat →
- 2. Safety Information - Fcc Regulation →
- 3. Safety Information - Required 24vac Power With 0.7a Maximum ... →
- 4. Fcc Regulation - Suppliers Declaration Of Conformity →
- 5. Fcc Regulation (continued) - Compliance With Fcc Rules →
- 6. Wireless Protocol - Warranty →
- 7. Package Contents - User Guide →
- 8. Pre-installation - Planning Installation →
- 9. Installation →
- 10. Installation (continued) - Remove Your Old Thermostat From T... →
- 11. Installation (continued) - Take A Picture Of The Wires →
- 12. Installation (continued) - Power Extender Kit (pek) Installa... →
- 13. Installation (continued) - Carefully Disconnect And Label Th... →
- 14. Installation (continued) - Follow The Step Below To Install ... →
- 15. Installation (continued) - Insert The Wall Anchors (f) →
- 16. Installation (continued) - Insert R-wire Or Wires →
- 17. Installation (continued) - If You Only Have 1 R-wire →
- 18. Installation (continued) - Tighten The Screws To The Wall To... →
- 19. Power Extender Kit (pek) Installation - If You Do Not See A ... →
- 20. Power Extender Kit (pek) Installation - Control Board →
- 21. Power Extender Kit (pek) Installation - Take A Picture Of Th... →
- 22. Power Extender Kit (pek) Installation - Connect The Wires Yo... →
- 23. Power Extender Kit (pek) Installation - Check Installation O... →
- 24. Power Extender Kit (pek) Installation - Remove The Old Therm... →
- 25. Operation - Download The Hubspace App From The Apple App Sto... →
- 26. Hubspace App Quick Start Guide - Using Your Smart Thermostat →
- 27. Current Temperature - Schedule Mode →
- 28. Operation (continued) - Adjust Temperature →
- 29. Power & Hvac Types →
- 30. Specification - Compatibility →
- 31. Troubleshooting - Problem →
- 32. Questions, Problems, Missing Parts? Before Returning To The ... →