Home > Commercial Electric > Commercial Electric HTSA15CWB Smart Thermostat User Guide
Commercial Electric HTSA15CWB Smart Thermostat User Guide


Item# xxxx xxx xxx
Model #HTSA15CWB
USER GUIDE
Smart Thermostat
THANK YOU
We appreciate the trust and confidence you have placed in Commercial Electric
through the purchase of this Smart Thermostat. We strive to continually create quality
ucts designed to enhance your home. Visit us online to see our full line of
ucts available for your home improvement needs. Thank you for choosing
Commercial Electric!

| General | Details |
|---|---|
| Name | Commercial Electric HTSA15CWB Smart Thermostat User Guide |
| Make | Commercial Electric |
| Language | English |
| Filetype | PDF (Download) |
| File size | 1.81 MB |


Commercial Electric HTSA15CWB Smart Thermostat User Guide Overview
Summary of Contents
- Page 1: User guide Smart thermostat Thank you We appreciate the trust and confidence you have placed in Commercial Electric through the purchase of this Smart Thermostat. We strive to continually create quality products designed to enhance your home. Visit us online to see our full line of products available for your home improvement needs. Thank you for choosing Commercial Electric!
- Page 2: Safety information FCC regulation Wireless protocol Warranty Package contents Pre-installation Installation Power extender kit (PEK) Operation Troubleshooting
- Page 3: Safety information includes important guidelines for installation and use. The product must be installed or used in accordance with electrical codes and regulations. It does not work with electric baseboard heat. The product is for indoor use only and should not be used in wet locations. Consult an electrician if unsure about any part of the instructions. Save the instruction sheet for important technical data and troubleshooting information. Do not disassemble the product or attempt repairs yourself to avoid electric shock and voiding the warranty. Required power is 24VAC with a maximum current of 0.7A. A Power Extender Kit (PEK) is included to provide power if needed. Disconnect power before beginning installation to prevent electrical shock or equipment damage.
- Page 4: FCC regulation Supplier’s declaration of conformity Compliance information Responsible party This equipment complies with FCC radiation exposure limits set forth for an uncontrolled environment. This equipment should be installed and operated with a minimum distance of 20 cm between the radiator and your body.
- Page 5: This device complies with Part 15 of the FCC Rules. Operation is subject to two conditions: it may not cause harmful interference and must accept any interference received. Equipment has been tested and found to comply with limits for a Class B digital device. These limits are designed to provide reasonable protection against harmful interference in a residential installation. This equipment generates, uses, and can radiate radio frequency energy. If not installed and used according to the instructions, it may cause harmful interference to radio communications. There is no guarantee that interference will not occur in a particular installation. If interference does occur, users are encouraged to try to correct it by reorienting or relocating the receiving antenna. Users may also increase the separation between the equipment and receiver or connect the equipment into a different outlet. Consulting a dealer or an experienced radio/TV technician for help is also recommended.
- Page 6: Wireless protocol information is provided. The Wi-Fi CERTIFIED™ logo is a registered trademark of Wi-Fi Alliance®. Apple and the Apple logos are trademarks of Apple, Inc. App Store is a service mark of Apple Inc. Google, Google Play, and Google Home are trademarks of Google LLC. The product comes with a 1 year limited warranty. The warranty guarantees the product to be free of defects in materials and workmanship. The warranty does not cover normal wear and tear.
- Page 7: Package contents include the smart thermostat, back plate, wall plate, power extender kit, screws, wall anchor, wire label, user guide, and quick start guide. The model number is HTSA15CWB. This user guide is for the smart thermostat. Thank you for choosing Commercial Electric. The company appreciates the trust and confidence placed in them through the purchase. They strive to create quality products designed to enhance your home. Visit online to see the full line of products available for home improvement needs. The quick start guide is included. The user guide provides detailed information about the product. The package includes a total of 1 smart thermostat, 1 back plate, 1 wall plate, 1 power extender kit, 2 screws, 2 wall anchors, 1 wire label, and 1 user guide.
- Page 8: Pre-installation Planning installation Shut off power at the circuit breaker or fuse panel before removing the old thermostat. Read all instructions before assembly. Disconnect the power by turning off the circuit breaker or by removing the fuse at the fuse box. Assemble it on a soft, non-abrasive surface such as carpet or cardboard. Tools required Recommended drill bit size: φ 6mm Flathead screwdriver Phillips head screwdriver Electric drill
- Page 9: Turn power off at the circuit breaker or fuse that controls your HVAC system. This is very important for your safety. Make sure that your system is off by turning on your heat during winter or AC during summer. Then wait a few minutes – you should not feel air coming from your vents. If you have a boiler, check to see that the main flame is extinguished. Power on/off status may also be checked by testing the ‘C’ wire if present.
- Page 10: Installation (continued) Remove your old thermostat from the wall plate. If you don't see screws on the faceplate, it should just pull off. Then, look at the wires attached. If the old thermostat has 110/120/240V wires with wire nuts, it is a high voltage system and not compatible with our smart thermostat. Do not remove any wires from your thermostat at this time!
- Page 11: Installation (continued) Take a picture of the wires connected to the terminals of your old thermostat. The smart thermostat is designed for 24VAC with a 0.7A maximum current. Do not connect it to line 110 VAC or 120 VAC or 240 VAC (high) voltage or millivolt systems. Use the Wire Labels included as each wire is removed from the existing thermostat. Remove any jumper wires, like Rh to Rc. Label each wire based on where it's connected to the thermostat terminal, not based on the color of the wire. Check if your home has R, Rc, R H wires. If there is only R H wire, connect R H wire to Rc terminal. If there are Rc wire and R wire, R wire should connect to R H terminal.
- Page 12: Installation (continued) Check if you see a wire connected to the C terminal of your old thermostat. If you have a C wire, continue to the step 6. If you do not see a C wire in the wall, see the “Power Extender Kit (PEK) Installation” section to proceed with the installation. The wiring on your old thermostat indicated in this manual may differ in some homes. Call electricians for help if needed.
- Page 13: Carefully disconnect and label the wires from your old thermostat one at a time, using the labels provided. The existing wire may not be color coded to the letter on the terminal. If you have a jumper between Rc, RH, or R, leave it alone. Only need to label the wires that run from your wall into a terminal block. Unscrew the mounting plate of your old thermostat and remove it from the wall.
- Page 14: Installation instructions for the thermostat are provided. The process includes using wall anchors and screws for secure mounting. Wires must be bundled and inserted through the back plate. The back plate needs to be pulled open to accommodate the wire bundle. Optional wall plate installation is mentioned. Thermostat components are labeled, including Rc, R, H, C, Y1, Y2, G, B, W1, O/B, W2, and PEK. The installation steps are numbered for clarity. The document indicates a continuation of installation instructions. Visual aids may be included to assist with the installation process. Proper wire management is emphasized for effective thermostat function.
- Page 15: Insert the wall anchors included in the box to mount your thermostat. Use the back plate to mark where you want to place the wall anchors. Level the wall plate using the included level. Mark the location of the wall anchors using a pencil. Use the drill bit size φ 6mm to make the holes for the wall anchors. Insert wall anchors and ensure they are flush with the wall.
- Page 16: Installation (continued) Insert R-wire or wires. Depress the tabs to put the wires into the inner holes of their corresponding terminals on the Back Plate. Make sure at least 1/4-inch of each wire is exposed for easy insertion into the wire terminals. Press the terminal block levers to insert the wires. Stretch the wires gently to ensure they are securely connected. When a wire has been connected correctly, the lever on the block will lower.
- Page 17: Installation (continued) If you only have 1 R-wire, please insert this R-wire to Rc terminal. If you have two R-wires, please insert your R or Rc wire to Rc terminal and insert Rh wire to Rh terminal. Note: If you are not sure how to connect these wires, consult a HVAC professional.
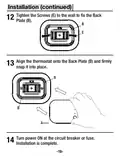
- Page 18: Installation (continued) Tighten the screws to the wall to fix the back plate. Align the thermostat onto the back plate and firmly snap it into place. Turn power ON at the circuit breaker or fuse. Installation is complete.
- Page 19: Power extender kit (PEK) installation If you do not see a C wire in the wall, please install as below steps with the included PEK (D) in the box. Take your PEK (D), wire label (G), tools, your smart phone, and go to your HVAC system. Ensure the fuse box is powered off before removing HVAC covers.
- Page 20: Power Extender Kit (PEK) Installation (continued) Open your HVAC system’s cover to reveal the control board. HVAC systems contain high voltage wires. Be careful when operating the control board.
- Page 21: Take a picture of the wires connected to your control board. You may need to reference this photo later on. Label only the R, Y, G and W wire with the matching labels provided. Disconnect the wires labeled R, Y, G and W from the HVAC control board.
- Page 22: Power Extender Kit (PEK) Installation (continued) Connect the wires you disconnected from the HVAC control board and plug them into their matching terminal blocks on the PEK. Stretch the wires gently to ensure they are securely connected. Connect the five wires coming out from PEK with the HVAC control board. Make sure the letters on the wires correspond to the terminals on the HVAC control board.
- Page 23: Check that you have installed the PEK correctly. It should be installed between your thermostat wiring and your control board. Mount the PEK inside your HVAC system, taking care not to strain the wires. Close the HVAC cover panel securely and return to your thermostat.
- Page 24: Power Extender Kit (PEK) Installation (continued) Remove the old thermostat and install the smart thermostat according to the following wiring. Must pay attention that: R/RC/RH wire -> RC terminal G wire -> C terminal Y1 wire -> PEK terminal
- Page 25: Operation Download the Hubspace app from the Apple App Store or the Google Play Store. Sign in if you have an account, or register to create an account then sign in. Connect your thermostat to power and follow the instructions on the app screen. This Hubspace product requires a 2.4GHz Wi-Fi channel. Hubspace only shows Wi-Fi networks that your product can use. If you do not see your Wi-Fi network name when you attempt to connect your product, please check your router settings or move the Wi-Fi router closer. The mobile device being connected must also be on the same Wi-Fi 2.4GHz network that the smart thermostat will be connected to. Tap the ‘+’ button in the upper-right corner on the app screen to add your thermostat. Bluetooth access is required for product setup. Android phones must also enable Location services to allow for Bluetooth scanning.
- Page 26: Scan the QR code on the thermostat or in the Quick Start Guide. If the QR code cannot be scanned, you can enter the code manually. Set the power type and HVAC system by the device or app. Tap the name of the smart thermostat on the Hubspace Home Page to display the control screen. Control temperature: choose the temperature you want in the app. Change modes: select between heat, cool, auto, or fan modes. Configure presets: save target temperatures and modes into presets for convenience. Create schedules: program the thermostat to turn on and off automatically. You are able to manually control the smart thermostat with the touch buttons on the device.
- Page 27: Current temperature Schedule mode WiFi status Auto status Fan button “Temperature+” button “Temperature-” button Mode button Fan mode Heating status
- Page 28: Adjust temperature using the up/down button for 1F degree or 0.5C at a time, or long press for continuous adjustment. Adjust the fan mode by tapping the fan button to switch between Auto, On, and Intermittent. Auto mode sets the fan to operate automatically when needed, while On mode keeps the fan running regardless of other settings. Intermittent mode circulates air for a set duration, which can be configured in the app. The Mode Button indicator light shows white during operation and changes color based on the current mode: red for heating, blue for cooling, and white for standby. Tap the Mode button during standby to cycle through Heat, Cool, Auto, and Off modes. In Heating settings, the heating icon lights up, allowing temperature adjustments with the up/down buttons. In Cooling settings, the cooling icon lights up for temperature adjustments. In Auto settings, the cooling icon flashes first for cooling temperature adjustments, followed by the heating icon for heating temperature adjustments. Press the Mode button to exit the setting mode after adjustments.
- Page 29: Power & HVAC Types When the thermostat powers on for the first time, the thermostat will go into set mode and the display will show “SET”. You can set the power type and HVAC system by the device or app. By device: short press the mode button, select the power type (P1-P2) by pressing + or - button and press mode button to confirm. By app: choose the power type and HVAC system from the options given. If you need to change your HVAC type after the initial types selected, you can set it by device or from the product’s settings screen on the Hubspace app.
- Page 30: Specification Input: 24VAC, 50/60Hz Operating temperature: 32° F–105° F Operating humidity: 5-85% RH, Non-condensing Heating: 2 stages (W1, W2) Cooling: 2 stages (Y1, Y2) Heat pump: with auxiliary heat (O/B, AUX, E) Power: Required 24VAC power with 0.7A maximum current Troubleshooting: Ensure thermostat is connected to the network Make sure the wiring installation is correct Make sure your product is connected to a power source with correct wiring
- Page 31: Troubleshooting My product is in a location that does not have Wi-Fi. Can I still use it with the Hubspace app? Yes. Use the app on a phone with an internet connection like LTE. I cannot find the QR code. It is on the thermostat housing. The QR code has become damaged. How do I add the product? Under the QR code is a 24-digit code. You can enter those manually instead of scanning the code. I lost my QR code. How do I add a product? In the Hubspace app, tap +, then Add Product. A product is on another account. How do I transfer it? Scan the QR code and it will transfer to your account. My product is offline for long periods of time. The product is on and I scanned the QR code, but the app cannot connect to it. For Android phones, make sure Location is enabled. Can I scan the same QR code to add multiple products? No. Each product has a unique QR code.
- Page 32: Questions, problems, missing parts? Before returning to the store, call Hubspace Customer Service. Retain this manual for future use.

EUROTRONIC Sparmatic COMET Programmable Energy-Saving Radiator Thermostat User Manual

GENERAL LIFE NORA 270S Digital Room Thermostat User Manual

AeoTec Radiator Thermostat ZWA021 User Manual

Honeywell TH8000 Vertical Non Programmable Thermostat Installation Guide

HONEYWELL RTH5160 Series Non-Programmable Thermostat Installation Guide

Honeywell TC500A-N Commercial Thermostat User Guide

Coleman 9420-381 Digital Wall Thermostat Instruction Manual

Honeywell T3 Programmable Thermostat User Guide

Danfoss RT 2 Thermostat Installation Guide

GENERAL FH10, FH10S Underfloor Heating Thermostat User Manual