Home > Commercial Electric > Commercial Electric HTSA15CWB Smart Thermostat User Guide
Commercial Electric HTSA15CWB Smart Thermostat User Guide


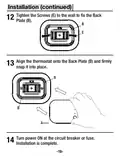


Installation (continued)
Insert the Wall Anchors (F). It is recommended that you
10
use the Wall Anchors (F) included in the box to mount
your thermostat. You can use the Back Plate (B) to mark
where you want to place the Wall Anchors (F).
□
Level the Wall Plate (C) using the included level.
Mark the location of the Wall Anchors (F) using a pencil.
□
□
Use the drill bit size φ6mm to make the holes for the Wall Anchors (F).
Insert Wall Anchors (F).
Make sure anchors are flush with wall.
□
□
C
90°
Rc
RH
C
Y1
Y2
G
B
W1
O/B
2
PEK
-15-
| General | Details |
|---|---|
| Name | Commercial Electric HTSA15CWB Smart Thermostat User Guide |
| Make | Commercial Electric |
| Language | English |
| Filetype | PDF (Download) |
| File size | 1.81 MB |


heatmiser neoStat-e Electric Floor Heating Thermostat Instructions

BEOK TDS21WIFI-AC Fan Coil Thermostat Instruction Manual

Honeywell ADEMCO 4500 Thermostat User Guide

GE APPLIANCES RAK190V 2 Way Energy Management Thermostat Instruction Manual

Carrier Wi-Fi Enabled 24V Smart Thermostat Instruction Manual

Klima C16 WiFi Floor Heating Thermostat User Guide

PRO1 T771 Programmable Electronic Thermostat Instructions

Dettson R02P034 Communicating Thermostat Instruction Manual

Wengart TP808 Low Voltage Thermostat User Guide

Regulus TP18 LCD Electronic Thermostat User Manual