
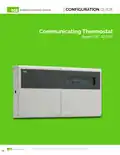
TCS SZ1051 Communicating Thermostat User Guide


| CONFIGURATION GUIDE
Communicating Thermostat
SuperSTAT SZ1051
202309


| General | Details |
|---|---|
| Name | TCS SZ1051 Communicating Thermostat User Guide |
| Make | TCS |
| Language | English |
| Filetype | PDF (Download) |
| File size | 0.28 MB |
 (1 votes, average: 5.00 out of 5)
 Loading...

TCS SZ1051 Communicating Thermostat User Guide Overview
Summary of Contents
- Page 1: Communicating thermostat SuperSTAT SZ1051
- Page 2: Introduction Display screen and keypad Locating the programming keypad Programming keypad access Navigating via keypad Program setup mode Basic setup System mode Occupancy settings Setting clock and schedule
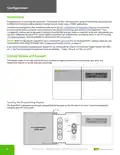
- Page 3: Configuration Congratulations on choosing the SuperSTAT™ Thermostat SZ1051. The SuperSTAT series of thermostats are multifunction devices providing extensive controls across a wide range of HVAC applications. Complete the configuration after installation. Your configuration settings will be uploaded to Ubiquity Cloud the first time you make a connection to the site. You can skip configuring the SuperSTAT via the keypad and perform all configurations via Ubiquity Cloud or via a PC running TCS Insight software. When configuring the SuperSTAT via a connected PC, you must first set the SuperSTAT’s address, baud rate, and temperature scale using the keypad. The display screen provides at-a-glance information including day, date, time, and temperature based on sensor selection and wiring. The SuperSTAT is programmed through a keypad behind the panel on the left side of the cover. Access the keypad by swinging open the cover panel.
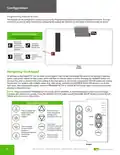
- Page 4: Configuration Programming keypad access can restrict access to the Programming Setup and Clock and Schedule functions. The dip switch panel controls access to clock, schedules, and programming. All settings on the SuperSTAT can be made via the keypad. Pressing the WARMER button will increase the value or advance the active setting. Press the PROGRAM SETUP or CLOCK SETUP button again to save the values. Press and hold the PROGRAM SETUP, CLOCK SETUP, WARMER, or COOLER buttons to scroll through screens more quickly. Press the SERVICE STATUS button to exit PROGRAM SETUP Mode or CLOCK SETUP Mode. Keypad button functions include options for heating, cooling, and fan control. Press to change fan speed and system modes when enabled. Press to review service screens.
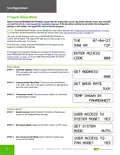
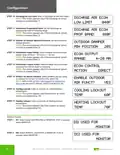
- Page 5: Configuration Program Setup Mode Ensure that the temperature sensor dip switch settings match your intended use. PROGRAM SETUP Mode can be disabled via dip switch settings. The main screen displays when not in PROGRAM SETUP Mode or CLOCK SETUP Mode. Press the PROGRAM SETUP button on the keypad to configure the settings. Select a unique address between 0 and 255 for the controller. Choose a baud rate between 2.4K, 4.8K, 9.6K, and 19.2K. Choose between Celsius or Fahrenheit for temperature display. Select whether to enable or disable user access to the System Mode settings. Select AUTO, HEAT, COOL, or OFF mode.
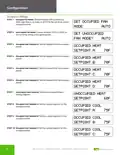
- Page 6: Configuration Occupancy Settings Occupied Fan Mode: Choose between ON (continuous), COOL (gas heat or no heat), or AUTO for fan run times during occupied periods. Unoccupied Fan Mode: Choose between AUTO or COOL for fan run times during unoccupied periods. Occupied Heat Setpoint A: Set the heatpoint for the occupied period. Occupied Heat Setpoint B: Set the heatpoint for the occupied period. Occupied Heat Setpoint C: Set the heatpoint for the occupied period. Occupied Heat Setpoint D: Set the heatpoint for the occupied period. Unoccupied Heat Setpoint: Set the Unoccupied Mode’s heating setpoint. Occupied Cool Setpoint A: Set the cooling setpoint for this occupied period. Occupied Cool Setpoint B: Set the cooling setpoint for this occupied period.
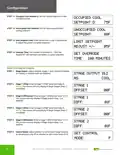
- Page 7: Configuration Occupied cool setpoint D: Set the cooling setpoint for this occupied period. Unoccupied cool setpoint: Set the unoccupied mode’s cooling setpoint. User setpoint limit: Enter the amount a user is allowed to adjust the preset occupied setpoints. Override time: The number of minutes (0 – 255) the SuperSTAT will maintain overridden occupied setpoints. Stage output: Select whether stages 1 and 2 perform heating or cooling, or whether both are disabled. Stage 1 offset: Enter a stage 1 offset value (normally 0). Stage 2 differential: Enter a stage 1 differential value. Stage 2 offset: Enter a stage 2 offset value (normally 0). Control mode: Select whether to control both stage outputs by temperature only or whether to add a time factor.
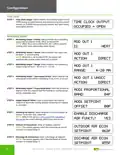
- Page 8: Configuration Time Clock Output: Select whether the auxiliary output will be OPEN during occupied periods and closed during unoccupied periods, or CLOSED during occupied periods and open during unoccupied periods. Modulating Output 1 Define: Select whether the modulating output will be used for COOL, HEAT, or AQUASTAT. Modulating Output 1 Action: Select whether the output will be direct- or reverse-acting. Modulating Output 1 Range: Select whether the modulating output range will be 0 – 20 mA or 4 – 20 mA. Modulating Output 1 Unoccupied Action: Select whether the unoccupied action will be modulating 0 mA, 4 mA, or 20 mA. Modulating Output 1 Proportional Band: Enter the number of degrees from the setpoint that the heating or cooling device will be completely open. Output Setpoint Offset: Enter a value below the heating setpoint or above the cooling setpoint where the AO1 begins to modulate. Discharge Air Sensor: Select whether to use a discharge air sensor. To monitor only, select NO. Outdoor Air Economizer: Enter an outdoor setpoint. Discharge Air Economizer: Enter a discharge air setpoint.
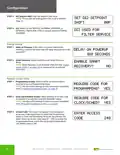
- Page 9: Configuration Discharge air low limit: Enter a discharge air low limit value. Economizer proportional band: Set the discharge air proportional band or throttling range. Outdoor air damper minimum position: Set the minimum damper position. Economizer output range: Select whether the economizer output range will be 0 – 20 mA or 4 – 20 mA. Economizer control action: Select whether the economizer control action will be direct or reversing. Outdoor air sensor function: Select whether you are using an outdoor air sensor. To monitor only, select NO. Cooling lockout: Enter an outdoor air cooling lockout temperature. Heating lockout: Enter an outdoor air heating lockout temperature. Digital inputs DI1: Select either FAN PROVING or MONITOR. If DI1 is unused, select MONITOR. DI2: Select SERVICE, AQUASTAT, or MONITOR. If DI2 is unused, select MONITOR.
- Page 10: Configuration DI2 Setpoint Shift: Enter the setpoint shift value. This screen will only appear if DI2 is set to Monitor. DI3: Select FILTER, SERVICE, EXTERNAL OVERRIDE, or EXTERNAL TIMECLOCK. If DI3 is unused, select EXTERNAL OVERRIDE. Delay on Powerup: Enter a value (in seconds) that will delay the powerup of the SuperSTAT. Smart Recovery: Select whether to use Smart Recovery Mode. Smart Recovery is not available when DI3 is configured for an external time clock. Programming Access: Select whether an access code is required to access Programming Setup. Clock and Schedule Access: Select whether an access code is required to access the Clock and Schedule menus. Access Code: Select an access code value (0 – 255) to access the Programming Mode and/or the Clock and Schedule Mode.
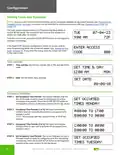
- Page 11: Configuration Setting clock and schedule Access to the Clock and Schedule Mode can be completely disabled via dip switch settings. The main screen displays when not in Programming Setup Mode or CLOCK SETUP Mode. From the main screen, press the CLOCK SETUP button on the keypad to configure the settings. Set the hour, minute, AM or PM, and day of the week. Set the month, date, and year. Set occupancy time periods for the day of the week shown. Set hours and minutes for start and stop times for occupancy time periods A and B. Time periods with start and end times of 00:00 are inactive. Press the CLOCK SETUP button on the keypad to advance to the setup screens for the day shown.
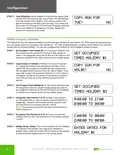
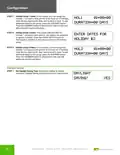
- Page 12: Configuration Copy schedules: Select whether to copy the occupancy time periods from the previous day. Holiday occupancy schedules: The SuperSTAT has two separate holiday occupancy groups (Holiday #1 and Holiday #2). Set occupied times Holiday No. 1: This screen indicates that the occupancy time periods for the first holiday group are ready to be configured. Copy Sunday for Holiday 1: Holiday 1 gives you the option of copying the schedule from the previous Sunday. Set occupied times Holiday No. 2: This screen indicates that the occupancy times for the second holiday group are ready to be configured. Occupancy time periods (1 of 2): Holiday 2 does not give you the opportunity to copy occupancy time periods from a regular day. Occupancy time periods (2 of 2): Set hours and minutes for start and stop times for occupancy periods C and D. Holiday group 1 dates: This screen indicates that the Holiday 1 occupancy time periods are ready to be assigned to specific dates.
- Page 13: Configuration Holiday Group 1 Dates: You can assign the Holiday 1 occupancy time periods to as many as 12 holidays. Enter the two-digit month, date, and duration in days. To add additional dates to this group, press the OVERRIDE button. Press the WARMER button to advance the Date number and add additional months and dates. Holiday Group 2 Dates: This screen indicates that the Holiday 1 occupancy time periods are ready to be assigned to specific holidays. Press the CLOCK SETUP button on the keypad to advance to the setup screens for the holiday group. In this screen, you can assign the Holiday 1 occupancy time periods to as many as 12 holidays. Set Daylight Saving Time: Determine whether to enable automatic Daylight Saving adjustments to your time periods.

EBECO EB-Therm 205 Thermostat User Guide

AURATON Libra Room Thermostat User Manual

SIEMENS RDG400 Room Thermostat Instruction Manual

seitron TAD022 Digital Room Thermostat for Heating Cooling System Instruction Manual

SMT-2W5 Smart Temp Wifi Thermostat Instruction Manual

Danfoss Link Connect Thermostat User Guide

PRO1 R250W Wireless System Thermostat Owner’s Manual

micro-Air EasyTouch 352 Thermostat User Manual

TFC Group OP-WFSTAT Wi-Fi Thermostat User Guide

BEOK BOT-R315 RF GasBolier Programmable Thermostat Instruction Manual